Spokes
Spokes is a fully-featured self-hosted version of our edge-server.
Running Spokes will provide administrator full control of tunnels and provides configuration options that are helpful if you intend to build or connect applications using Packetriot tunnels. This option also provides users the ability to audit and manage network traffic to tunnels more rigidily and may suit those serving an enterprise.
The Packetriot client works identically with Spokes as it does with our subscription service. The only changes are the configuration steps for the client which we highlight later in the docs. Otherwise all of the functions of client are available.
In addition to managing the server, administrators will also be required to manage client registration and authentication tokens. We have a section below to review this. In lieu of the user management perform by Packetriot, administrators will need to manage tokens to perform the same function.
One important missing feature to note are the assigned hostnames. Hostnames and their DNS records are generated and managed by packetriot.com. Since Spokes is an independently running server we can't provide this functionality, however, we have suggestions you can use to implement this feature.
Prior to installing and configuring Spokes you will need the following:
- A Spokes License
- A domain name
- A server or virtual machine that is Internet accessible
Please contact us if this guide does not provide answers to your questions or if any issues arise. Follow us on Twitter @packetriot for announcements on new releases or updates for Spokes.
Need help planning a large deployment? Please reach out to us, we're glad to help!
Installation
We support several targets and mechanisms for deploying Spokes. Our default method is an RPM that is installed on a Centos 7.x system. A container image is maintained and supports Docker environments well. We are working to improve the experience with setting up Spokes as a container. Finally, we support Spokes on macOS using the Homebrew packaging tool.
All of these deployments have different nuances with setting them up and then configuring them to run persistently in the background. We'll cover those differences in the sub-sections below.
Linux RPM
Spokes is compiled and packaged to run on CentOS 7 x86-64bit. The latest RPM can be downloaded on our software page. There are no dependencies for Spokes. All that's required is to install the RPM. See the example command below to download Spokes.
[user@host] curl -o spokes-1.0.3-1.x86_64.rpm https://download.packetriot.com/linux/RPM/packages/spokes-1.0.3-1.x86_64.rpm

[user@host] sudo rpm -Uvh spokes-1.0.3-1.x86_64.rpm
Note, this example may not be latest revsion of Spokes. Always check our software page for the latest version of Spokes or use the package repositories.
Linux Package Repositories
We suggest using the yum and dnf package repositories we provide. Using them will make installation a breeze and easy to stay up-to-date with Spokes releases.
yum
# import our GPG key
[user@host ] sudo rpm -v --import https://download.packetriot.com/linux/RPM/RPM-GPG-KEY-packetriot
[user@host ] sudo yum install yum-utils -y

# add the repo
[user@host ] sudo yum-config-manager --add-repo https://download.packetriot.com/linux/RPM/packetriot.repo

[user@host ] sudo yum install spokes
dnf
# import our GPG key
[user@host ] sudo rpm -v --import https://download.packetriot.com/linux/RPM/RPM-GPG-KEY-packetriot
[user@host ] sudo dnf install dnf-utils -y

# add the repo
[user@host ] sudo dnf config-manager --add-repo https://download.packetriot.com/linux/RPM/packetriot.repo </pre>

[user@host ] sudo dnf install spokes
Service Scripts
Most users will run Spokes 24/7 and need the service to start up on system reboots. It comes with a service unit for Systemd. Use the following commands to enable the service for continuous opeations:
[user@host] sudo systemctl enable spokes
Before we start up Spokes, we'll need to edit the configuration file,. However, the commands to start and stop the systemd service are below.
# starting Spokes
[user@host] sudo systemctl start spokes

# stopping Spokes
[user@host] sudo systemctl stop spokes
Docker Container
Our container image is hosted on Docker Hub and can be downloaded to your environment using the following command:
[user@host ] docker pull packetriot/spokes:latest
We have tested our container in the Linux environment and not on Windows or Mac. We imagine it will work as intended since Docker is a tool to help standardize these cross-platform/OS differences.
The Spokes container image is built with an example configuration and empty database. Ideally, you want the configuration and database to be saved on the host so that updates and backups can be performed. This approach also makes it simple to migrate the container and update the image.
Docker volumes make this possible. We'll create two different volumes, one for configuration and the other for data. Note, volumes will allow us to merge existing data inside container image at the paths we mount volumes. This is necessary for the correct use and set up of our container image.
It's recommended to utilize some environment variables to help Spokes auto-configure itself and allow futher set up through it's web-based dashboard. The DOMAIN and ADMIN_SECRET are environment variables we can set when the container is created that'll cause Spokes to create self-signed certificates so we can securely access the dashboard and then use the ADMIN_SECRET to authenticate and create an administrative user.
It's important that DNS records, firewall rules and network will allow access to the Spokes server using the input domain name. You can change TLS options later to use custom certificates or Let's Encrypt.
A random value for the secret can be created with the following command:
[user@host ] openssl rand -hex 8
7ee82a6451146814
These steps are optional but allow you to complete set up through the dashboard instead of through manual edits of the configuration. Those steps are outline in the Configuration section.
We've provided an example Docker Compose file that makes this easy.
version: '2.1'

volumes:
        config:
        data:

services:
  spokes:
    container_name: spokes-server
    image: packetriot/spokes:latest
    restart: unless-stopped
    network_mode: "host"
    volumes:
      - config:/etc/spokes:rw
      - data:/var/lib/spokes:rw
    ports:
      - 80:80
      - 443:443
    environment:
      - DOMAIN=spokes.example.com
      - ADMIN_SECRET=7ee82a6451146814
Spokes is commonly used to listen and relay HTTP/S traffic to distributed tunnels (clients) however it can also be used for TCP relays as well. Since the range of ports can be quite large, it's more performant to run the container using host networking instead of being NAT'd as a container normally would.
In addition, you want to instruct Linux to not use ports in the range that Spokes will be configured for potentially listening on behalf of tunnels. The default range is 22,000 - 22,9999. Refer the tunnel options section of our docs for more information on this.
Unlike our RPM that sets up the configuration file to do this, you will need to manually add a file to /etc/sysctl.d, example spokes.conf to reserve these ports for exclusive use and management by Spokes.
[user@host ] sudo echo "net.ipv4.ip_local_reserved_ports = 22000,22999" > /etc/sysctl.d/spokes.conf

[user@host ] sudo sysctl -p
The restart property in the compose file will instruct Docker to keep this container running all the time unless it is manually stopped by an admin. This effectively allows it to run in the background and restart on power-cycles.
We need to start the containers for the first time to setup the volumes and merge our baseline configurations and data to the volumes.
[user@host ] cd ~/spokes-compose-dir

[user@host:~/spokes-compose-dir ] docker-compose up -d
Spokes hasn't been properly configured yet so it will crash. This is fine, we'll begin editing the configuration in the section.
Configuration
Note the two directories mounted to the config and data volumes in the compose file. The config volume is where /etc/spokes inside the container is mounted to. The example configuration config.json.example will be stored there.
Usually the volumes on a system running Docker will be stored in /var/lib/docker/volumes. The name of the directory hosting the compose file is used as a prefix followed by the name of the volume, e.g. spokes_config. You can change to the following directory to make a copy of the example configuration and begin tailoring it.
Note, you will need to be root to perform these commands and navigate to this directory.
[user@host ] sudo bash

[root@host ] cd /var/lib/docker/volumes
[root@host ] ls
spokes_config  spokes_data

[root@host ] cd spokes_config/_data
[root@host ] ls
certs config.json.example

[root@host ] cp config.json.example config.json
Now you can begin making modifications to the configuration file to match the domain and other needs for your Spokes server. Refer to our configuration section for more details.
Once the configuration has been completed you will need to restart the container.
[user@host ] docker restart spokes-server
Updating the Container Image
Containers make it simple to update software. The container image needs to be updated first with a pull.
[user@host ] docker pull packetriot/spokes:latest
Change to the directory where you stored the original compose file. We can shutdown the container using the following command. This still destory the instance of the container but the volumes, and your configuration and and runtime data, will be intact.
[user@host ] cd ~/spokes-compose-dir

[user@host:~/spokes-compose-dir ] docker-compose down

[user@host:~/spokes-compose-dir ] docker-compose up -d
The container has been updated. A backup of the database is run each time the container image is updated. Migration scripts will be run, the backup allows the admin to make any recover should there be a need to roll back to an earlier version.
Homebrew Package
Homebrew is a popular package manager for macOS. We host a Brew formula on our Github page. Installation straight-forward and requires Homebrew installed earlier.
Install Spokes with the following command:
[user@host ] brew install packetriot/homebrew-tools/spokes
Homebrew maintains all the packages it installs in the /usr/local directory. The Spokes package will install the following components:
* Binaries
* Static assets
* Configuration
* Database (empty)
The binary will be installed in the /usr/local/bin directory through a symbolic link. Brew uses symlinks to the binaries it installed in the $PATH.
Configuration is installed in /usr/local/etc/spokes. An example file config.json.example is provided. The only change that needs to be made is with the domain property and the TLS configuration. Please follow the guidelines and instructions in [configuration] section.
Runtime data: license files, cookie sessions and the database (and backups), are all stored in /usr/local/var/lib/. Finally, static assets are all stored in /usr/local/opt/spokes. When Spokes is upgraded or uninstalled, the package manager will leave the configuration and runtime data directories alone.
Software Updates
You can upgrade Spokes using the following command:
[user@host ] brew upgrade packetriot/homebrew-tools/spokes
Uninstalling Spokes can be performed with this command:
[user@host ] brew uninstall packetriot/homebrew-tools/spokes
Launchd Services
MacOS uses a service manager called launchd to run programs and services in the background. One important characteristic to consider when running Spokes as a service on macOS is that it will not be started until a user logs into the system. So on reboots or power-cycles you will need to log in for launchd to kick-off the Spokes server.
We provide an example launchd service plist in /usr/local/opt/spokes/spokes.plist. Copy this file to /Library/LaunchDaemons and run the following commands to start it. If you want to test your configuration before using launchctl to run Spokes execute the following command:
[user@host ] spokes --config /usr/local/etc/spokes/config.json start
Spokes will attempt to listen on ports 80 and 443 and macOS will prompt you to allow this. On upgrades you will need to enable this permission again.
Once your configuration is setup as you need, run the following commands to setup the service plist and load it (e.g. start Spokes).
[user@host ] sudo cp /usr/local/opt/spokes/spokes.list /Library/LaunchDaemon

[user@host ] sudo launchctl load /Library/LaunchDaemon/spokes.plist
To shut down the Spokes server use the command below. Note, when you're updating Spokes using brew you should unload and copy and updated spokes.plist to /Library/LaunchDaemons. Then run load command with launchctl again.
The reason this is not automated is that we don't want to run sudo from our installation scripts and assume the user running these commands is part of the admin group.
Create Administrator
We need to create an administrative user. So we can log into the administrative web dashboard and setup a license file. We will cover user creation in more detail in future sections. Run this command to create an admin user that will help us with completing the Spokes server setup.
[user@host ] sudo su spokes
...

[spokes@host ] spokes users add --email "jane@domain.com" --fullname "Jane Doe"
Password:
Confirm:

User created!
[spokes@host ]
With this admin user we can login and finish installing the license file.
Configuration
In this section we'll review the steps that edit the configuration file manually when Spokes is installed using a Linux package (RPM) or the Homebrew packaging system for macOS.
This section will also cover the auto-configuration and first-run workflows available in the containerized deployment of Spokes. The container image for Spokes invites more web-based steps for setting up the server.
Container Setup
Follow the steps documented in the container installation section of these docs. Be sure to set environment variables for DOMAIN and ADMIN_SECRET. It's important that DNS records, firewall and network will allow access to the Spokes server using the input domain name.
First-Run
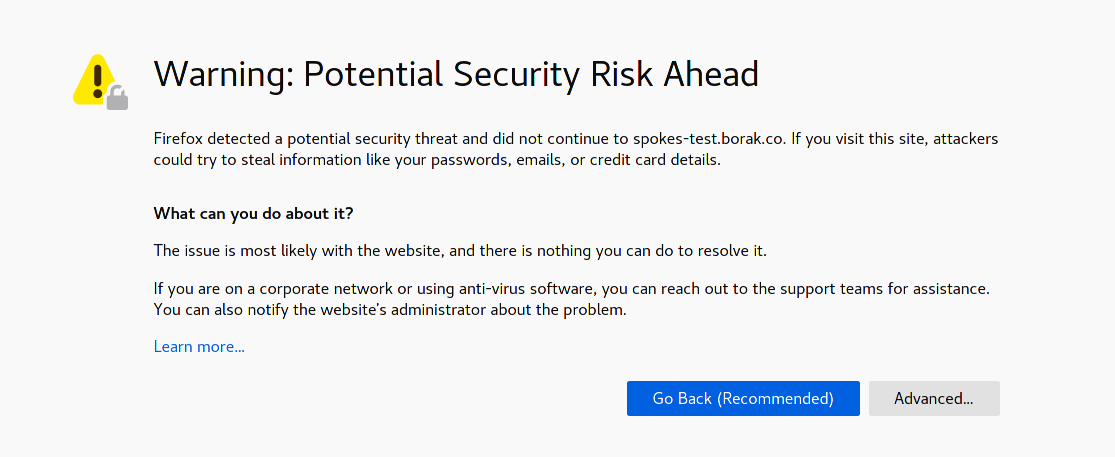
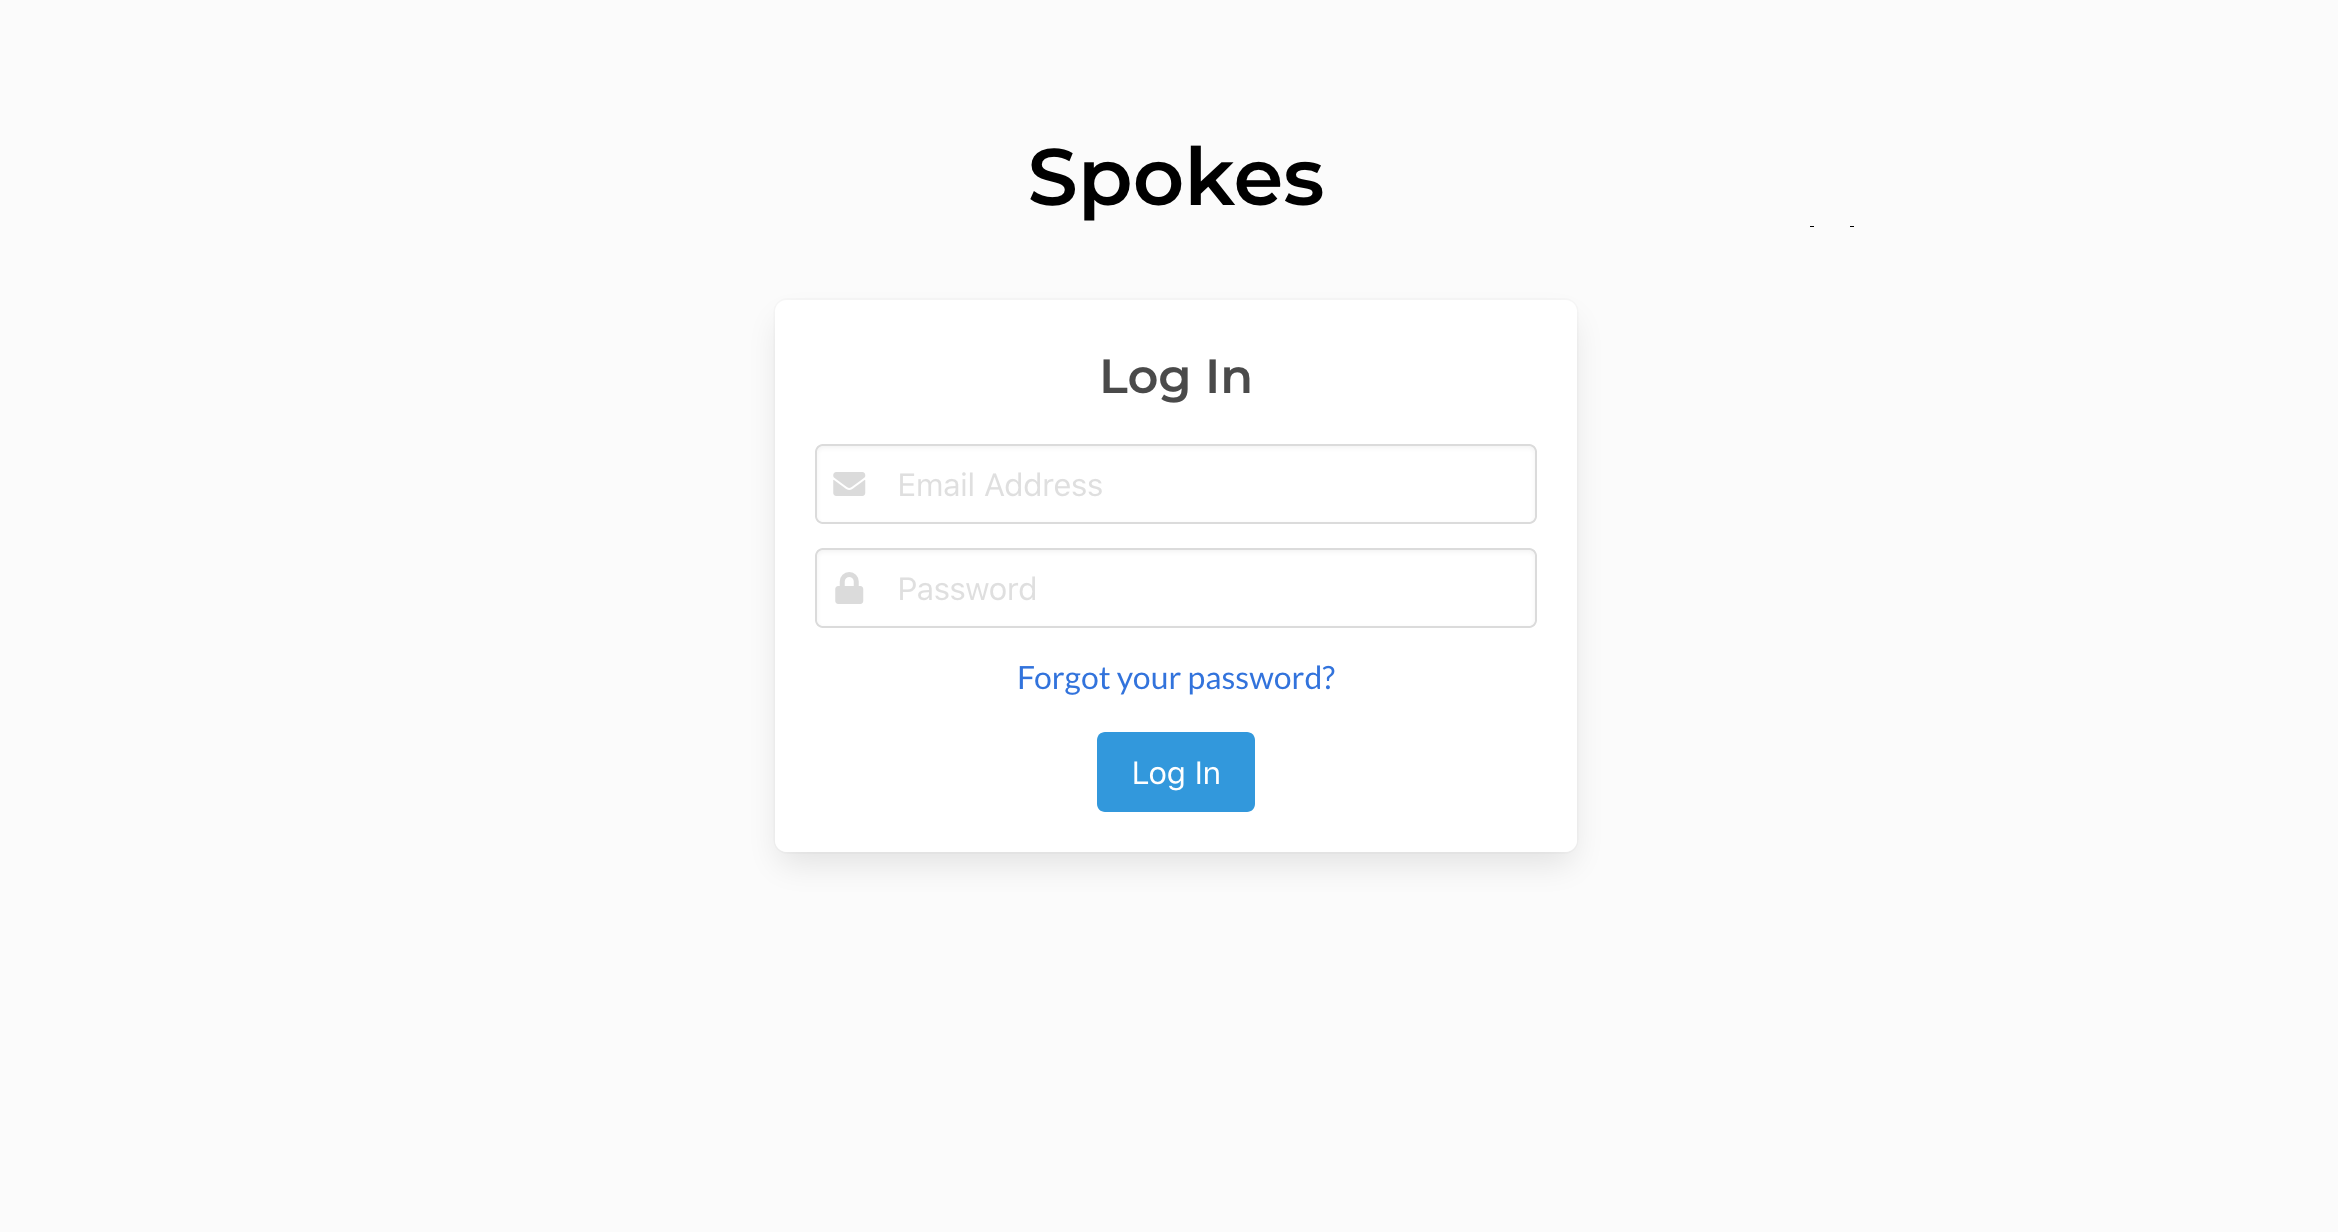
Visit the Spokes server using the domain you set, e.g. https://spokes.domain.com. The certificates created by Spokes are self-signed so you will get a warning from your browser. This allows Spokes to serve HTTPS traffic and keep initial configuration simple and succinct.
Continue past this warning and you'll presented with the login page. Below the login form is a link to configure the server further. This link is provided when there are no admin users and the ADMIN_SECRET environment variable is set.
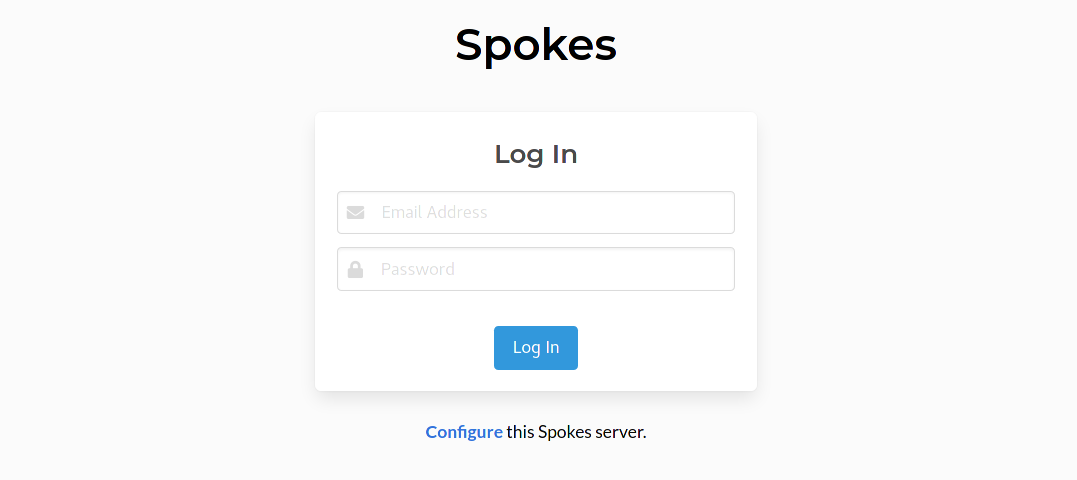
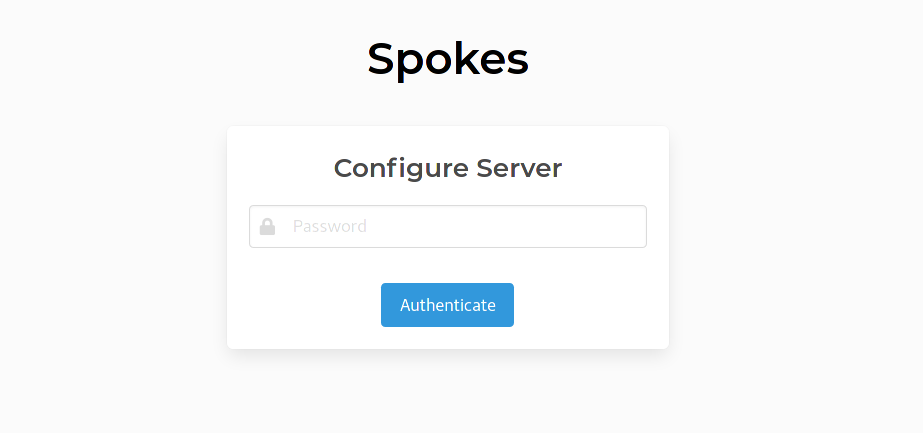
Click on the Configure link to continue. This new page is to authenticate you before allowing you to create the first admin. Enter the value set earlier for ADMIN_SECRET to continue.
Create Administrator
The next page will present a form that's used to create the administrative user for this Spokes system. Note, more than one admin user can be created, please see this section to read how to create more using the CLI.
All fields require an input except for 2FA.

Enabling 2FA is optional and setting it up is completed during the first login for this admin. A companion application such as Google Authenticator can be used for managing the one-time-passcodes for 2FA. The table lists mobile companion app options.
| App | Android | iOS |
|---|---|---|
| Google Authenticator | Play Store | App Store |
| Microsoft Authenticator | Play Store | App Store |
| Twilio Authy | Play Store | App Store |
Once the administrator account is created you will be directed back to the login. Note, the Configure link is not presented anymore. Please login and complete any additional steps if you enable 2FA.
Server Configuration
The overview page will be presented to you initially. There is more information about the overview page provided here. Use the navigation menu on the left to visit the server Configuration page.
The Configuration displays the domain, TLS and tunnel option settings.
Domain and TLS options are presented together since the Spokes server will verify that any combination of options can be used together. For example, checking that the domain name can be verified by a custom certificate.
Other validation checks are performed as well such as making sure that the domain input can be used to resolve an IP address that can be visited and reach the Spokes server on ports 80 and 443.
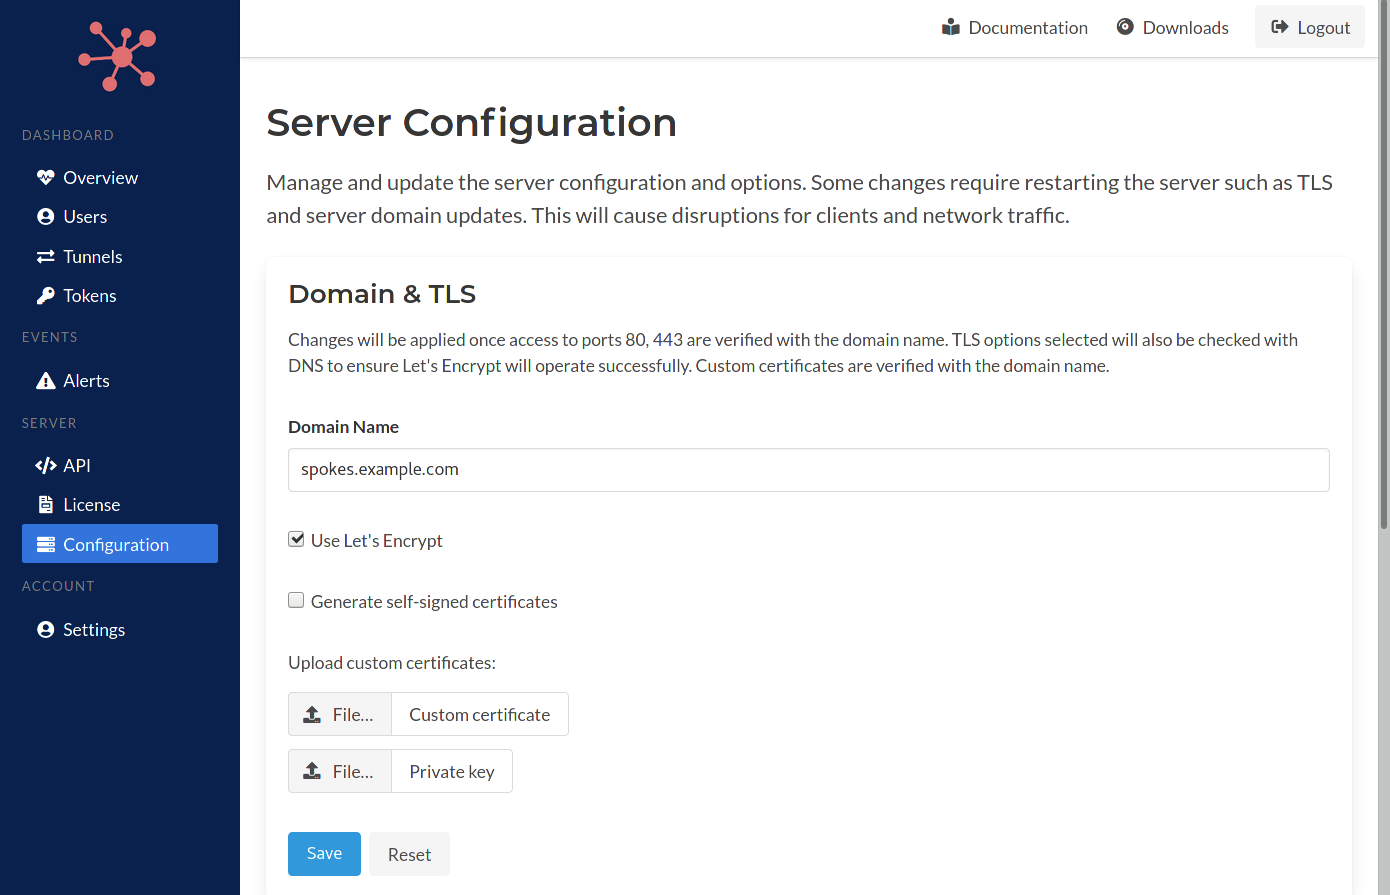
Once these changes are validated they will be applied. If any issues are detected the specific errors or inputs will be highlighted in it's respective section on this page.
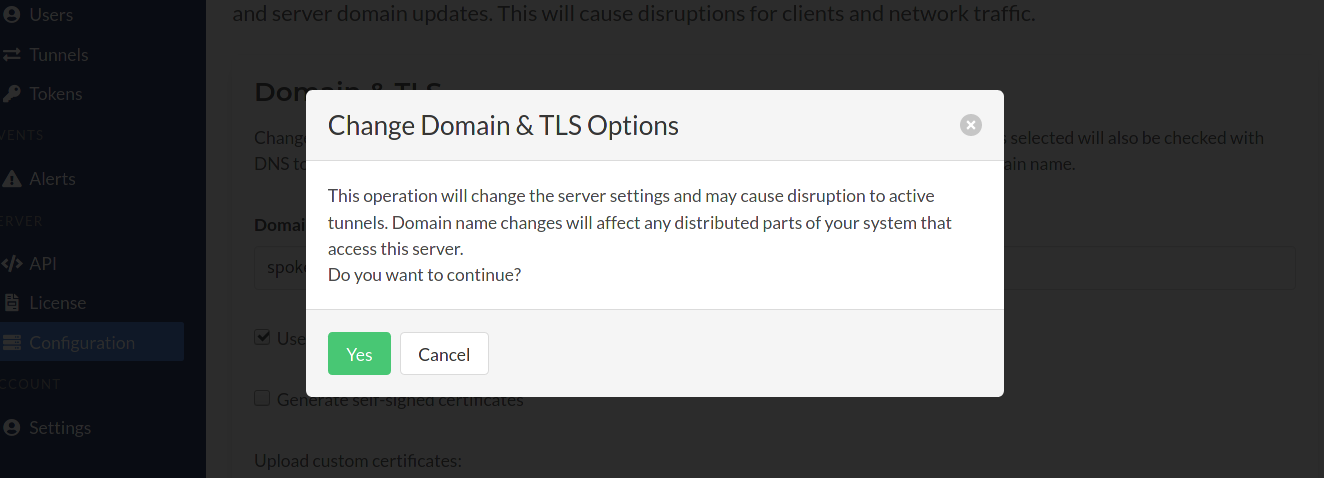
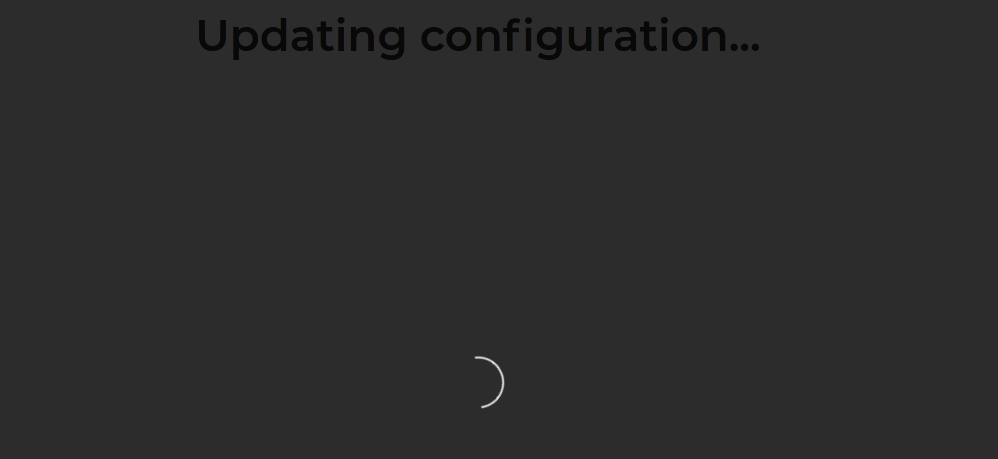
The HTTPS server will be restarted when the changes are being applied. This can cause some disruption to existing tunnels. After 15 seconds this page will attempt to the visit Spokes server using the updated or existing domain.
When using Let's Encrypt, some delays can occur. Attempt to refresh the browser to allow the certificates more time to be generated.
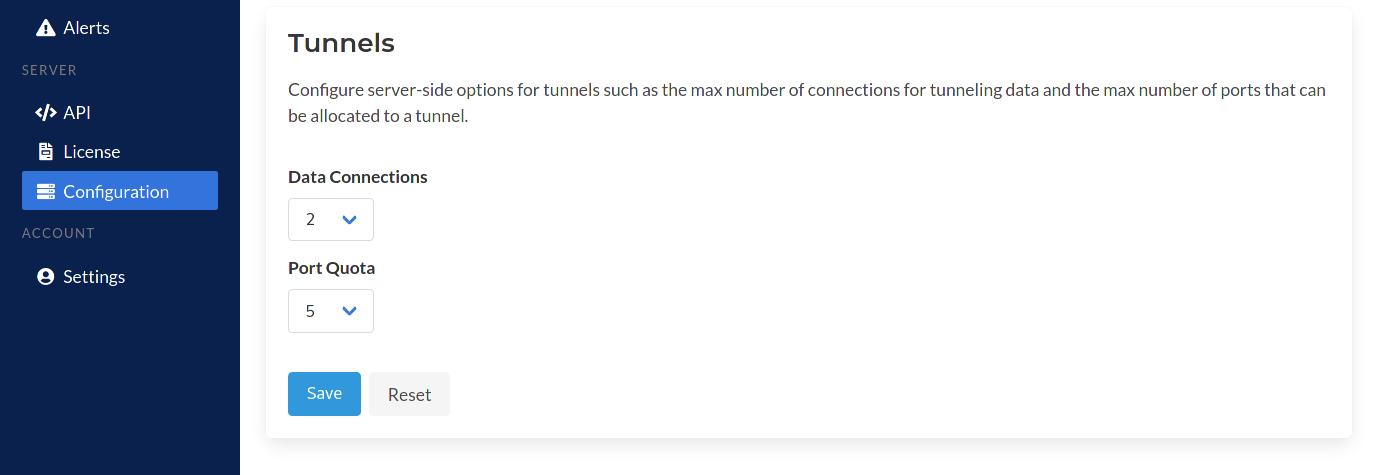
Tunnel options can be set here as well such as the max number of ports that can be allocated by a tunenl or the number of TLS connections that can be used as data connections to relay data across tunnels.
These options can be changed in the configuration file as well.
Making changes to tunnel options do not require a restart.
This concludes the section of first-run configuration steps required when using the containerized deployment. By using the DOMAIN and ADMIN_SECRET environment variables when creating an instance of the Spokes container, you can finish setting up Spokes through some convenient pages available in our web application.
Package Setup
After installation you'll need to configure some values in the Spokes configuration file. By default the RPM will install a template - /etc/spokes/config.json.example. Copy this template to the path expected by Spokes.
[user@host] sudo -u spokes cp /etc/spokes/config.json.example /etc/spokes/config.json
Below is the template that is provided after the RPM is installed.
{
    "domain": "example.com",
    "template": "/usr/share/spokes/templates",
    "static": "/usr/share/spokes/htdocs",
    "dataPath": "/var/lib/spokes",
    "database": {
        "path": "/var/lib/spokes/spokes.db"
    },
    "portRange": {
        "begin": 22000,
        "end": 22999
    },
    "tunOptions": {
        "maxPoolSize": 5,
        "maxPorts": 5
    },
    "tls": {
        "useLE": false,
        "certificate": "",
        "privateKey": ""
    }
}
The values that are absolutely required to be customized are:
- The domain name
- TLS options
Read the sections below to understand what steps need to be taken to setup a domain name for your Spokes server. Once a domain is setup we can start the Spokes server and then walk through downloading the license file and installing it.
Setup a Domain
You'll need to assign and setup a hostname for the Spokes server. We'll use the domain example.com for our instructions in this section. We will assume that example.com is being used to serve a website, so we'll create a subdomain called spokes.example.com for the Spokes server.
A DNS A record needs to be created for this subdomain with the value set as the IP of the server. We'll use the IP 2.3.4.5. You'll need to perform these steps using the tools available with the domain registrar you used to purchase your domain or another service you use to manage the DNS records.
Setup a Wildcard Domain
Setting up a wildcard domain is highly encouraged. It will allow you to utilize hostnames that can be used by clients for tunneling traffic and will work similarly to the assigned hostnames that the managed Packetriot Tunnel service provides.
In this configuration we will utilize the subdomain we created earlier for our spokes server to create a wildcard domain record. This DNS record will be a CNAME with the name *.spokes with a value spokes.example.com.
This might be presented differently across different DNS management tools. Simply put, we want *.spokes.example.com to resolve to spokes.example.com. Using a CNAME here will also make it easy to change the IP of example.com later and not have to also update this wildcard CNAME record.
The Packetriot client can now request any subdomain from spokes.example.com and it will resolve to spokes.example.com and when received the server, Spokes will correctly route to the tunnel requesting traffic. The example below will illustrate how this works:
[user@host] pktriot tunnel http add --domain tun-01.spokes.example.com --destination 127.0.0.1 --http 8080
[user@host] pktriot tunnel http add --domain tun-02.spokes.example.com --destination 127.0.0.1 --http 8081
In this example, we have a tunnel running on a PC that will request the Spokes server to route all traffic for the two domains to it. Since tun-01.spokes.example.com will resolve to spokes.example.com for all clients on the Internet, the traffic will be sent to the Spokes server. The Spokes server will then route the traffic to this client.
This provides a very similar feature to the assigned hostnames that Packetriot provides. In fact, if you configure a wildcard domain like this it will be even more flexible.
TLS Options
You can setup TLS for HTTP/S services using two methods: Let's Encrypt or custom certificates.
Let's Encrypt
Let's Encrypt is built into Spokes once setup will automatically maintain the certificates so they are always up-to-date. The domain name entered in the configuration must have its DNS records setup correctly ahead of time to match the IP address(es) for the host running Spokes.
Let's Encrypt can be setup in two ways in the configuration. The first is the legacy method (pre v1.0.0) where Let's Encrypt was the only method for setting up TLS certificates. In this method it's a matter of just inputting a domain name in the configuration setting up DNS. Below is an example:
{
    "domain": "example.com",
    ...
}
The other way of setting up Let's Encrypt (v1.0.0+) is to add an object using the "tls" in the configuration and setting the field useLE to true. Below is an example.
{
    "domain": "example.com",
    "tls": {
        "useLE": true
    },
    ...
}
Custom Certificates
It's also possible to use custom certificates that are provided by trusted third parties such as Verisign, DigiCert, Comodo, some domain registrars and many others.
A full-chain certificates and private key will need to be install in location on the Spokes server where the software has access and read-permissions to the file.
In addition, the common name (domain name) that is set in the certificate must match the domain that is input in the Spokes configuration.
Here is an example of a Spokes configuration using custom certificates.
{
    "domain": "example.com",
    "tls": {
        "certificate": "/etc/spokes/ssl/example.com.crt",
        "privateKey": "/etc/spokes/ssl/example.com.key"
    },
    ...
}
Spokes will use the domain in it's configration to verify that the certificates, specified by paths in the tls section of the configuration file all match. If you've loaded a wildcard certificate it will work as well.
These checks are performed to ensure a proper configuration.
Updates to custom certificates will require a restart of the Spokes server. The Packetriot client will make several attempts to re-connect to the server when the connection is severed bringing all of your tunnels back online.
Tunnel Options
The configuration file includes some options that will change the the parameters sent to the Packetriot client when establishing a tunnel to a Spokes server. These parameters are the maximum number of data-plane connections a tunnel can establish and the number of TCP ports that can be reserved.
{
    "tunOptions": {
        "maxPoolSize": 2,
        "maxPorts": 5
    }
}
The defaults in Spokes will serve most requirements. They are almost identical to what's used by the managed Packetriotc.com servers. A max "pool size" of 5 is whats used on Packetriot.com for paid tiers and the max ports are based on the users' plan. These values can be changed based on the limits you want to enforce.
If you don't want any reserved ports for tunnels then set that value to 0.
Increasing the pool size will not necessarily improve performance of serving client connections. The function of the pool is similar to a connection pool setup in an HTTP reverse proxy like nginx or Apache.
Incoming traffic will be relayed across one connection in the tunnel pool but having more will prevent saturation of that connection.
Port Ranges
By default the port ranges used are 22,000-22,999. This is the range used on Packetriot edge-servers. The range begins at 22,000 since most users want to tunnel SSH and that services port is 22. You can change this range to any value you want.
To ensure that the range you choose will be available for listening on, e.g. not selected for other network connections the OS is serving, you will need to update the /etc/sysctl.d/spokes-sysctl.conf. This file includes one lines that reserves the port range for selective use by applications.
net.ipv4.ip_local_reserved_ports = 22000,22999
Be sure to update this line if you make any changes to the port ranges in the Spokes configuration file /etc/spokes/config.json. After making changes and saving them use the command sysctl -p to make the changes active. Note, since these are reserved ports, you may want to reboot the server to cautiously ensure that any port in that range hasn't already been used by some process.
Starting the Service
Once all changes to the configuration file is complete you can start the service using systemctl. Spokes will not function as intended without a domain. Spokes uses Let's Encrypt to generate a TLS certificate for HTTPS support, so it's important that a domain and DNS records have been setup correctly.
To start the service run the following command:
[user@host] sudo systemctl enable spokes
[user@host] sudo systemctl start  spokes
License Setup
Initially Spokes used an license token to authenticate and identify the license that would be used for the Spokes server. We've since migrated to a new mechanism which is a license file that is downloaded from your account on Packetriot.com and uploaded and and installed on the Spokes server.
You'll need to login and visit the License page. Any licenses you have purchased will be listed there.
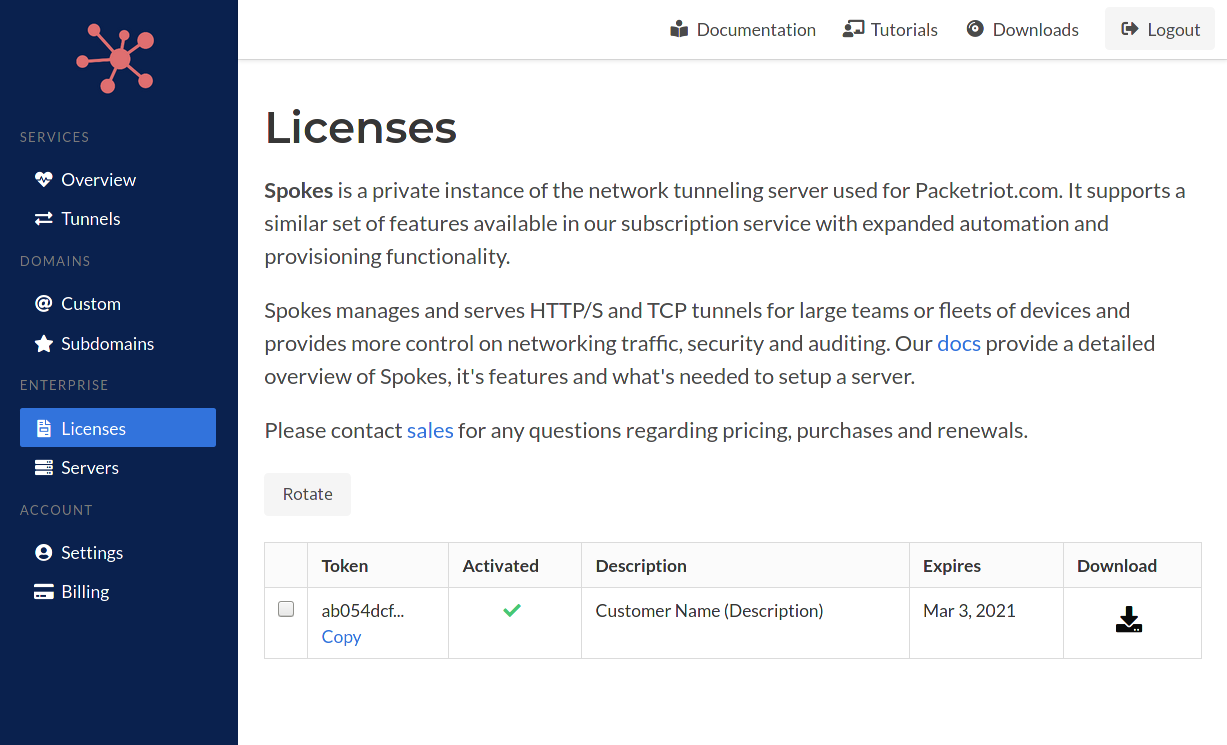
Click the download link. A license file will be download to your computer.

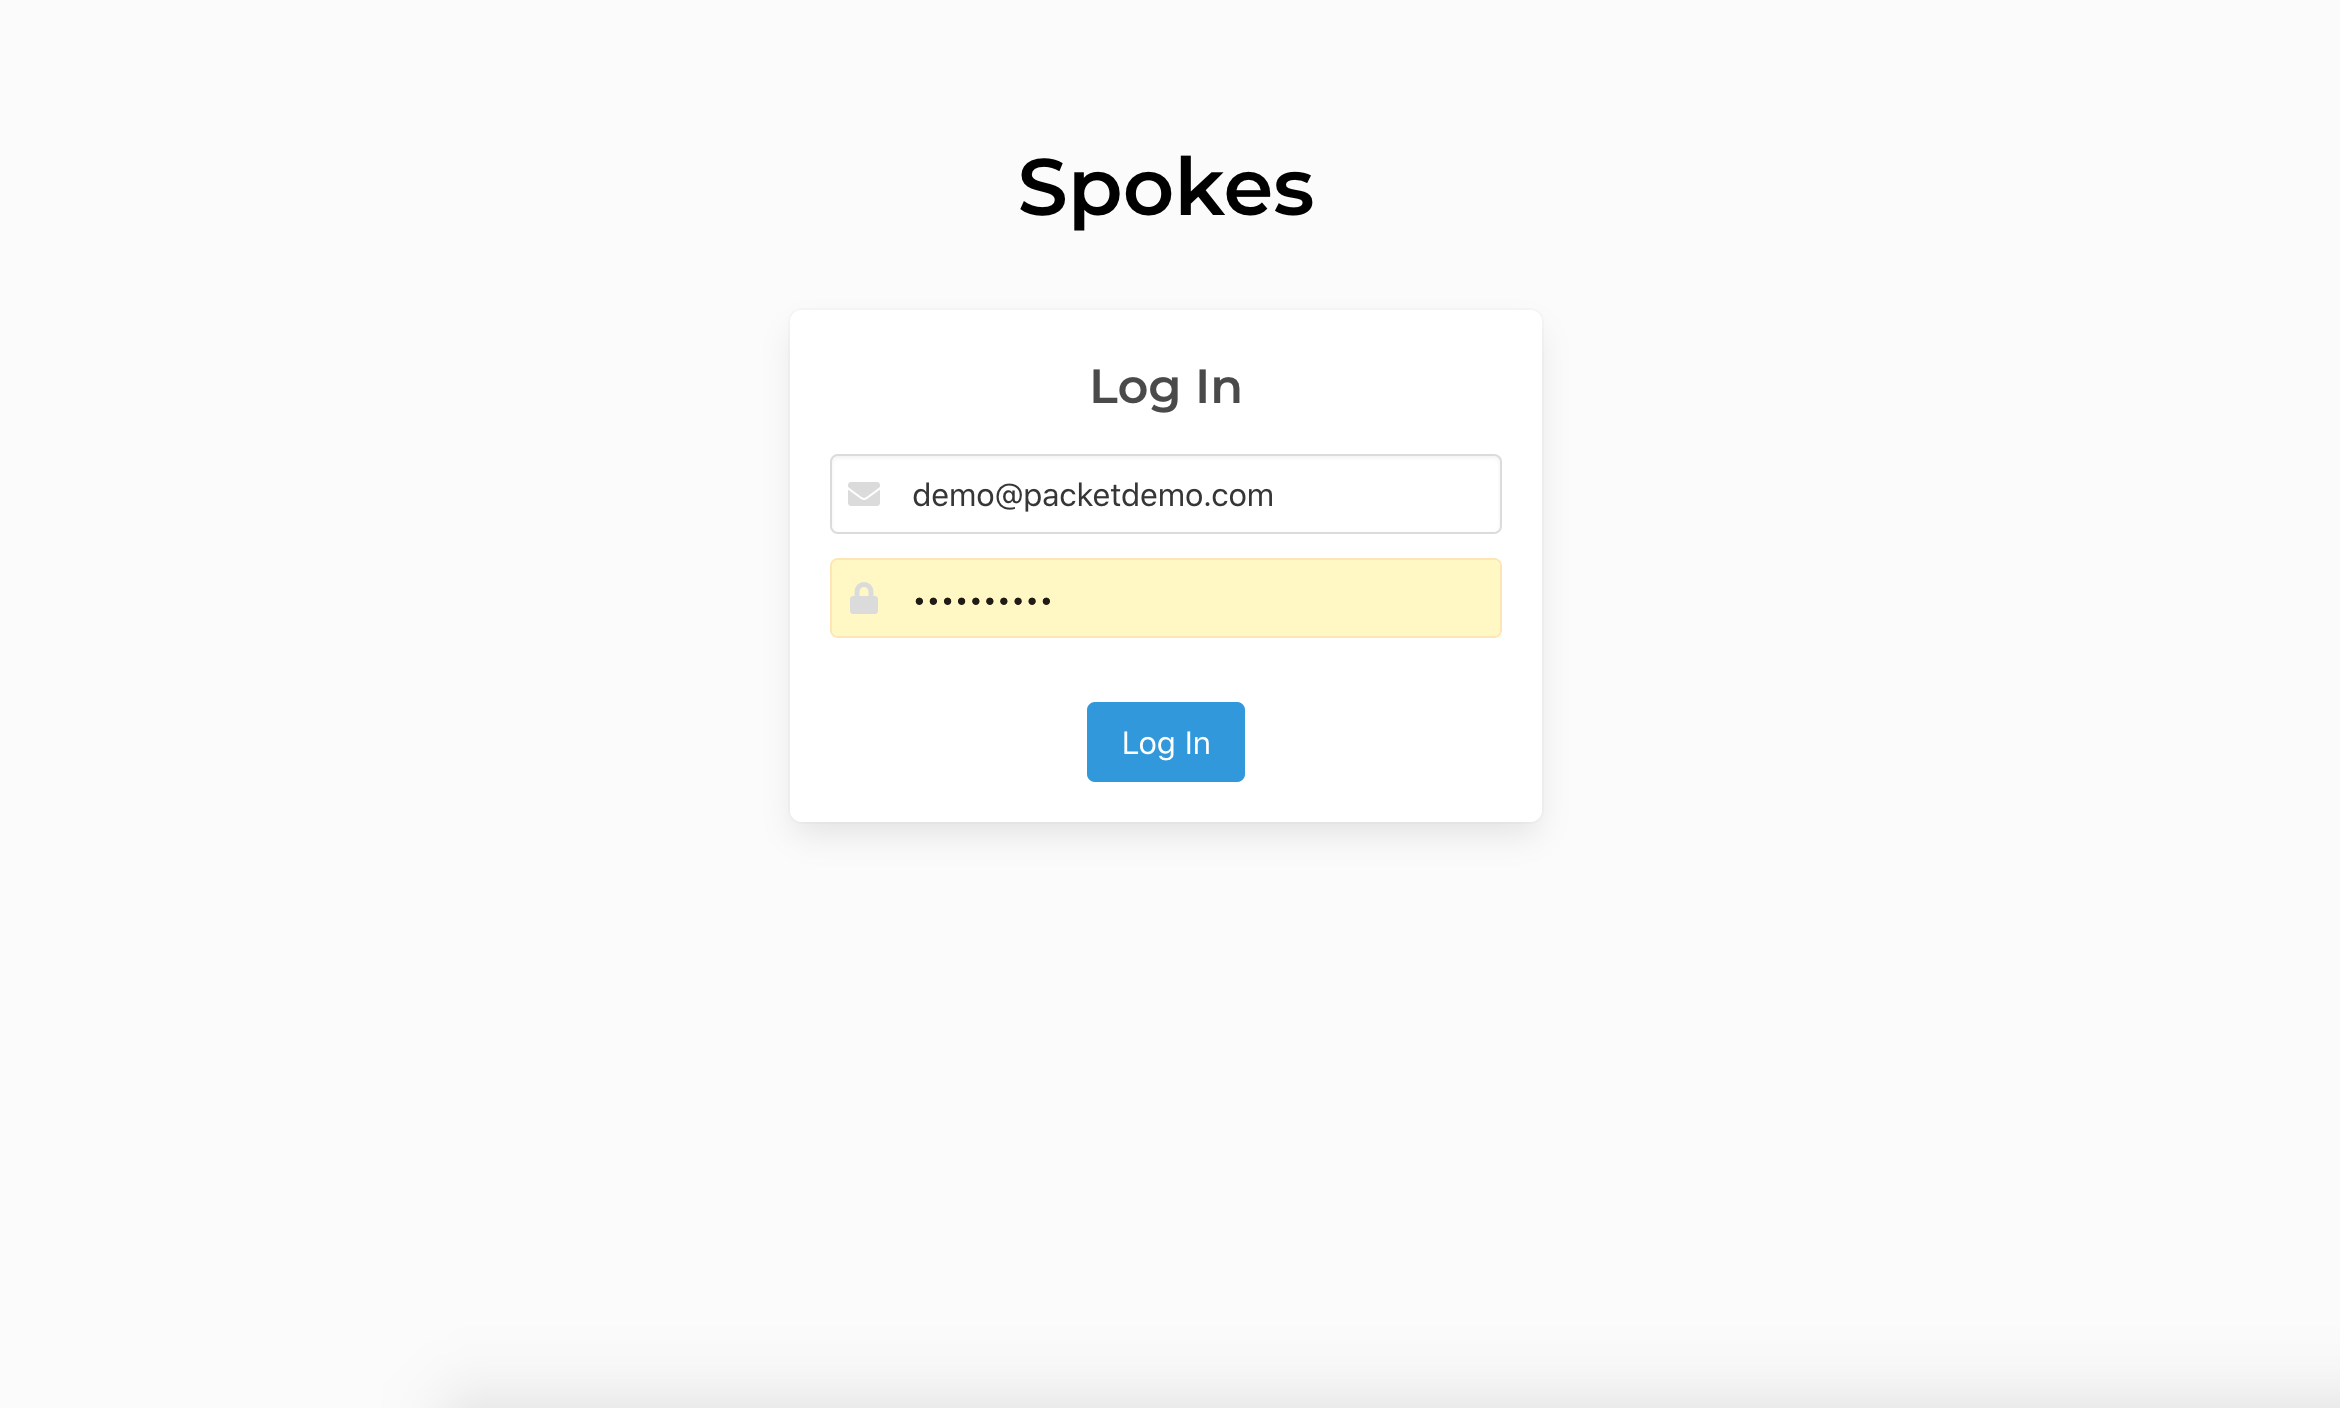
We'll be uploading and installing this license file to the Spokes server we just finished setting up and starting. You'll need to login with the administrative user you created earlier.
In our example we will visit https://spokes.example.com to login.
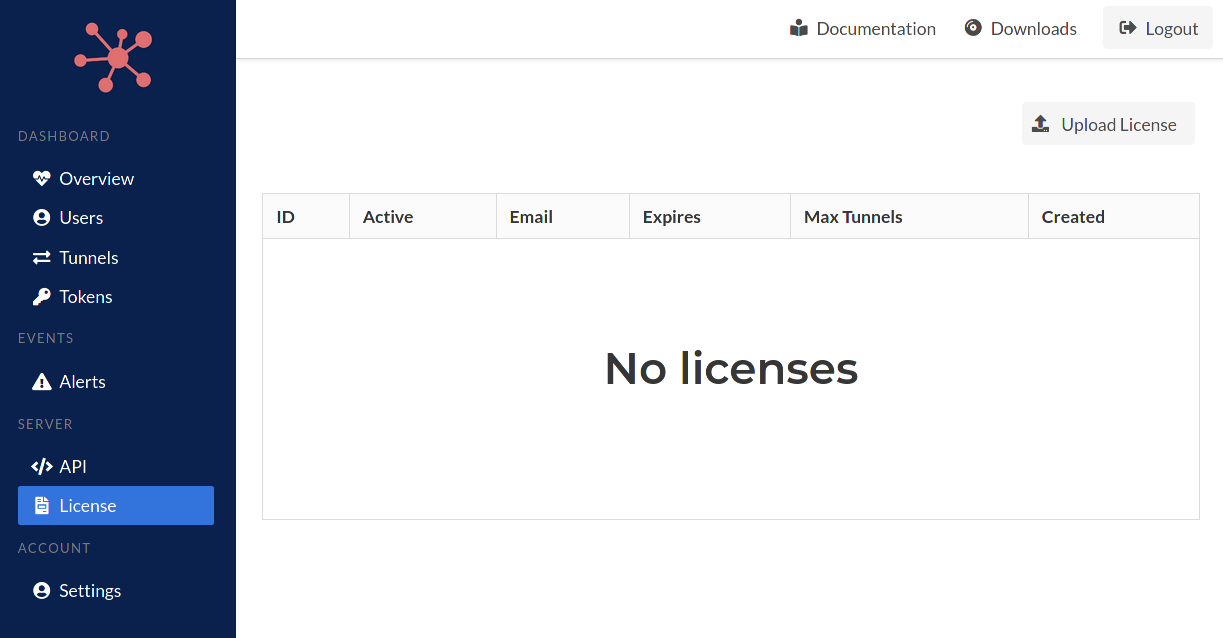
Log into the Spokes dashboard and navigate to the license section of the dashboard by clicking on "License" under the Server section of menu items on the sidebar.
Click the "Upload License" button. A new page will load with the button Choose a file... that you must click to browse your local computer and choose the license file that was downloaded in the earlier steps from Packetriot.com.
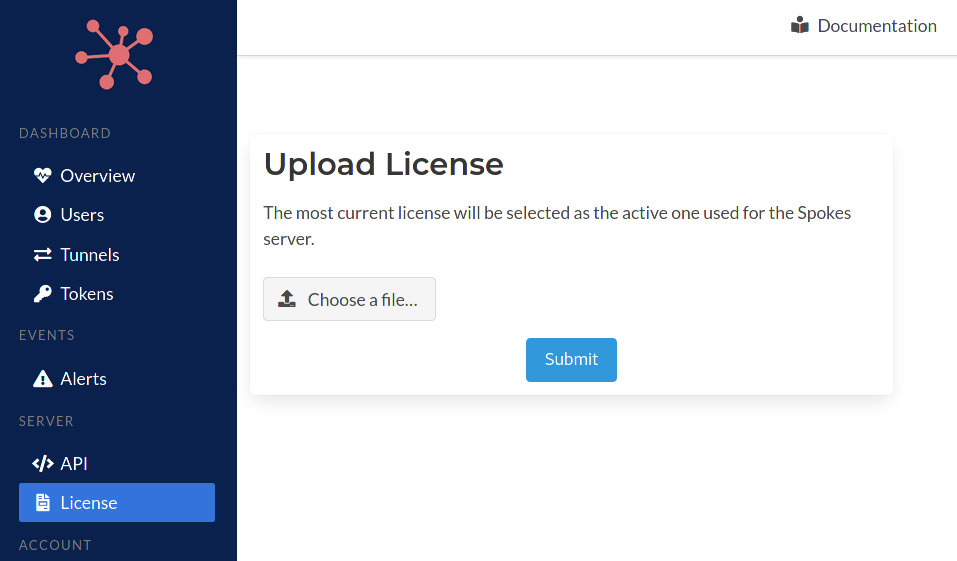
Click the "Submit" button to install it. The license will be processed by the server. This operation compares this license to any other licenses that may have been installed in the past. The most recent and longest valid license will always be selected.
Administration
In this section we will discuss the mechanisms (CLI-based) for managing users, tokens and clients (Tunnels) for Spokes.
Since user management and authentication is not performed by Packetriot.com, Spokes includes commands in the CLI program to provide this functionality.
Spokes also provides a web-based administrative dashboard for viewing performance data, metrics and connection metrics. You can managing tokens and also remotely managing online tunnels and their traffic configuration.
This section will also describe in detail the the two tokens types that you can manage with Spokes that serve different use-cases.
- Registration
- Authentication
Users
The Spokes dashboard borrows heavily from Packetrit.com so it includes a concept of users, however, there are basically two "types" of users. Actual users (people) who manage the Spokes system and tunnels. This section will cover how to create those users and manage their passwords.
The other type of 'user' are tunnel(s). Each tunnel has an associated authenitcation key that enables it to identify and authenticate itself to a Spokes server. That key has an associated 'user' in Spokes. So this is why we have two types of users in Spokes.
Tunnel users are useful since they allow administrators to "group" tunnels. If you're deploying tunnels to various customers or locations and want to group by using that identifying attribute then using the same value passed to --id in the pktriot unmanage configure command will help you do that.
We'll show examples of using this convention later. For now, let's focus on administrative users.
Creating a User
Create a user is a simple but first requires you to be running the commands as the spokes users. Use the following command to change users.
[user@host ] sudo su spokes
...

[spokes@host ]
Since we are adding a user and making changes to the Spokes database will need the permissions of the spokes user to do that.
The following command will create a new administrative user for the Spokes sytem.
[spokes@host ] spokes users add --email "jane@domain.com" --fullname "Jane Doe"
Password:
Confirm:

User created!
[spokes@host ]
Listing Users
You can list administrative users with the following command.
[user@host ] spokes users ls

+-----------------------------------------------------------------------------------------------------------------+
| ID                                 | Email                  | Fullname     | Origin      | Created              |
+-----------------------------------------------------------------------------------------------------------------+
| ed55097a43304c7783fbeb8ee9907041   | admin@packetriot.com   |              | Admin CLI   | Aug 26, 2020 22:47   |
+-----------------------------------------------------------------------------------------------------------------+
| 11197dc149104b0ebeef1f189f5f6baf   | jane@domain.com        | Jane Doe     | Admin CLI   | Oct 18, 2020 21:41   |
+-----------------------------------------------------------------------------------------------------------------+
Remember how we mention two "types" of users in the first secton on Spokes users?
Using the --all flag with the list command will show the administrative users and the users created specifically for tunnels. You'll notice that value in the "Origin" column of the output will indicate what mechanism was used to create that user.
[user@host ] spokes users ls --all

+---------------------------------------------------------------------------------------------------------------------------+
| ID                                 | Email                  | Fullname     | Origin                | Created              |
+---------------------------------------------------------------------------------------------------------------------------+
| ed55097a43304c7783fbeb8ee9907041   | admin@packetriot.com   |              | Admin CLI             | Aug 26, 2020 22:47   |
+---------------------------------------------------------------------------------------------------------------------------+
| 2edf8257261f4986b0323029f8b182be   | demo-app               |              | Tunnel Registration   | Sep 18, 2020 13:02   |
+---------------------------------------------------------------------------------------------------------------------------+
| 66ecf658ead44638b8d874111f589497   | testing                |              | Tunnel Registration   | Sep 21, 2020 21:46   |
+---------------------------------------------------------------------------------------------------------------------------+
| 11197dc149104b0ebeef1f189f5f6baf   | jane@domain.com        | Jane Doe     | Admin CLI             | Oct 18, 2020 21:41   |
+---------------------------------------------------------------------------------------------------------------------------+
Another thing to note is that we ran these commands as administrative Linux user user@host. Because these are read-only operations we don't need to be logged in as the spokes user.
Passwords
As an admin you will need to change the password for users from time-to-time. This operation is possible only using the CLI tool. You will need to be logged as the spokes user to run these commands since we will be making changes to the database.
We will need either the ID of the user or the email address to specify which users' we want to change.
[user@host ] sudo su spokes

[spokes@host ] spokes users ls
...
[spokes@host ] spokes users passwd --email "jane@domain"
New password for 'jane@domain.com':
Confirm:

Password updated
[spokes@host ]
Two-Factor Authentication
Enabling two-factor authentication (2FA) on accounts will provide an additional layer of security for admins managing a Spokes server.
2FA can be enabled or disabled after accounts are created. Should a user lose the corresponding mobile device that generates the one-time-passcode, it can be reset by the admin using the Spokes CLI tool.
Below is the usage menu for the two-factor sub-command used for managing 2FA for users.
[spokes@host ] spokes users two-factor -h
Usage:
  spokes users two-factor [flags]
  spokes users two-factor [command]

Available Commands:
  disable     Remove two-factor auth requirement for user
  enable      Add two-factor auth requirementn to user
  reset       Reset two-factor secret for user

Flags:
  -h, --help   help for two-factor

Global Flags:
      --config string   path to configuration file (default "/etc/spokes/config.json")

Use "spokes users two-factor [command] --help" for more information about a command.
Note, when using the Spokes CLI to manage 2FA for users you will want to switch users to the spokes user. The Spokes database in /var/lib/spokes/spokes.db is owned by the spokes user so this is necessary.
[user@host ] sudo su spokes

[spokes@host ]
Another method to invoke the Spokes CLI program as the spokes user is to use sudo with the -u flag followed by the Spokes command you wish to execute.
[user@host ] sudo -u spokes spokes users <sub-command>
2FA Management
We'll cover all of the use-cases for managing 2FA for users in examples below. This is an example of creating a user with 2FA enabled.
[spokes@host ] spokes users add --email "jane@domain.com" --fullname "Jane Doe" \
    --enable2FA
Password:
Confirm:

Info: Two-factor authentication (one-time-passcodes) will be setup on first-login.

User created!
Two-factor authentication was added in v1.0.3 of Spokes so you may want to enable it for users created with past revisions of Spokes. Here's an example for that, the user will be prompted to setup 2FA on their next login.
[spokes@host ] spokes users two-factor enable --email "jane@domain.com"

Two-factor enabled, setup will be completed on next login
Below is an example to reset the two-factor authentication for a user. This clears the previous 2FA secret that is validated with a companion 2FA authentication app on your mobile phone. The user will setup 2FA again on their next login to the Spokes server.
This is useful is a user changes or loses the phone running the companion 2FA app.
[spokes@host ] spokes users two-factor reset --email "jane@domain.com"

Two-factor reset, setup will be completed on next login
2FA can be removed from a users' login requirements with the following command.
[spokes@host ]  spokes users two-factor disable --email demo@packetdemo.com

Two-factor disabled for user
2FA Setup
Two-factor authentication setup is completed during the first login after a user is created with 2FA enabled on their account. It can also occur when a 2FA secret is reset or added to an existing user. Users will need to first login using their email and password.
One authenticated you will be redirected to a page with a QR code that contains the information to setup 2FA using a companion mobile application. Scanning this code makes adding the time-based one-time-passcode to your companion app easy.
Once the QR code is scanned it will provide 6-digit passcodes that will update every 30 seconds. To complete setting up 2FA, input the current passcode into the form and click the Validate button. If the passcode is validated, the secret is stored and the user will be authenticated and continue to the Spokes dashboard.
Prior to validating 2FA a user can refresh this page to generate a new secret and corresponding QR code in case there are any errors or trouble using a companion app.

Users with 2FA enabled will visit a similar screen each time they log into Spokes. You will be prompted for a passcode to verify your identify before continuing to the dashboard. In the next section we list all of the companion apps that are compatible and test to worked with Spokes 2FA support.
Companion Mobile Apps
There are several 2FA authentication companion apps available for both iOS and Android. We've tested the following companion mobile apps with our 2FA system and verified them to be working:
| App | Android | iOS |
|---|---|---|
| Google Authenticator | Play Store | App Store |
| Microsoft Authenticator | Play Store | App Store |
| Twilio Authy | Play Store | App Store |
Since time-based one-time-passcodes are a standardized mechanism for providing 2FA you may find other companion apps that will also work.
Registration Token
A registration token is scoped such it can be used to generate an authentication token by clients. A registration token cannot be used by clients to establish a tunnel session. This token type is useful for fleets of clients where the registration token is used to generate an authentication token that is used for some life-time.
With the Spokes CLI tool you can generate and remove any number of registration tokens. It's important to note that these operations do modify the Spokes database, you will need to execute these commands as the Spokes user.
In the commands below we will first switch to the spokes user on the system and
then perform our commands.
[user@host] sudo su spokes
[spokes@host] spokes registration ls

[spokes@host] spokes registration create --description "provide a note to describe use-case for token"

Registration token:
5b72e92d2c5e863e3a21685e....

# or

[user@host] sudo -u spokes spokes registration create --description "provide a note to describe use-case for token"
In this command we used the --description flag to include a short note about how this
registration token will be used. It's discussed in more detail in the Client Configuration
section how this token is used, but this example below will provide some helpful context
of how it's used by clients.
[user@host] pktriot unmanaged configuration --hostname spokes.example.com --registration <token...>
This is most simplest version of using a registration token with the Packetriot client to generate an authentication token such that the client can begin requesting traffic.
Administrators can list registration tokens. This example demonstrates how helpful leaving a description or note about the token makes management and tracking easier.
[user@host] spokes registration ls

+----------------------------------------------------------------------------------------------------------------------------------+
| ID                                 | Created                 | Description                     | Value                | Active   |
+----------------------------------------------------------------------------------------------------------------------------------+
| e93dc13a2b6a4a82862e35e5ee80292c   | Feb 23, 2020 18:27:11   | beta-keys                       | e7c5bfc68fb6e1....   | true     |
+----------------------------------------------------------------------------------------------------------------------------------+
| 64183c82433a4e53b85cfc29338543ac   | Feb 24, 2020 00:22:06   | integration testing             | cc55c793cba732....   | true     |
+----------------------------------------------------------------------------------------------------------------------------------+
| c28959b384b24b168008eb7a91195741   | Mar 1, 2020 16:28:04    | production registration token   | 5b72e92d2c5e86....   | true     |
+----------------------------------------------------------------------------------------------------------------------------------+
When an administrator wants to terminate the use of a token it's simply disabled using
the rm sub-command in the registation command. The token is left in the database
but it's disabled for future use. You can use the --id flag to remove a specific key.
There is also the --all flag which will remove use for all registration tokens.
Use with caution.
[user@host] spokes registration rm --id e93dc13a2b6a4a82862e35e5ee80292c
Authentication Tokens
An authentication token is the key that allows clients to immediately authenticate with a Spokes server and begin requesting traffic to the client. It functions similarly to registration tokens and has an identical command structure.
[user@host] spokes token create
Client auth-token:
c6e15c70e9a6504dd1fe036d23b...
Since Spokes does not automatically provide a hostname like the managed Packetriot
service, it provides a flag --hostname that can be used to specify a hostname for the tunnel
associated to the generated token.
If you're using wildcard domains to manage and access your tunnels this flag can useful. However, you can input any value, it's not used by Spokes for anything functional.
[user@host] spokes token create --hostname tun-01.spokes.example.com
Client auth-token:
c6e15c70e9a6504dd1fe036d23b...
Use this token to configure a Packetriot client so that it can establish authenticated sessions with Spokes and begin requesting traffic. Below is a quick example of thow this token is used by the client.
[user@host] pktriot unmanaged configure --hostname spokes.example.com --key <token...>
Managing Tokens
Authentication tokens can be listed as well. One thing to notice is that some tokens have values in the user sections and others do not. We'll quickly explore why here.
When a client uses a registration token to generate an authentication token, they can supply
an id field. This id field is basically treated as unique ID. An underlying "user" is
created to represent this id and can be looked up to associate more tokens (and tunnels) to it.
Here is a quick example:
[user@host] pktriot --config spokes.json unmanaged configure --id 'jack' --tunnel-hostname "tun-10.spokes.example.com" --hostname unmanaged.borak.co --registration 5b72e92d2c5e863e3a21685ef7c4c...
This allows users to "group" a set of tunnels and identify their users or use-cases. It's not necessary to do this but it can be helpful if you're managing many tunnels some of which are created/used by the same user.
You will see a mixture of tokens and tunnels below. The tokens that have a value in the user
column were created with a variety of the pktriot unmanaged configure command above. The
other tokens with an empty user value were create using the spokes CLI commanf spokes token create.
+-------------------------------------------------------------------------------------------------------------------------------------+
| ID                                 | Created              | User   | Tunnel                      | Value                 | Active   |
+-------------------------------------------------------------------------------------------------------------------------------------+
| c5f6cd3f76124f7e959959e76de7df16   | Mar 20, 2020 17:28   |        | tun-01.spokes.example.com   | 6b6098da12b0f62d...   | true     |
+-------------------------------------------------------------------------------------------------------------------------------------+
| d6065c44dee446cfacb1d666b482875f   | Mar 20, 2020 17:28   |        | tun-02.spokes.example.com   | 196299cdd15e5e38...   | true     |
+-------------------------------------------------------------------------------------------------------------------------------------+
| c95bebd87cd34e60b8e43e2d1543a995   | Mar 20, 2020 17:29   |        | tun-03.spokes.example.com   | 24b78f0f3f63372d...   | true     |
+-------------------------------------------------------------------------------------------------------------------------------------+
| 1dc94bcb47454b3b954c57deb28fbdc0   | Mar 20, 2020 17:29   |        | testing-non-functional      | 3bce91dd9c3c7d7a...   | true     |
+-------------------------------------------------------------------------------------------------------------------------------------+
| 03e0a1fa2ba24f369470ebb9c167bcda   | Mar 20, 2020 17:31   | jack   | tun-10.spokes.example.com   | 973a97e234218963...   | true     |
+-------------------------------------------------------------------------------------------------------------------------------------+
| 7a0451f45f9c49a9bcf6f556a169778c   | Mar 20, 2020 17:31   | jack   | tun-11.spokes.example.com   | e656e259bfe9802c...   | true     |
+-------------------------------------------------------------------------------------------------------------------------------------+
| 1b7ff3a246554f918fdac4a2894f296f   | Mar 20, 2020 17:31   | jack   | tun-13.spokes.example.com   | 6c33045d3077d638...   | true     |
+-------------------------------------------------------------------------------------------------------------------------------------+

7 tokens
Need to recover the entire token value? You can use the flag --expand and it will print the
entire token value along with the basic information.
Authentication tokens can be deleted as well by using the rm subcommand. This will
delete tokens generation by the administrator using the CLI (in our examples directly
above) or ones created through a registration token.
[user@host] spokes token rm --id e239ad1556654d58a540114632b00055
There is also a --all flag that can be used this command and it will delete all tokens.
Please use with caution. If you make any mistakes with this command you can attempt to
recover the token by use sqlite3 and opening up the Spokes database located in
/var/lib/spokes/spokes.db. You will need to update the value of the active column in
the apikeys table.
Listing Tunnels
A list of the tunnels and some information on their state, origin (IP) of the clients
and their bandwidth consumption, can be present by using the spokes tunnel ls command
in the CLI.
The bandwidth values and uptime are not updated in real-time by Spokes. These values are cached so that the accumulated data-points can be stored in a single transaction. However, when connects and disconnect, the online state is updated in real-time.
[user@host] spokes tunnel ls

+--------------------------------------------------------------------------------------------------------------------------------------------------------------+
| ID                                 | User   | Hostname                    | Online   | Address         | Uptime   | Daily / Monthly   | Created              |
+--------------------------------------------------------------------------------------------------------------------------------------------------------------+
| 8cf14c7e48fd4addb5f6daa5af7da969   |        | tun-01.spokes.example.com   | false    |                 | 0 secs   | 0.00 B / 0.00 B   | Mar 20, 2020 17:28   |
+--------------------------------------------------------------------------------------------------------------------------------------------------------------+
| 4a2954d4eff04fe9bf881ea546f827ba   |        | tun-02.spokes.example.com   | false    |                 | 0 secs   | 0.00 B / 0.00 B   | Mar 20, 2020 17:28   |
+--------------------------------------------------------------------------------------------------------------------------------------------------------------+
| 5d906dcf26ab4e67909ad3ffc282b770   |        | tun-03.spokes.example.com   | false    |                 | 0 secs   | 0.00 B / 0.00 B   | Mar 20, 2020 17:29   |
+--------------------------------------------------------------------------------------------------------------------------------------------------------------+
| 399b236fdfa84c58b46acf7db7d00562   |        | testing-non-functional      | false    |                 | 0 secs   | 0.00 B / 0.00 B   | Mar 20, 2020 17:29   |
+--------------------------------------------------------------------------------------------------------------------------------------------------------------+
| 810b2453b97c44f8bdb1369126e99489   | jack   | tun-10.spokes.example.com   | false    |                 | 0 secs   | 0.00 B / 0.00 B   | Mar 20, 2020 17:31   |
+--------------------------------------------------------------------------------------------------------------------------------------------------------------+
| 6bb481ae9e614686a23d12470ae69d76   | jack   | tun-11.spokes.example.com   | false    |                 | 0 secs   | 0.00 B / 0.00 B   | Mar 20, 2020 17:31   |
+--------------------------------------------------------------------------------------------------------------------------------------------------------------+
| 70fddfb497874f1e8e99a4140f3cad0d   | jack   | tun-13.spokes.example.com   | false    | 123.45.67.89    | 0 secs   | 0.00 B / 0.00 B   | Mar 20, 2020 17:31   |
+--------------------------------------------------------------------------------------------------------------------------------------------------------------+

7 tunnels
You can use the --online flag to list only those tunnels that are currently connected
to the Spokes server. The --all flag will list all tunnels including those that
have been shutdown (deleted), which happens when the associated authentication token was
deleted earlier spokes token rm --id <token-id>.
Listing Ports
Ports limited resources, to help manage and understand which tunnel are using allocated
ports, the spokes port ls can provide that information.
[user@host] spokes port ls

+------------------------------------------------------------------------------------------------------------------+
| Port No.   | User   | Tunnel ID                          | Tunnel Online   | Tunnel Uptime   | Daily / Monthly   |
+------------------------------------------------------------------------------------------------------------------+
| 22817      | jack   | 70fddfb497874f1e8e99a4140f3cad0d   | false           | 0 secs          | 0.00 B / 0.00 B   |
+------------------------------------------------------------------------------------------------------------------+
| 22708      | jack   | 70fddfb497874f1e8e99a4140f3cad0d   | false           | 0 secs          | 0.00 B / 0.00 B   |
+------------------------------------------------------------------------------------------------------------------+
| 22459      | jack   | 70fddfb497874f1e8e99a4140f3cad0d   | false           | 0 secs          | 0.00 B / 0.00 B   |
+------------------------------------------------------------------------------------------------------------------+
| 22212      | jack   | 70fddfb497874f1e8e99a4140f3cad0d   | false           | 0 secs          | 0.00 B / 0.00 B   |
+------------------------------------------------------------------------------------------------------------------+

4 port allocations
The tunnel ID is included in the output and can be used to filter the tunnel using a combination
of ID, spokes tunnel ls and grep
[user@host] spokes tunnel ls | grep 70fddfb497874f1e8e99a4140f3cad0d

| 70fddfb497874f1e8e99a4140f3cad0d   | jack   | tun-13.spokes.example.com   | false    | 123.45.67.89    | 0 secs   | 0.00 B / 0.00 B   | Mar 20, 2020 17:31   |
House Keeping
The Spokes command provide a simple command for performing some house-keeping. In the
case of a server crash or some other unforeseen issues, admins can run the command
spokes clean that will review the database and fix any issues that don't look right.
The potential issues that may be resolved are collecting orphaned ports or correcting the states of tunnels when their associated auth tokens have been deleted (de-activated).
[user@host] spokes clean

Issues Fixed (tunnels + ports): 0
The clean command can also be run with the --check flag that will allow you to see
the issues and not automatically correct them.
House-keeping is performed while the Spokes server is run. It will log issues that are found and then correct them.
Dashboard
The web-based administrative dashboard provides many of the same functions as the CLI, however, user (admin) management is not avaialble. That is a CLI function only.
You'll be able to view details about the operation of tunnels and analyze how they're performing, past connections metrics and remote management of traffic rules for all connected tunnels (clients).
To begin visit the domain name setup for your Spokes server, e.g. https://spokes.example.com.
Be sure to create least one administrative user before continuing. See section "Administration -> Users -> Creating a User".
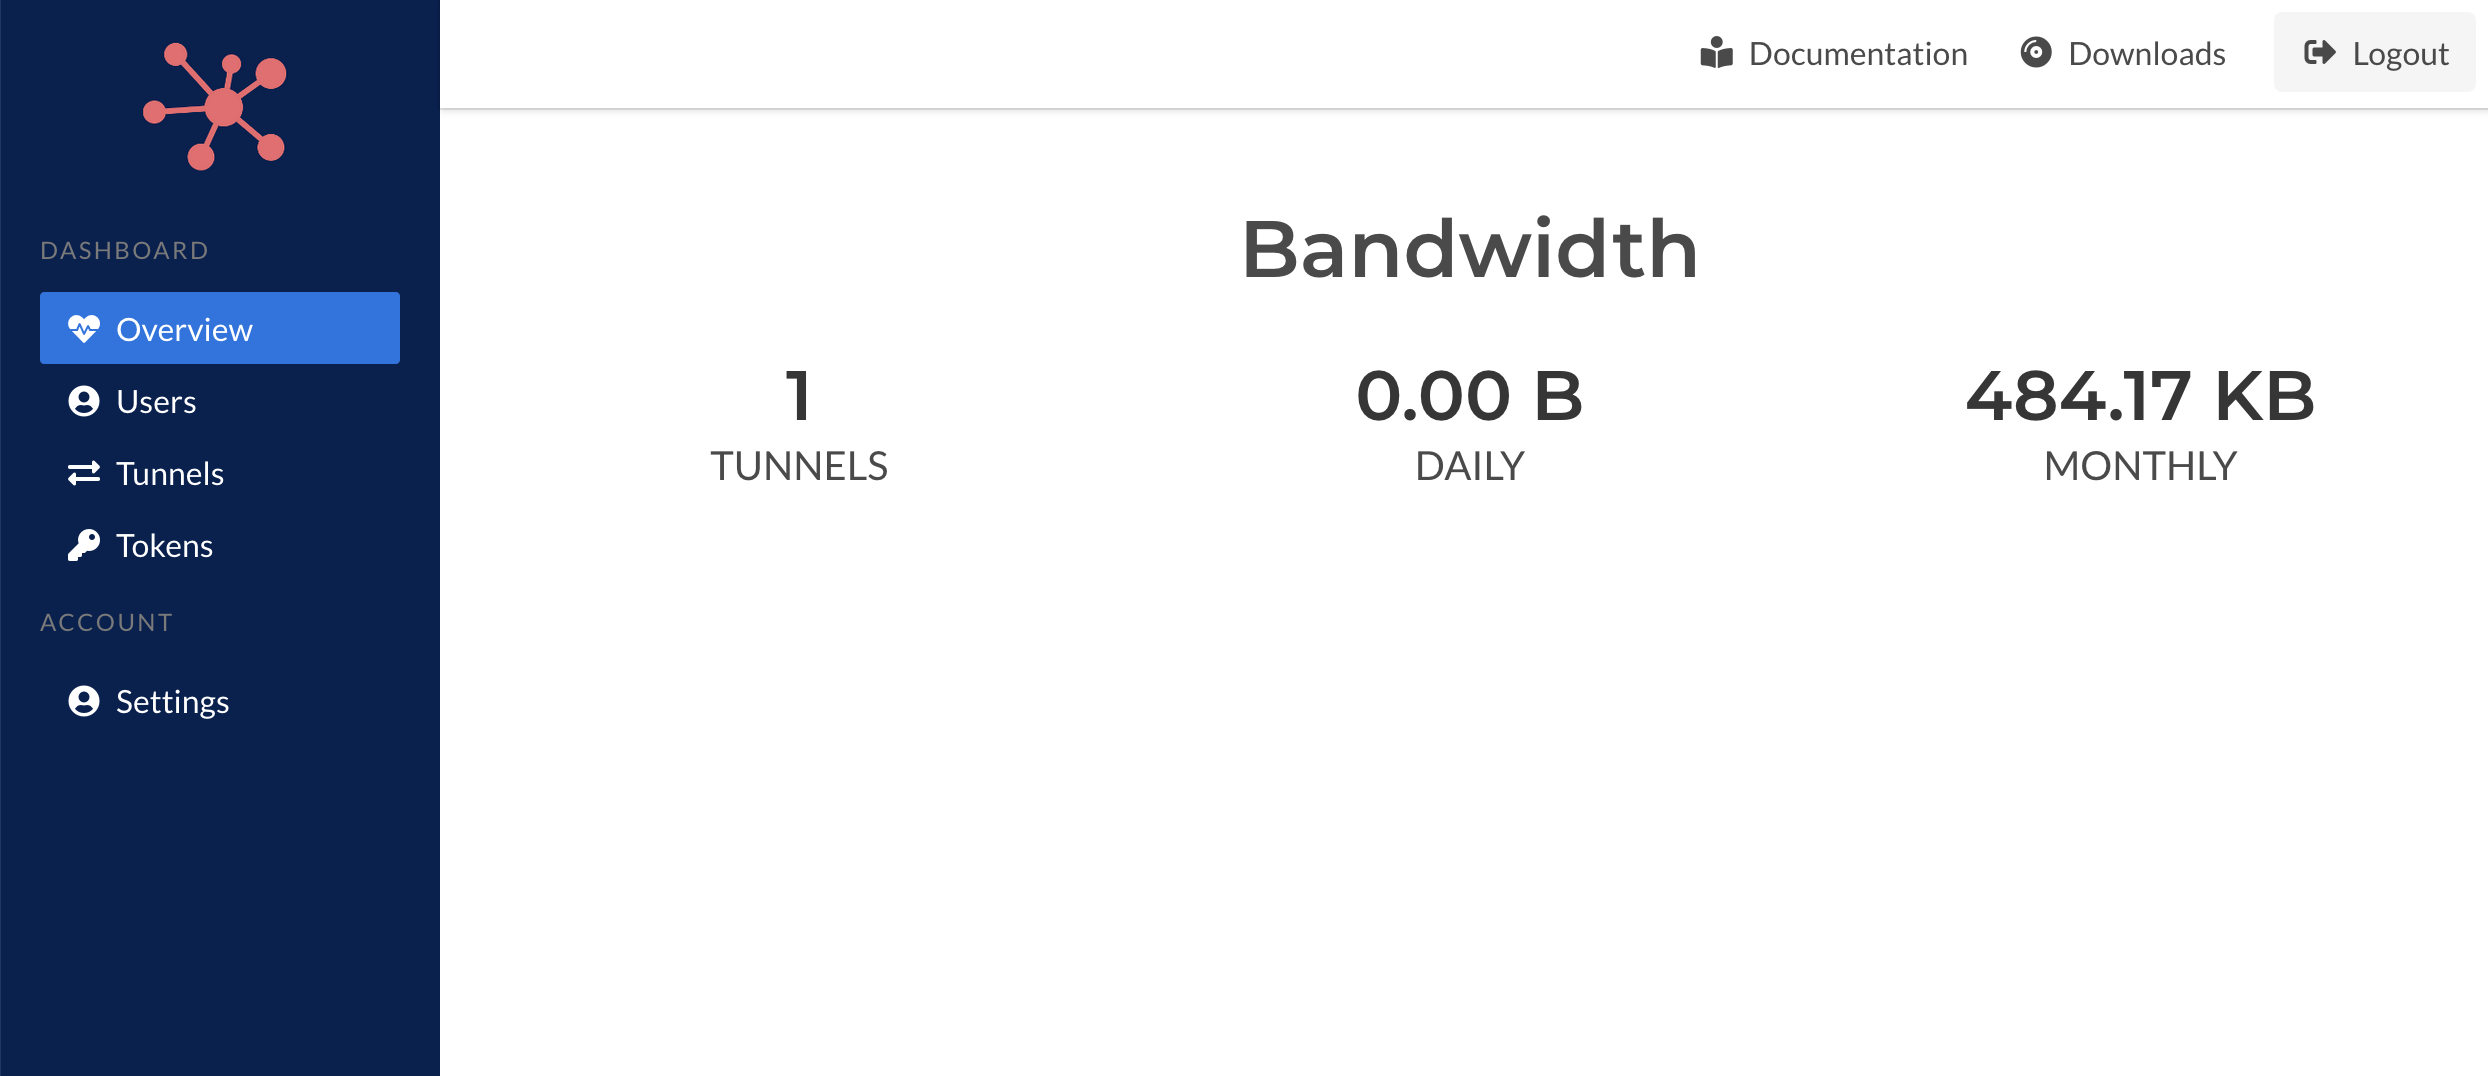
Overview
The overview page provides some high-level metrics as the number of active tunnels, daily and monthly bandwidth statistics. An active tunnel implies both online and off-line tunnels.
Currently the overview dashboard isn't include as much information as can be provided and will grow over time. Values we intend to include are: online vs. offline, client software statistics (platforms, versions), and license expiration indicators.
Token Management
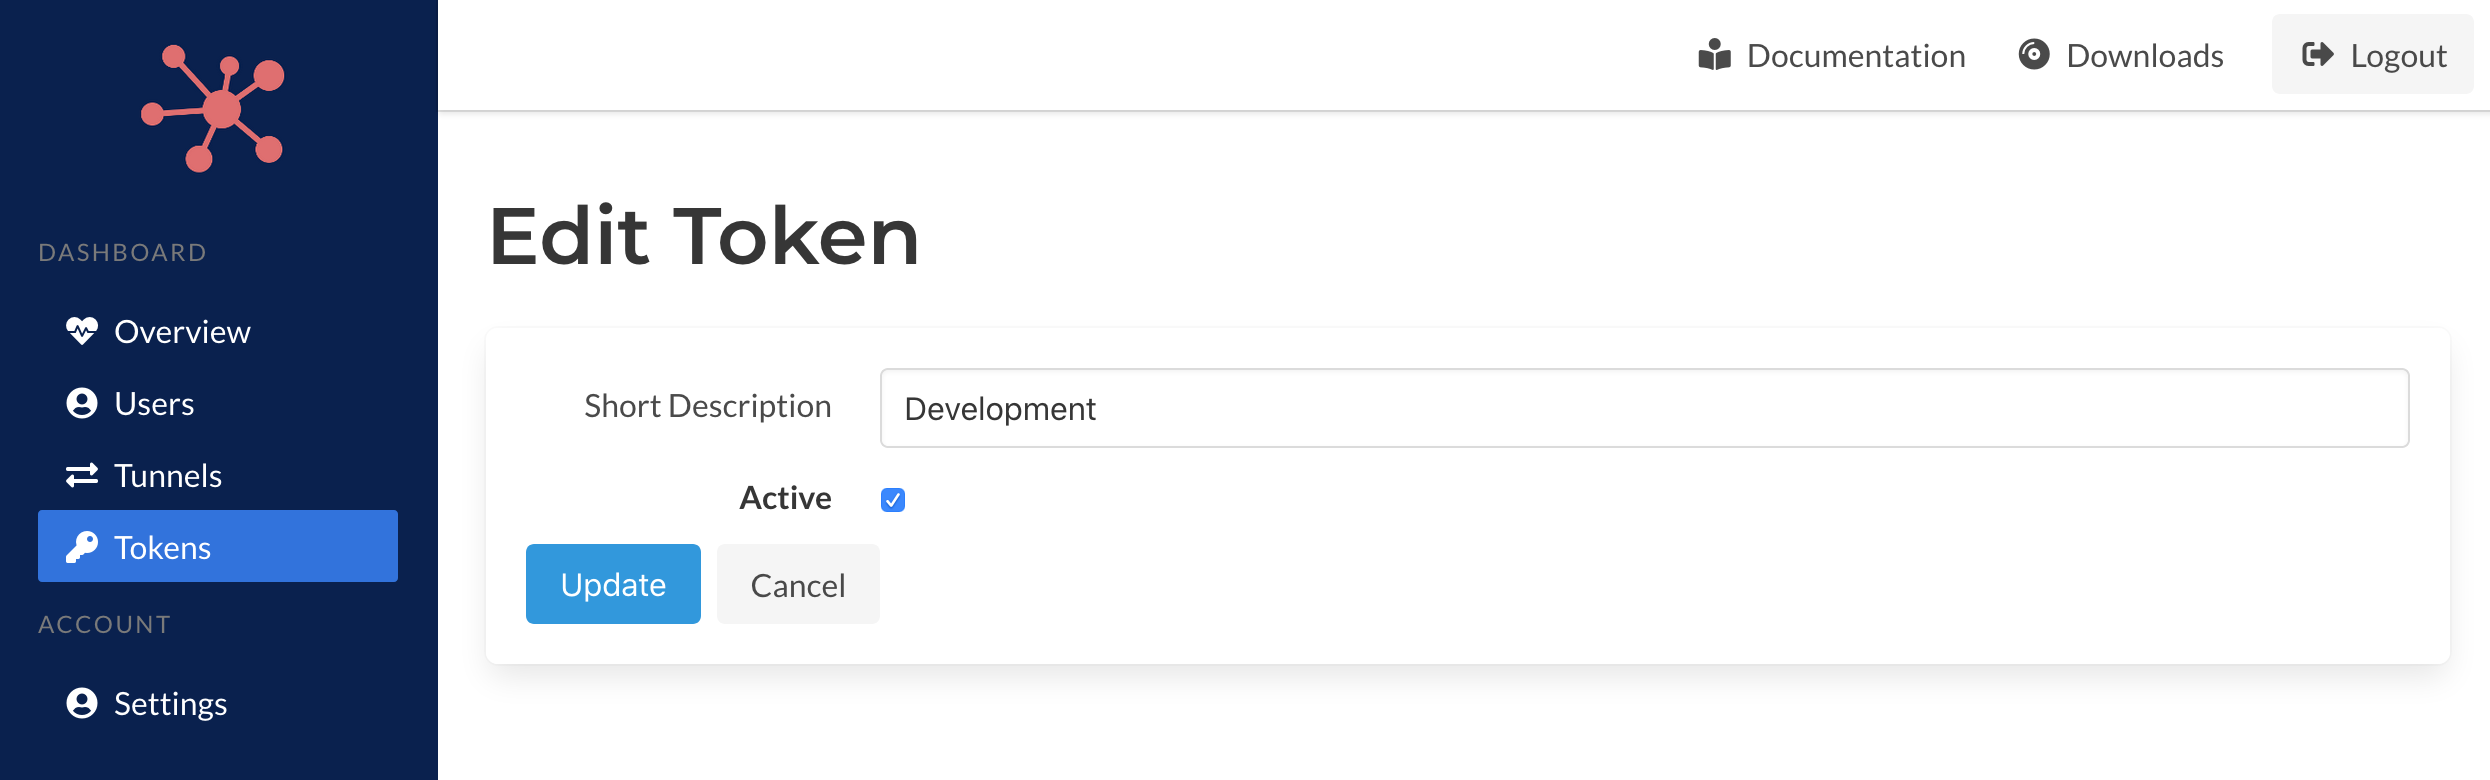
The token management area of the dashboard provides functions to create new registration tokens, list and edit existing tokens.
A registration token is used by the Packetriot client to authenticate itself with Spokes and request a tunnel authentication token so it can identify and authenticate itself in the future and make requests for HTTP/S and TCP traffic.
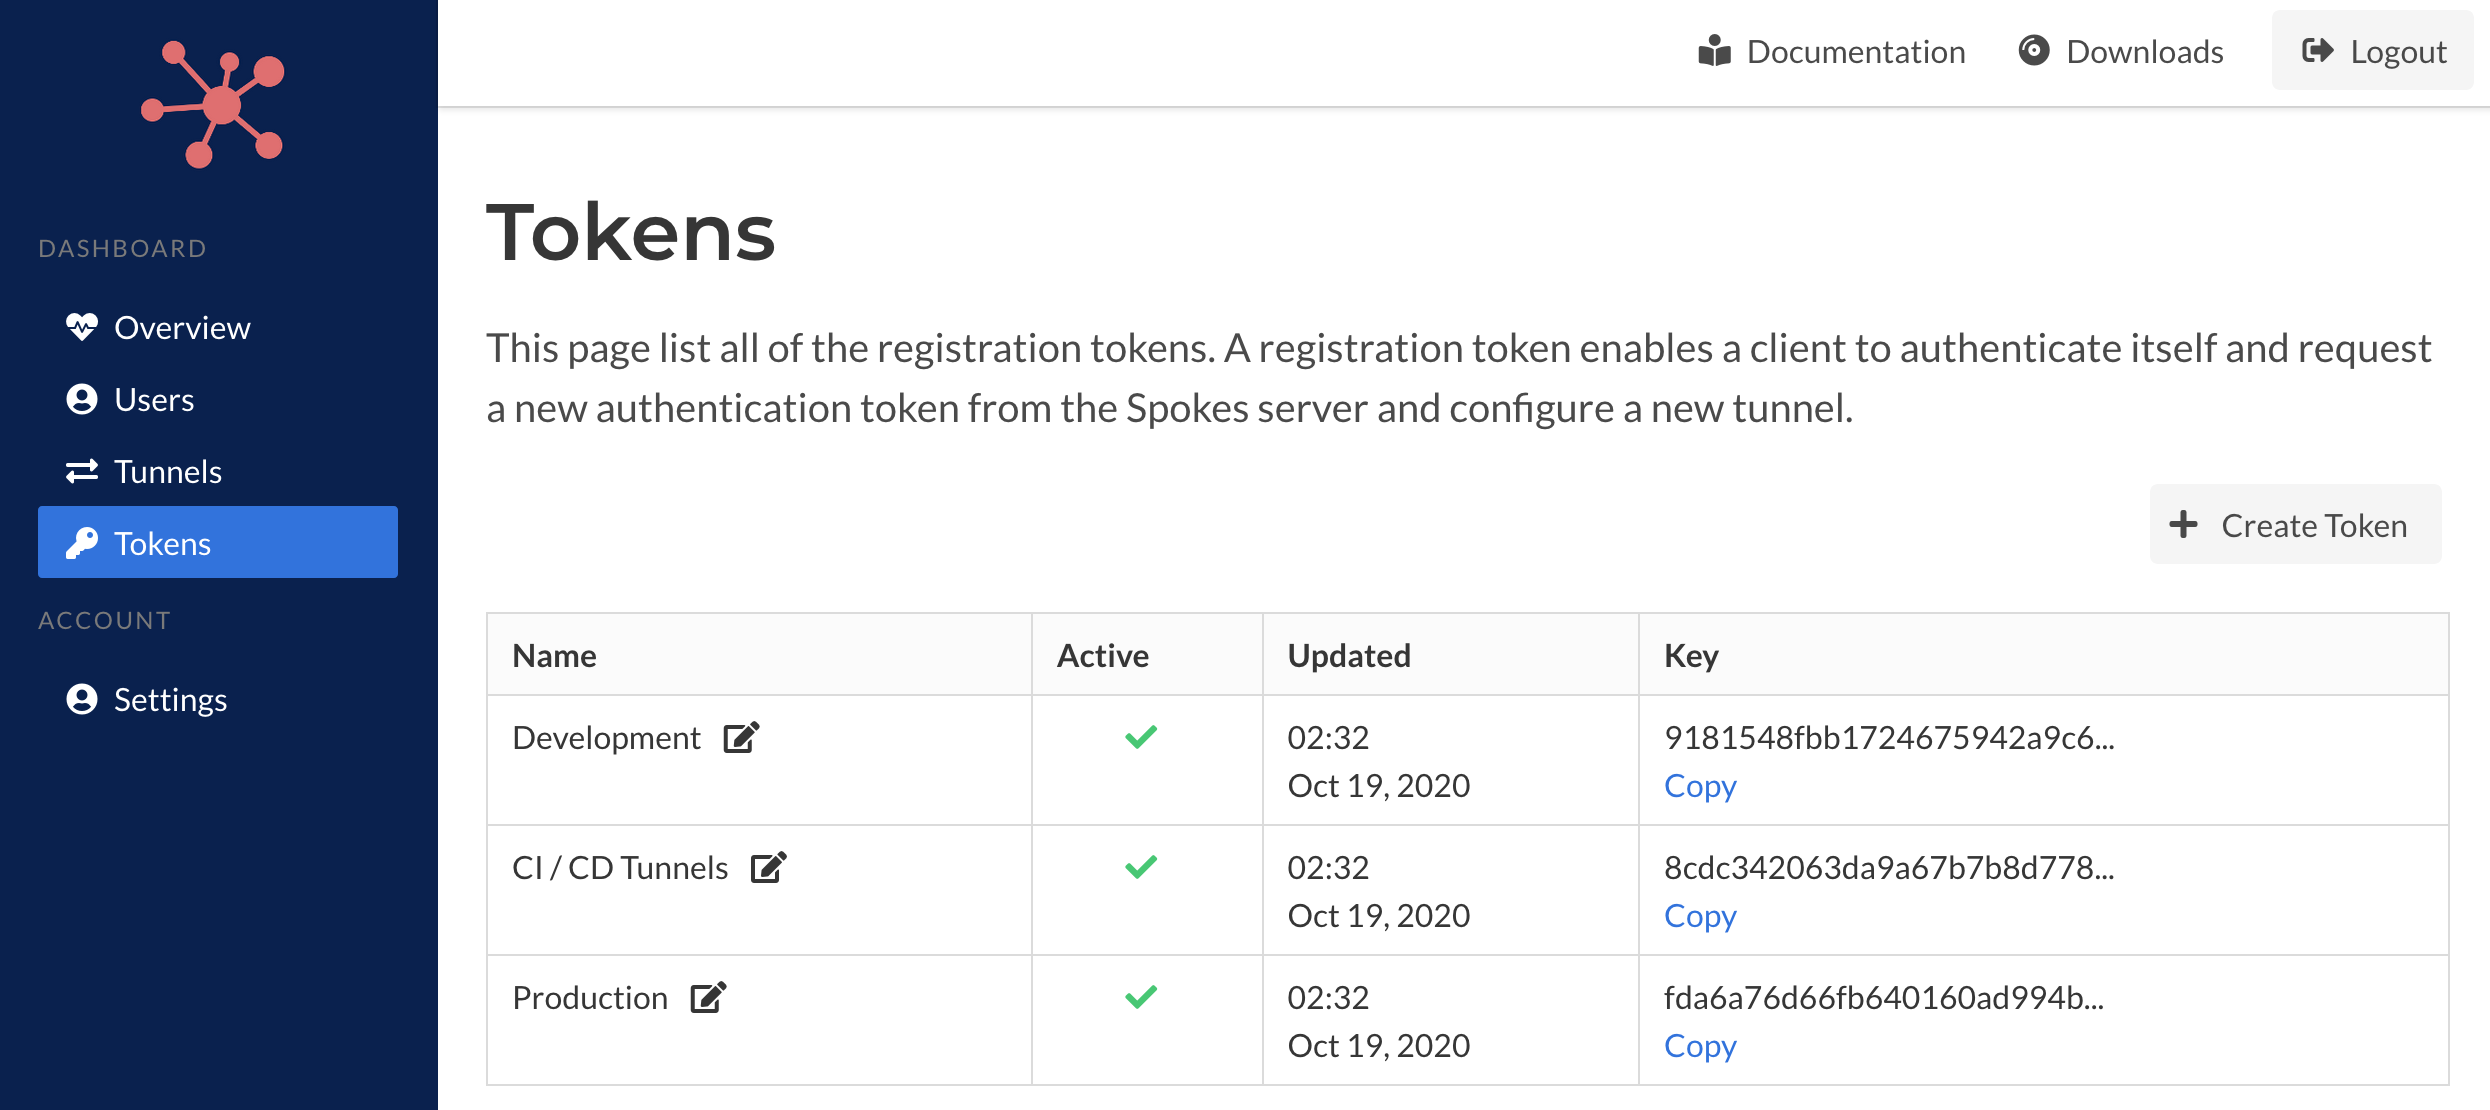
You can edit the description for the registration token by clicking the edit icon next to existing name in the table. An form with the mutable details of the token will be provided. You can also set an token active, or not, as well.
By making a token inactive it will prevent its use to create new authentication tokens for tunnels in the future.
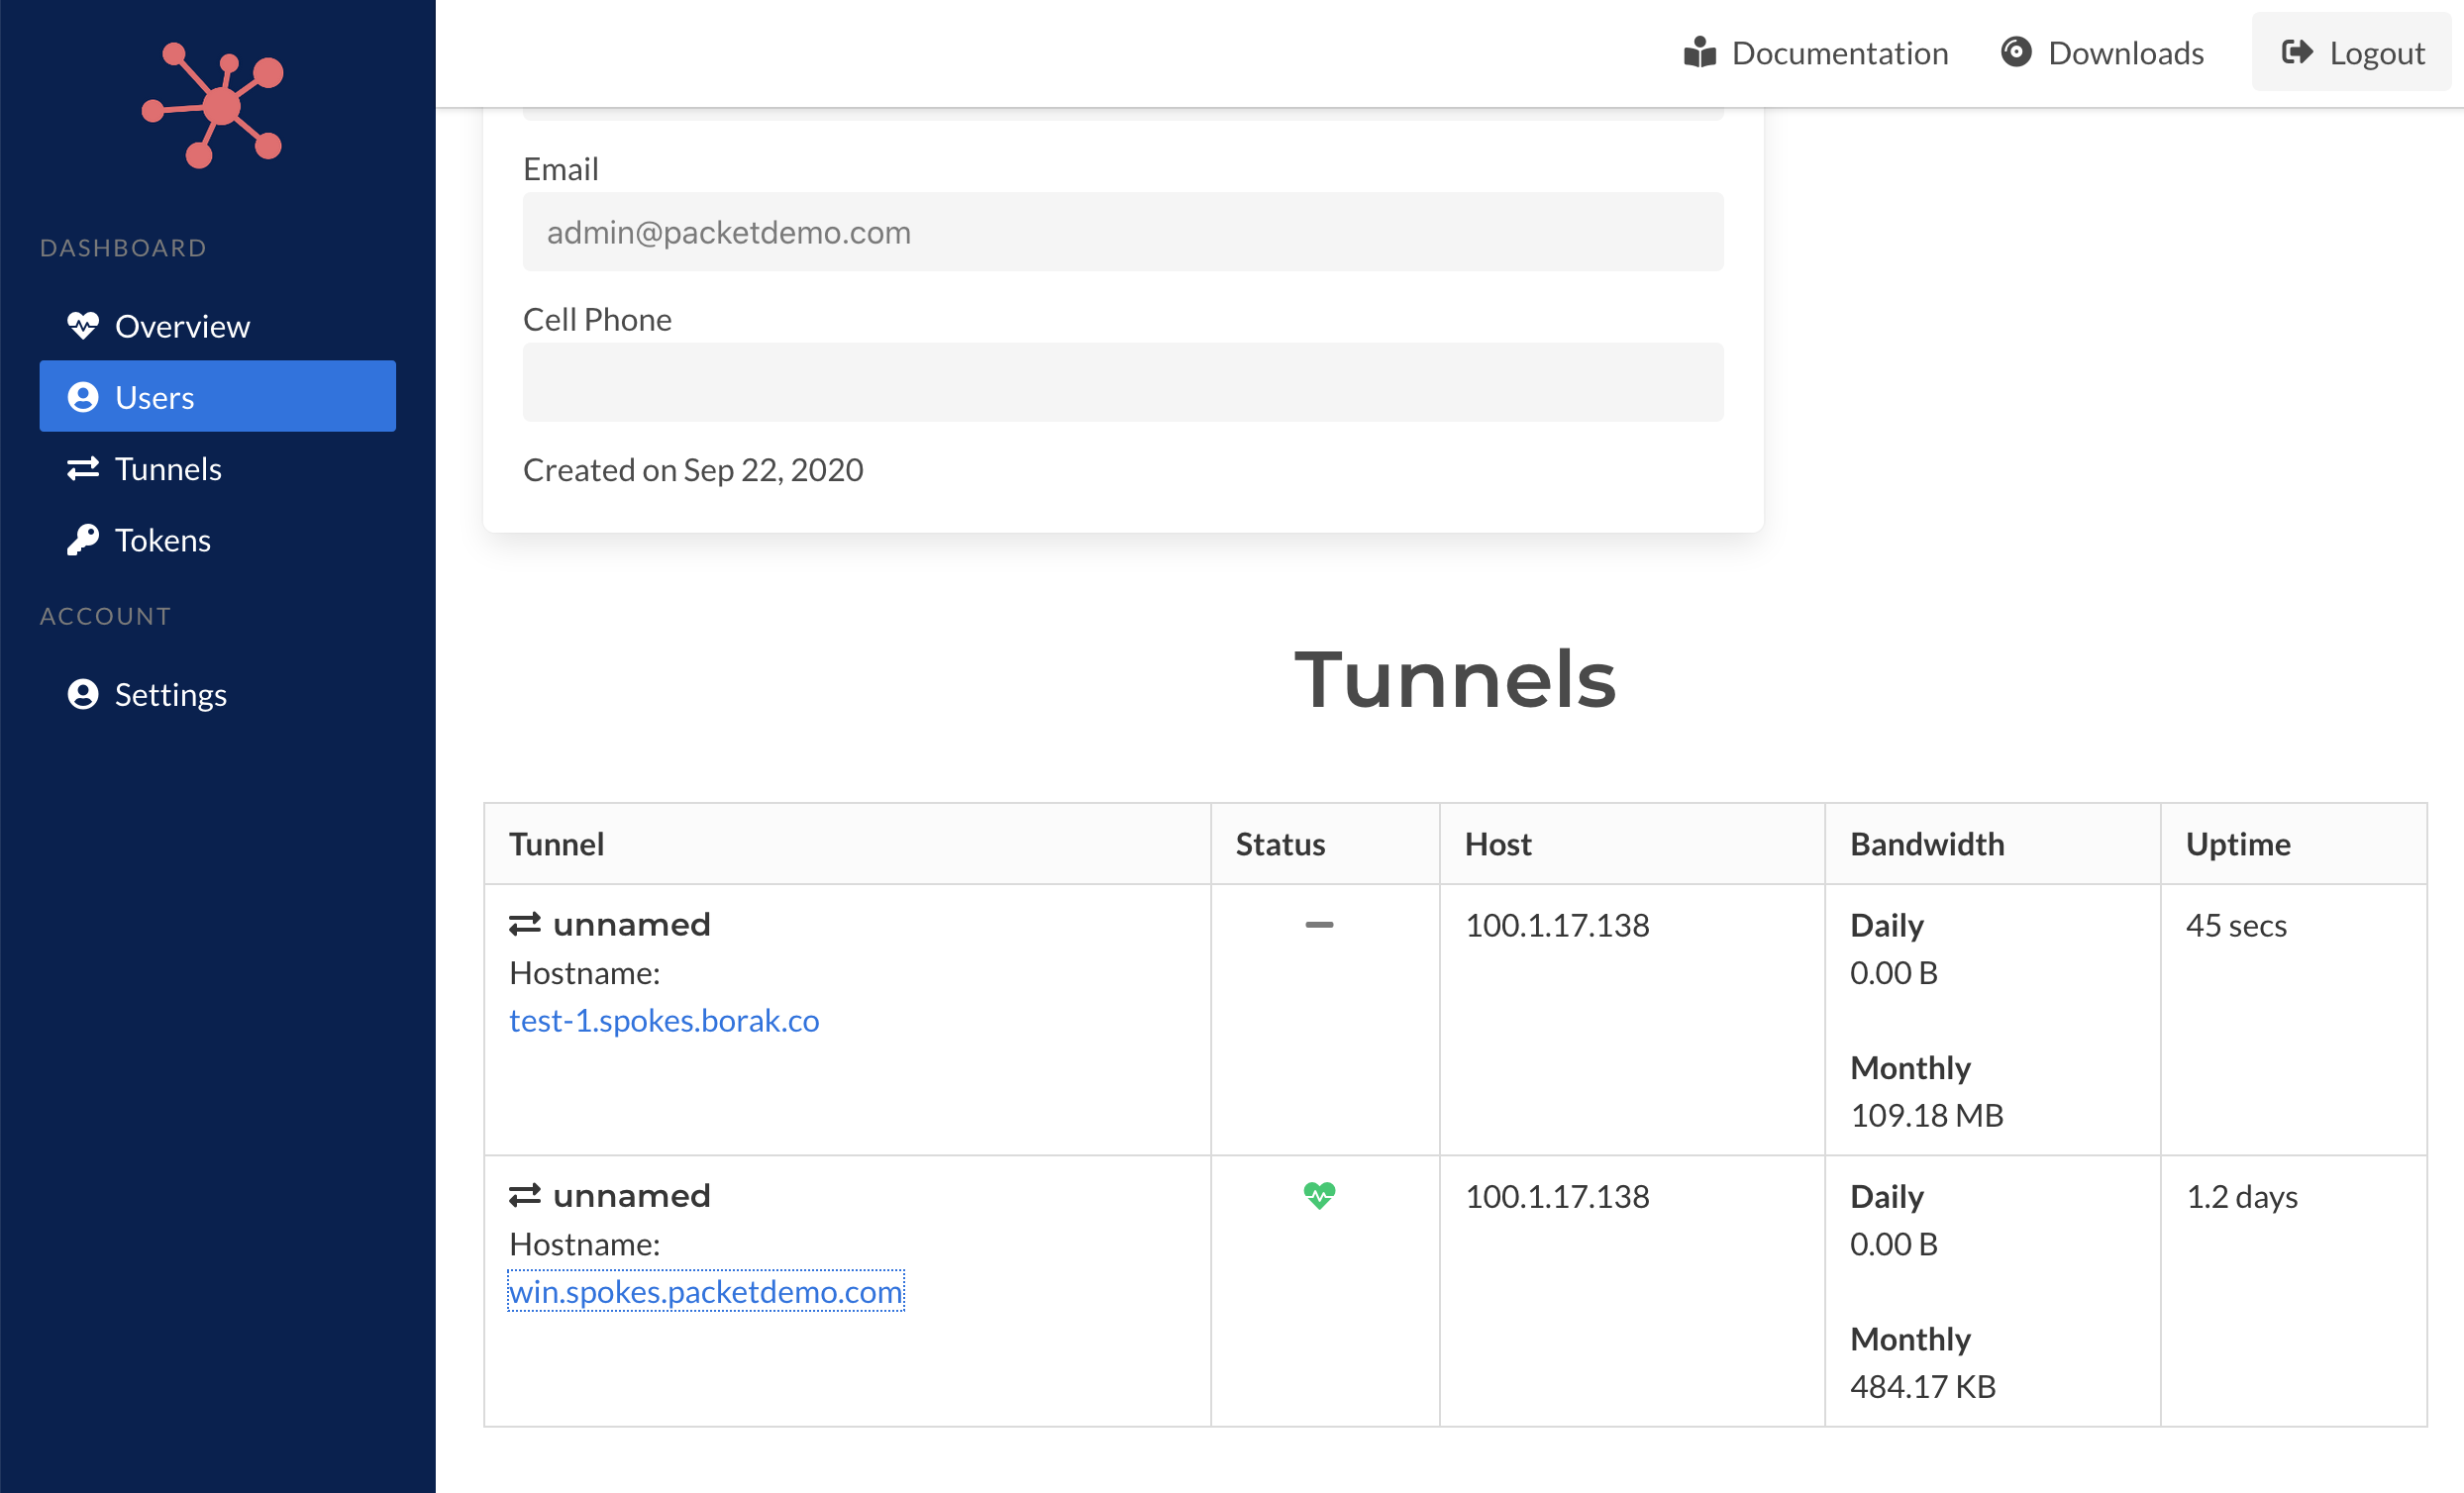
Tunnels
The main tunnels page will list all of the active tunnels across all of the users in the system. It will provide some useful information such as whether it's online, the IP address of the host running the tunnel and bandwidth statistics.
Clicking on the hostname of the tunnel take you to a page with more details on the tunnel.
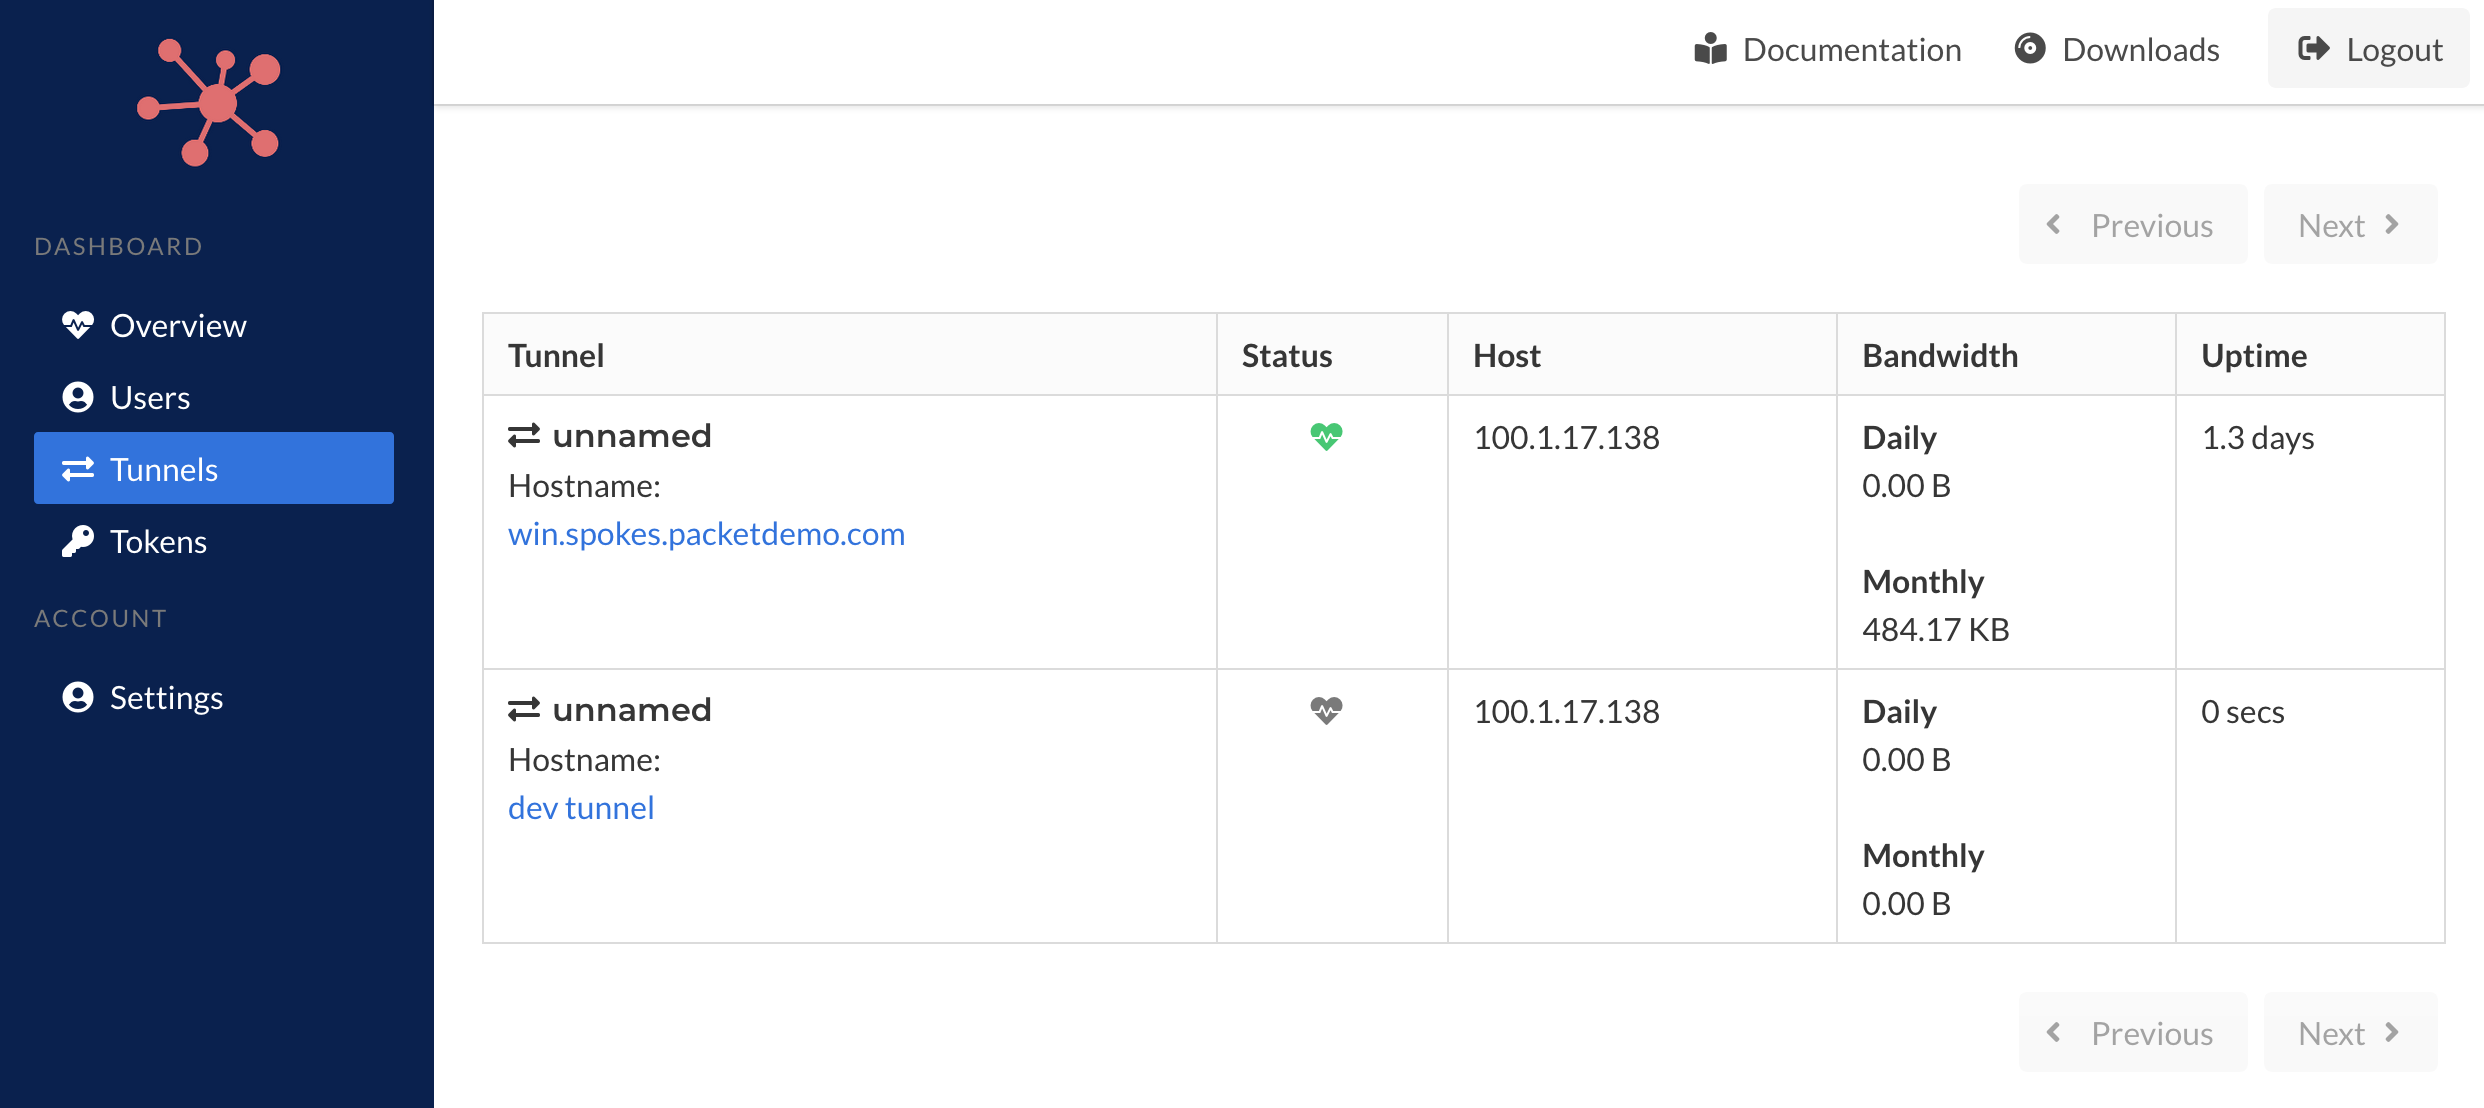
You can browse tunnels per user as well by visiting the Users section and clicking on any of the users listed there. You will be able to browse the list of tunnels associated to the user.
There are two types of users, administrative and "tunnel users". Users are created when tunnels are configured. They can be grouped using the --id with the pktriot unmanaged configure command such that if you use a convention such as: customer, region, deployment, admin, etc... you can "group" tunnels to a single which may make monitoring and managing them easier.
A tunnel require keys to identifying and authenticating themselves and keys are associated to users in Spokes. Instead of creating a separate user for each tunnel that is configured (automatically or manually) you can use the --id flag and your own conventions to group and organize them.
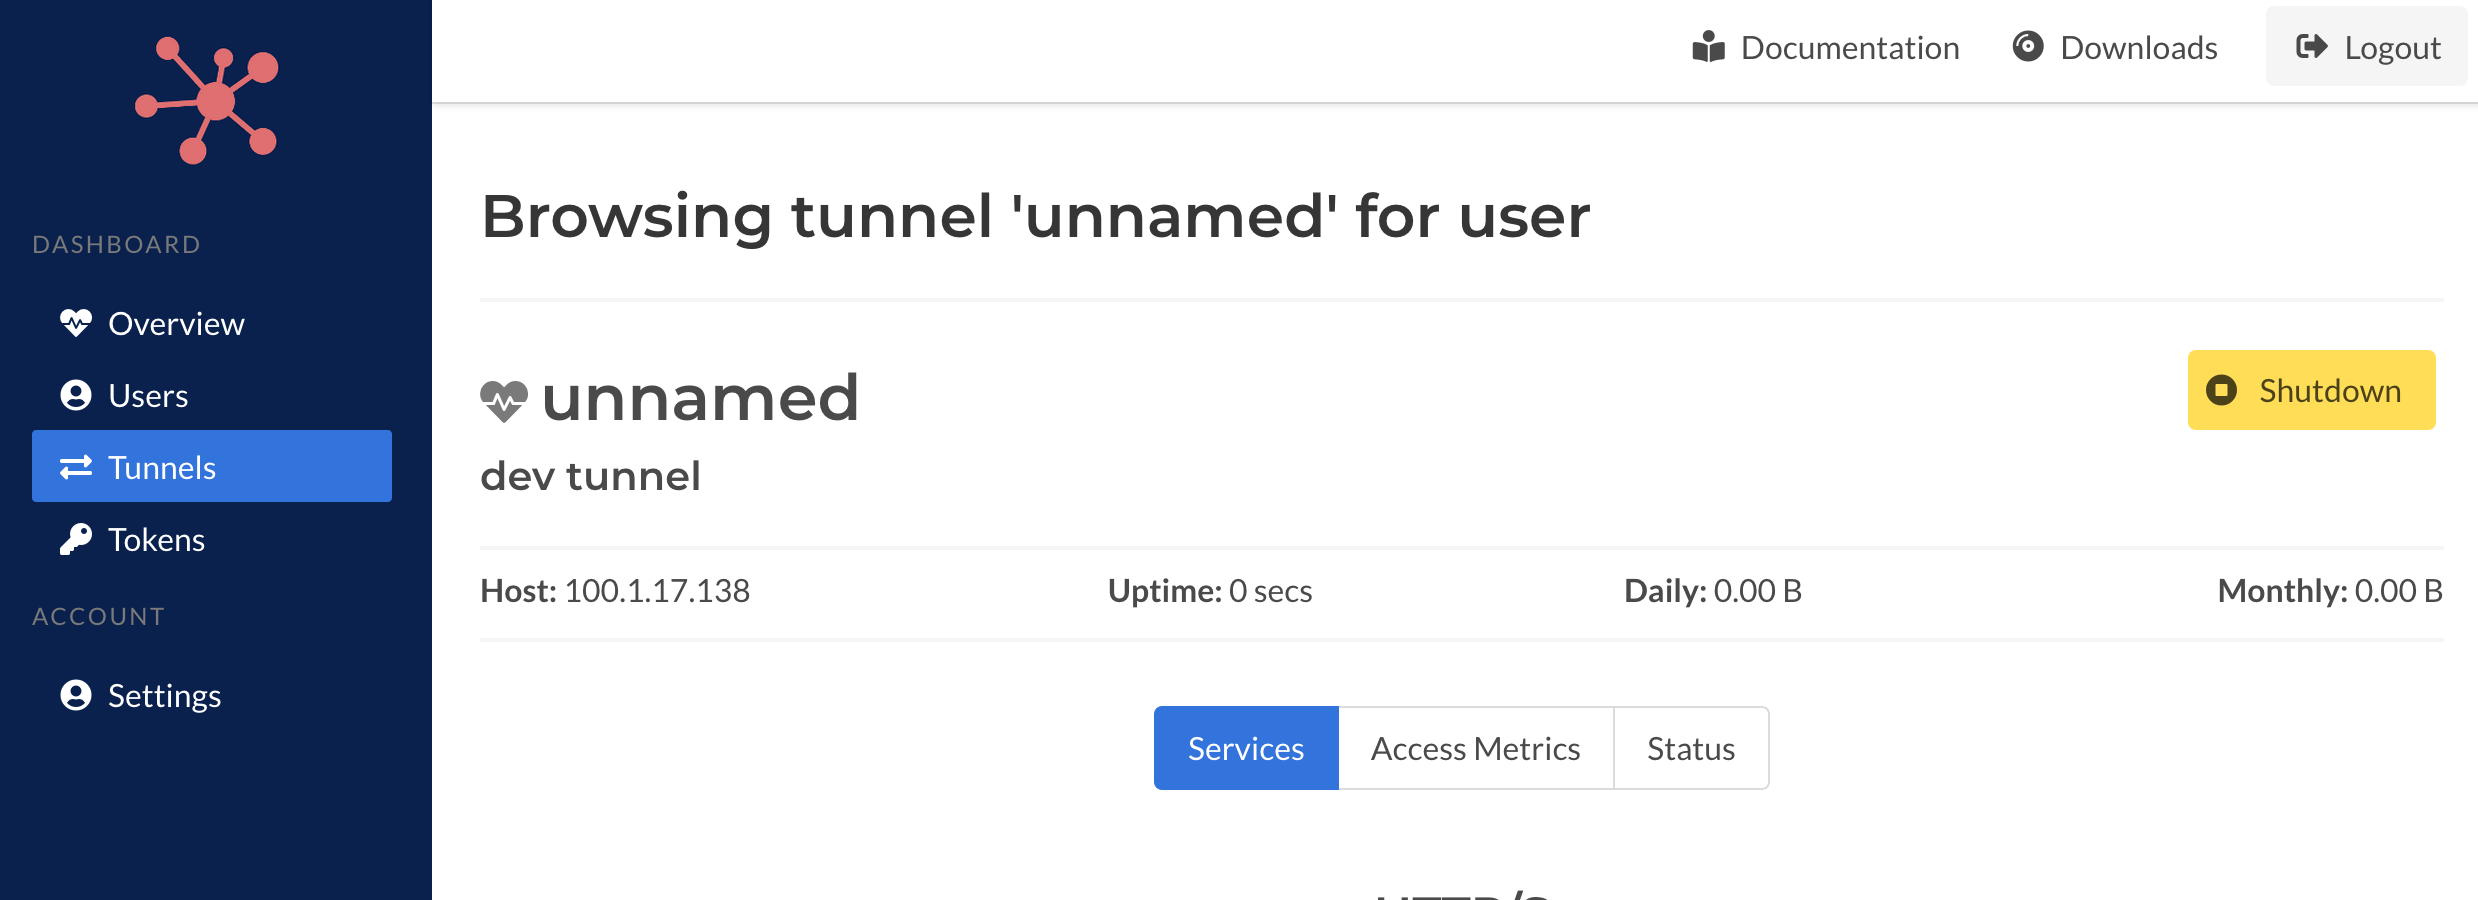
Tunnel Details
The details page shows the existing or past set of rules; depends if the tunnel is online or not. In addition you browse the connection metrics for the tunnel. Each successful connection to the tunnel is record once the TCP session has been closed.
A successful connection means that a client connection was made to the Spokes server, inspected to determine its destination, e.g. HTTP Host header field, TLS-SNI server name, or port number, and then routed to the correct tunnel. If no tunnel is matched to the traffic flow it is closed and the event is not recorded.
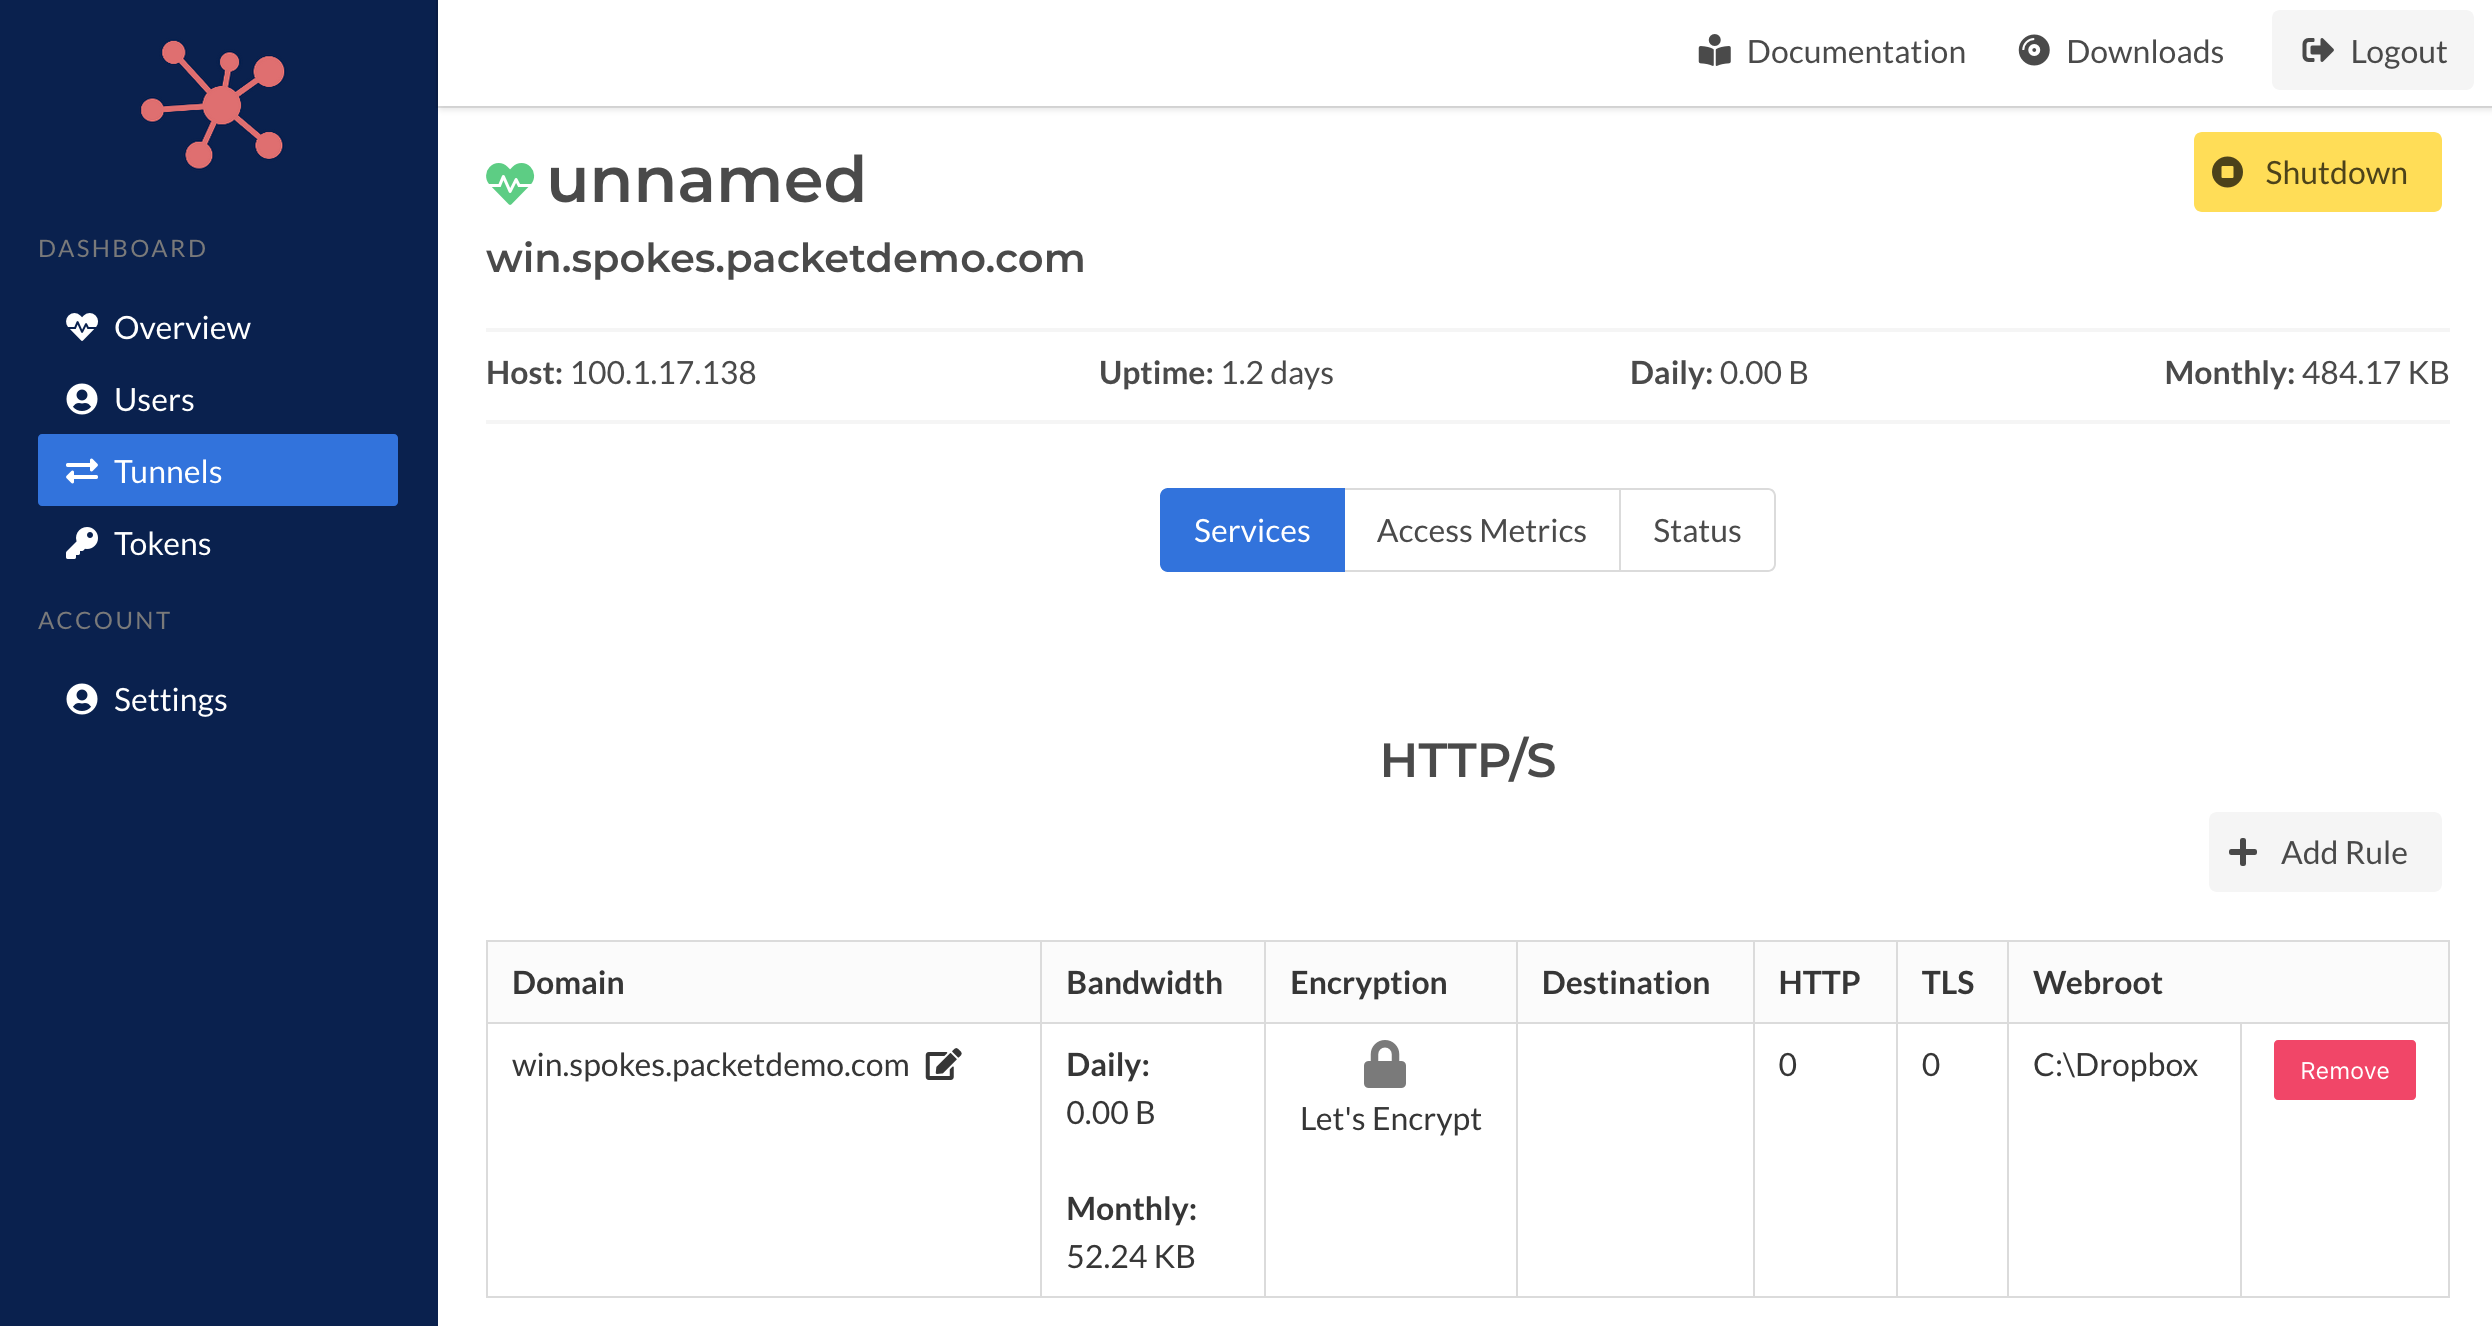
When a tunnel is online the details page will include the currently HTTP/S and TCP traffic rule configuration. When the tunnel is offline it will present the cached rules from the last connection.
Each traffic rule will include
Offline
When tunnels connect and request HTTP/S and TCP traffic, those rules will be cached in the database. In addition, any ports that are currently allocated will also be stored in the database. When tunnels are offline, this information will be presented. Past bandwidth statistics for each rule are be displayed as well.
When tunnels are online there will be more information present such as the specific encryption (TLS) options, destination (host:port, webroot, etc..) and other details. This information is not stored in the database since it's information that is stored on the client side. The client is treated as the principal source for traffic relay rules.
Access information and connection metrics will be availble when a tunnel is offline.
Shutdown
A tunnel can be shutdown from this page. Once a tunnel is shutdown it can't be reversed. A tunnel isn't required to be connected the Spokes server (online) for this operation to be performed. It will set the authentication key for the tunnel inactive so that it can no longer be used by the tunnel (client) to identify and authenticate itself.
In addition it will set the state of the tunnel to shutdown and will no longer be visible in the system-wide Tunnels page or when you select a specific user and browse the tunnels associated to that user.
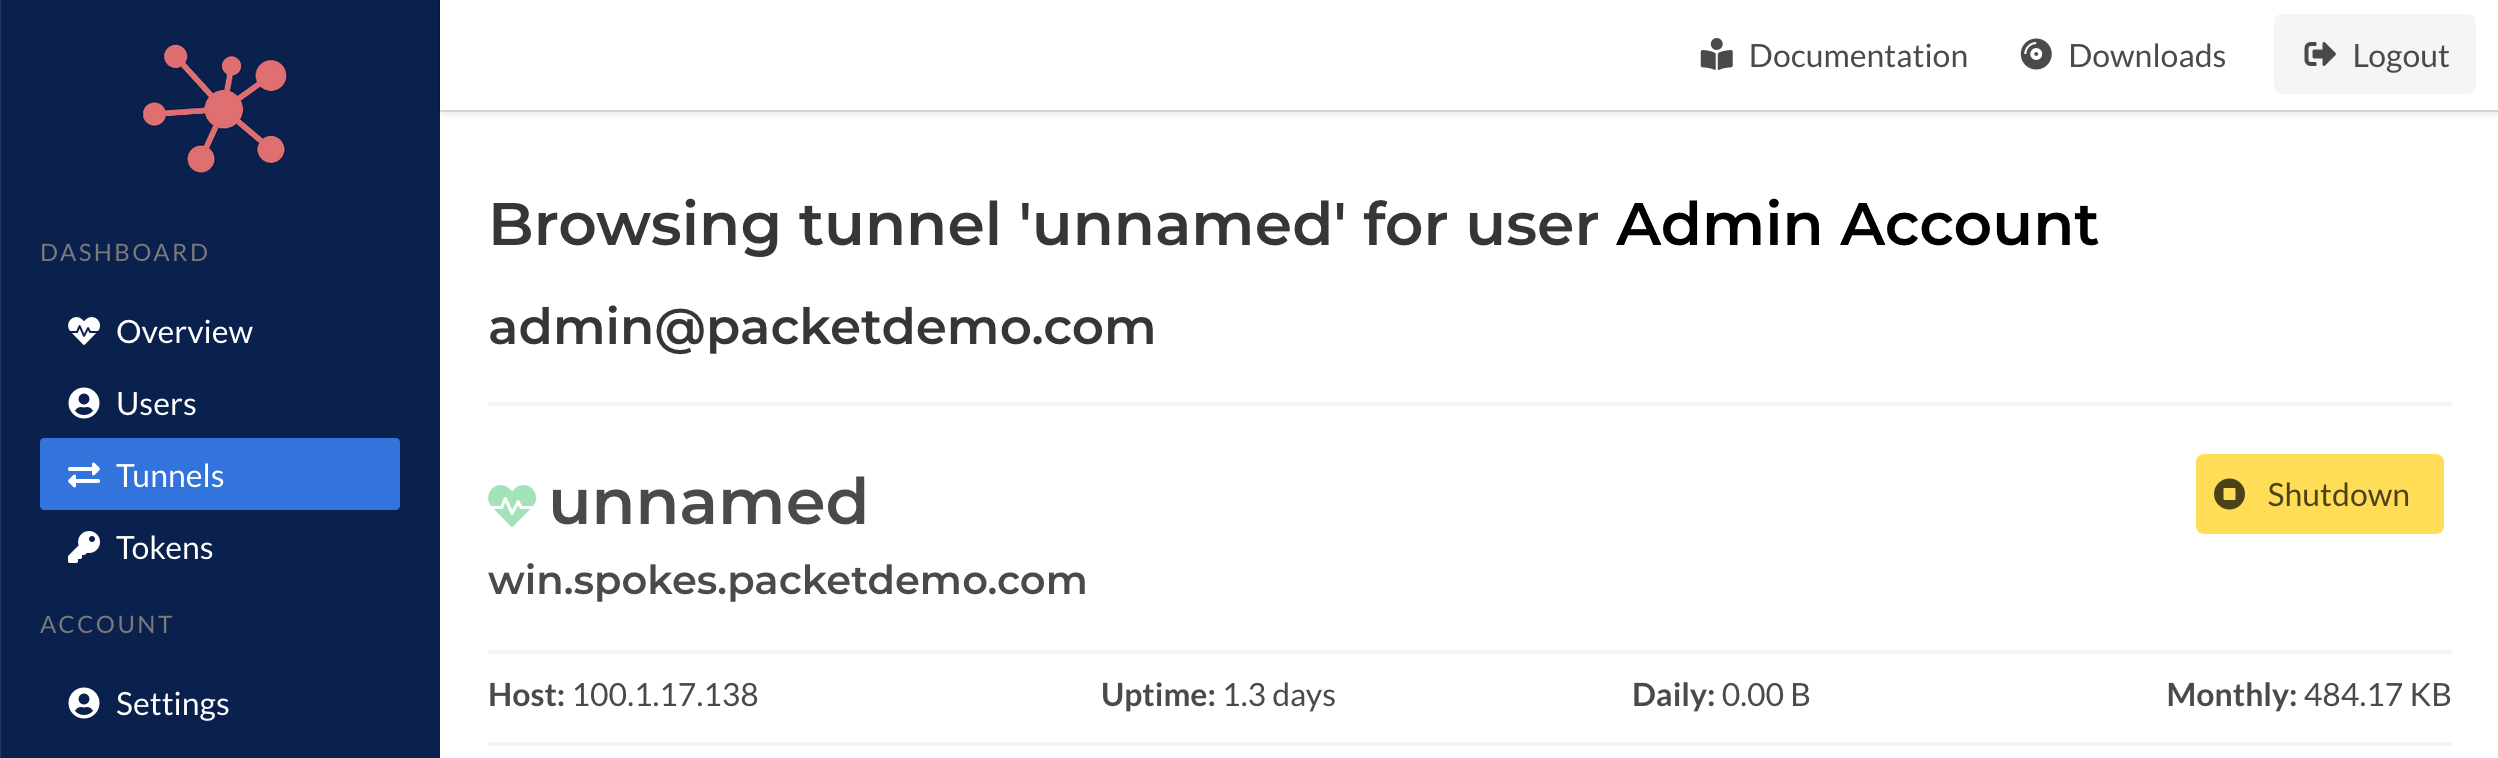
Prior to shutting down you will need to confirm the action. Tunnels can't be recovered after they've been shut down.
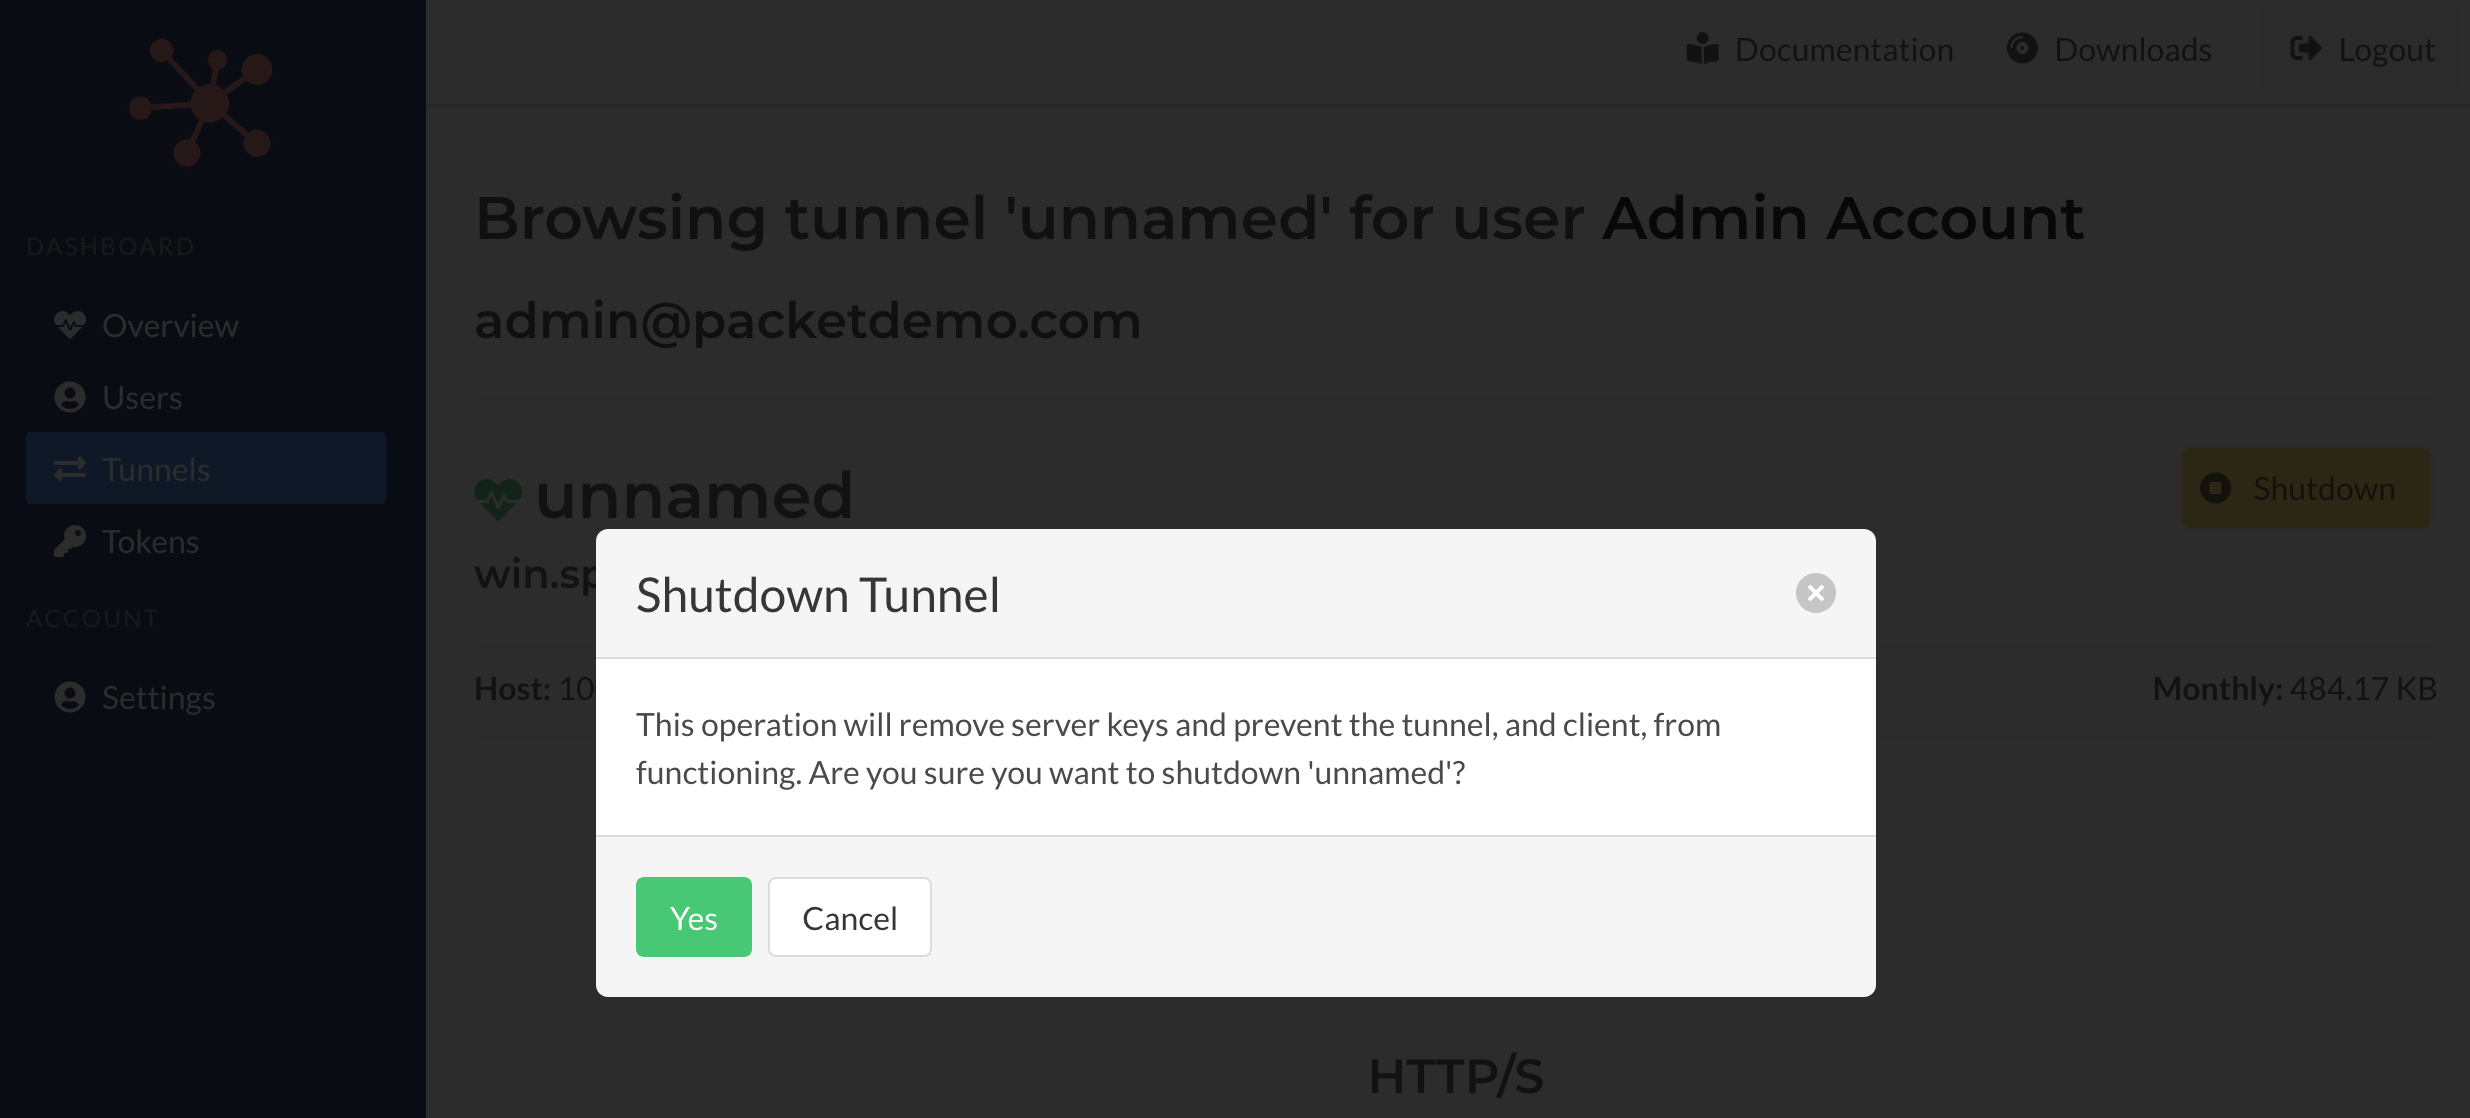
Once the operation is complete you will be redirect to this tunnel, if any errors occur a page will be presented to indicate the failure.
Remote Tunnel Management
When a tunnel is online will stream it's configuration to the Spokes server. This will provide the traffic rules and also the upstream proxying/relaying information that is used by the client to relay incoming traffic to the configured destinations, e.g. 127.0.0.1, http:8080, tls:8443, or a local path for a static web root.
This information is combined with past bandwidth statistics collected and presented.
You can edit existing HTTP/S and TCP rules by clicking on the edit icon next to the name of each rule.
You can add new rules for HTTP/S and TCP and also remove them. These changes will be made in real-time and will effect the client and traffic that is routed through Spokes. Additions, edits or removal are sent to the client which utilizes it's normal mechanisms (tunnel API) to update its local configuration and then make the change requests to the Spokes server.
HTTP/S Traffic
New traffic rules can be created and sent to the client. Existing rules can also be edited as well. Validation for the criteria for the rule is performed on the Spokes server before it's sent to the client. Any errors will be presented on submission.
Below is example of the form presented when you're adding a new HTTP/S rule. It provides options for a destination server, HTTP (plain-text) port, TLS (for TLS transparent proxying) and local path on the client that the client can serve static assets (files) from.
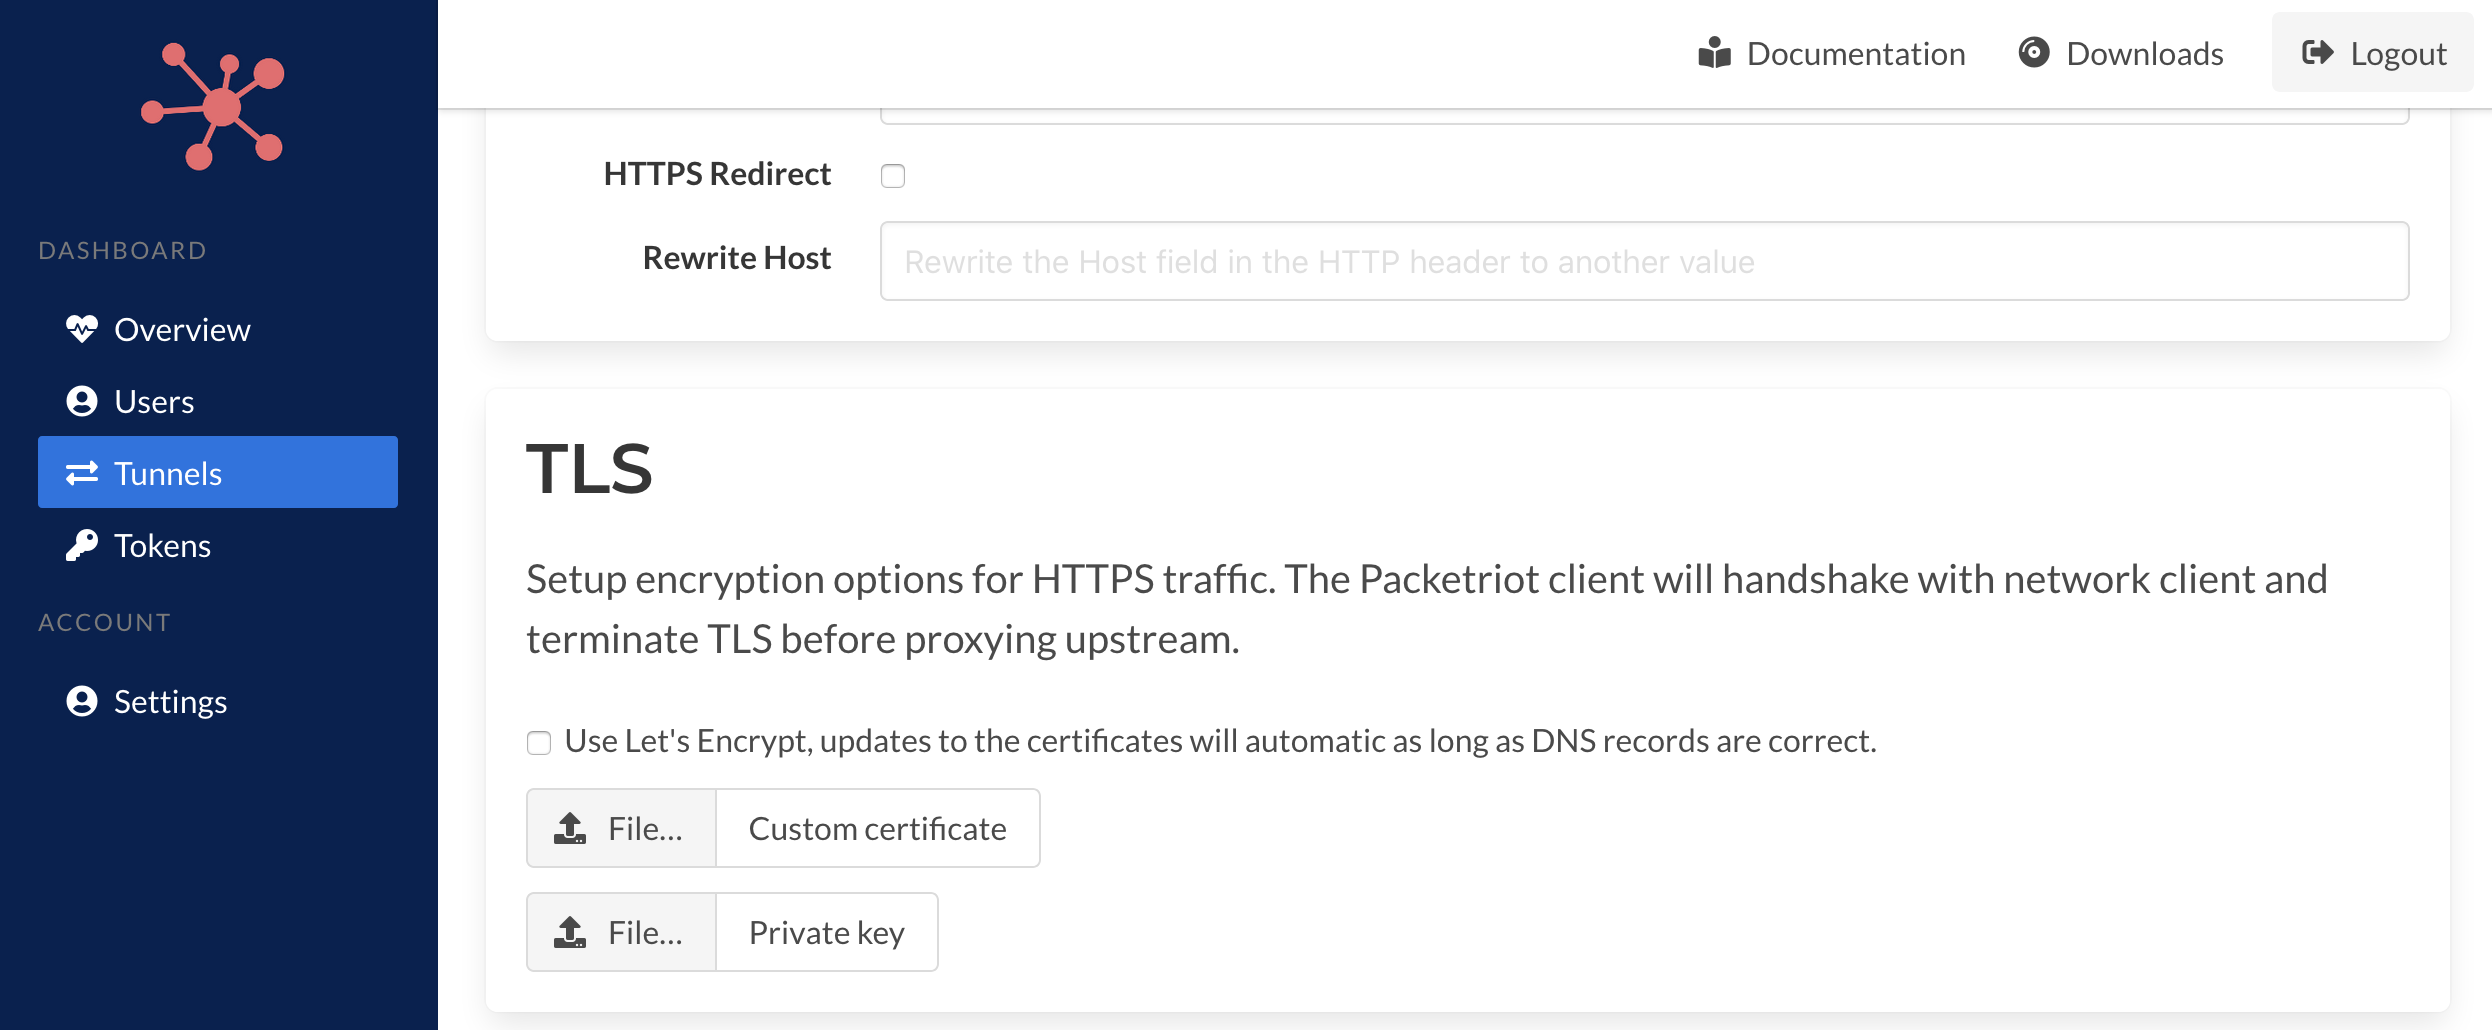
In addition, you can also set secure redirection options, e.g. HTTP -> HTTPS, and also set a Host header value that can be written to the request before it's passed its destination.
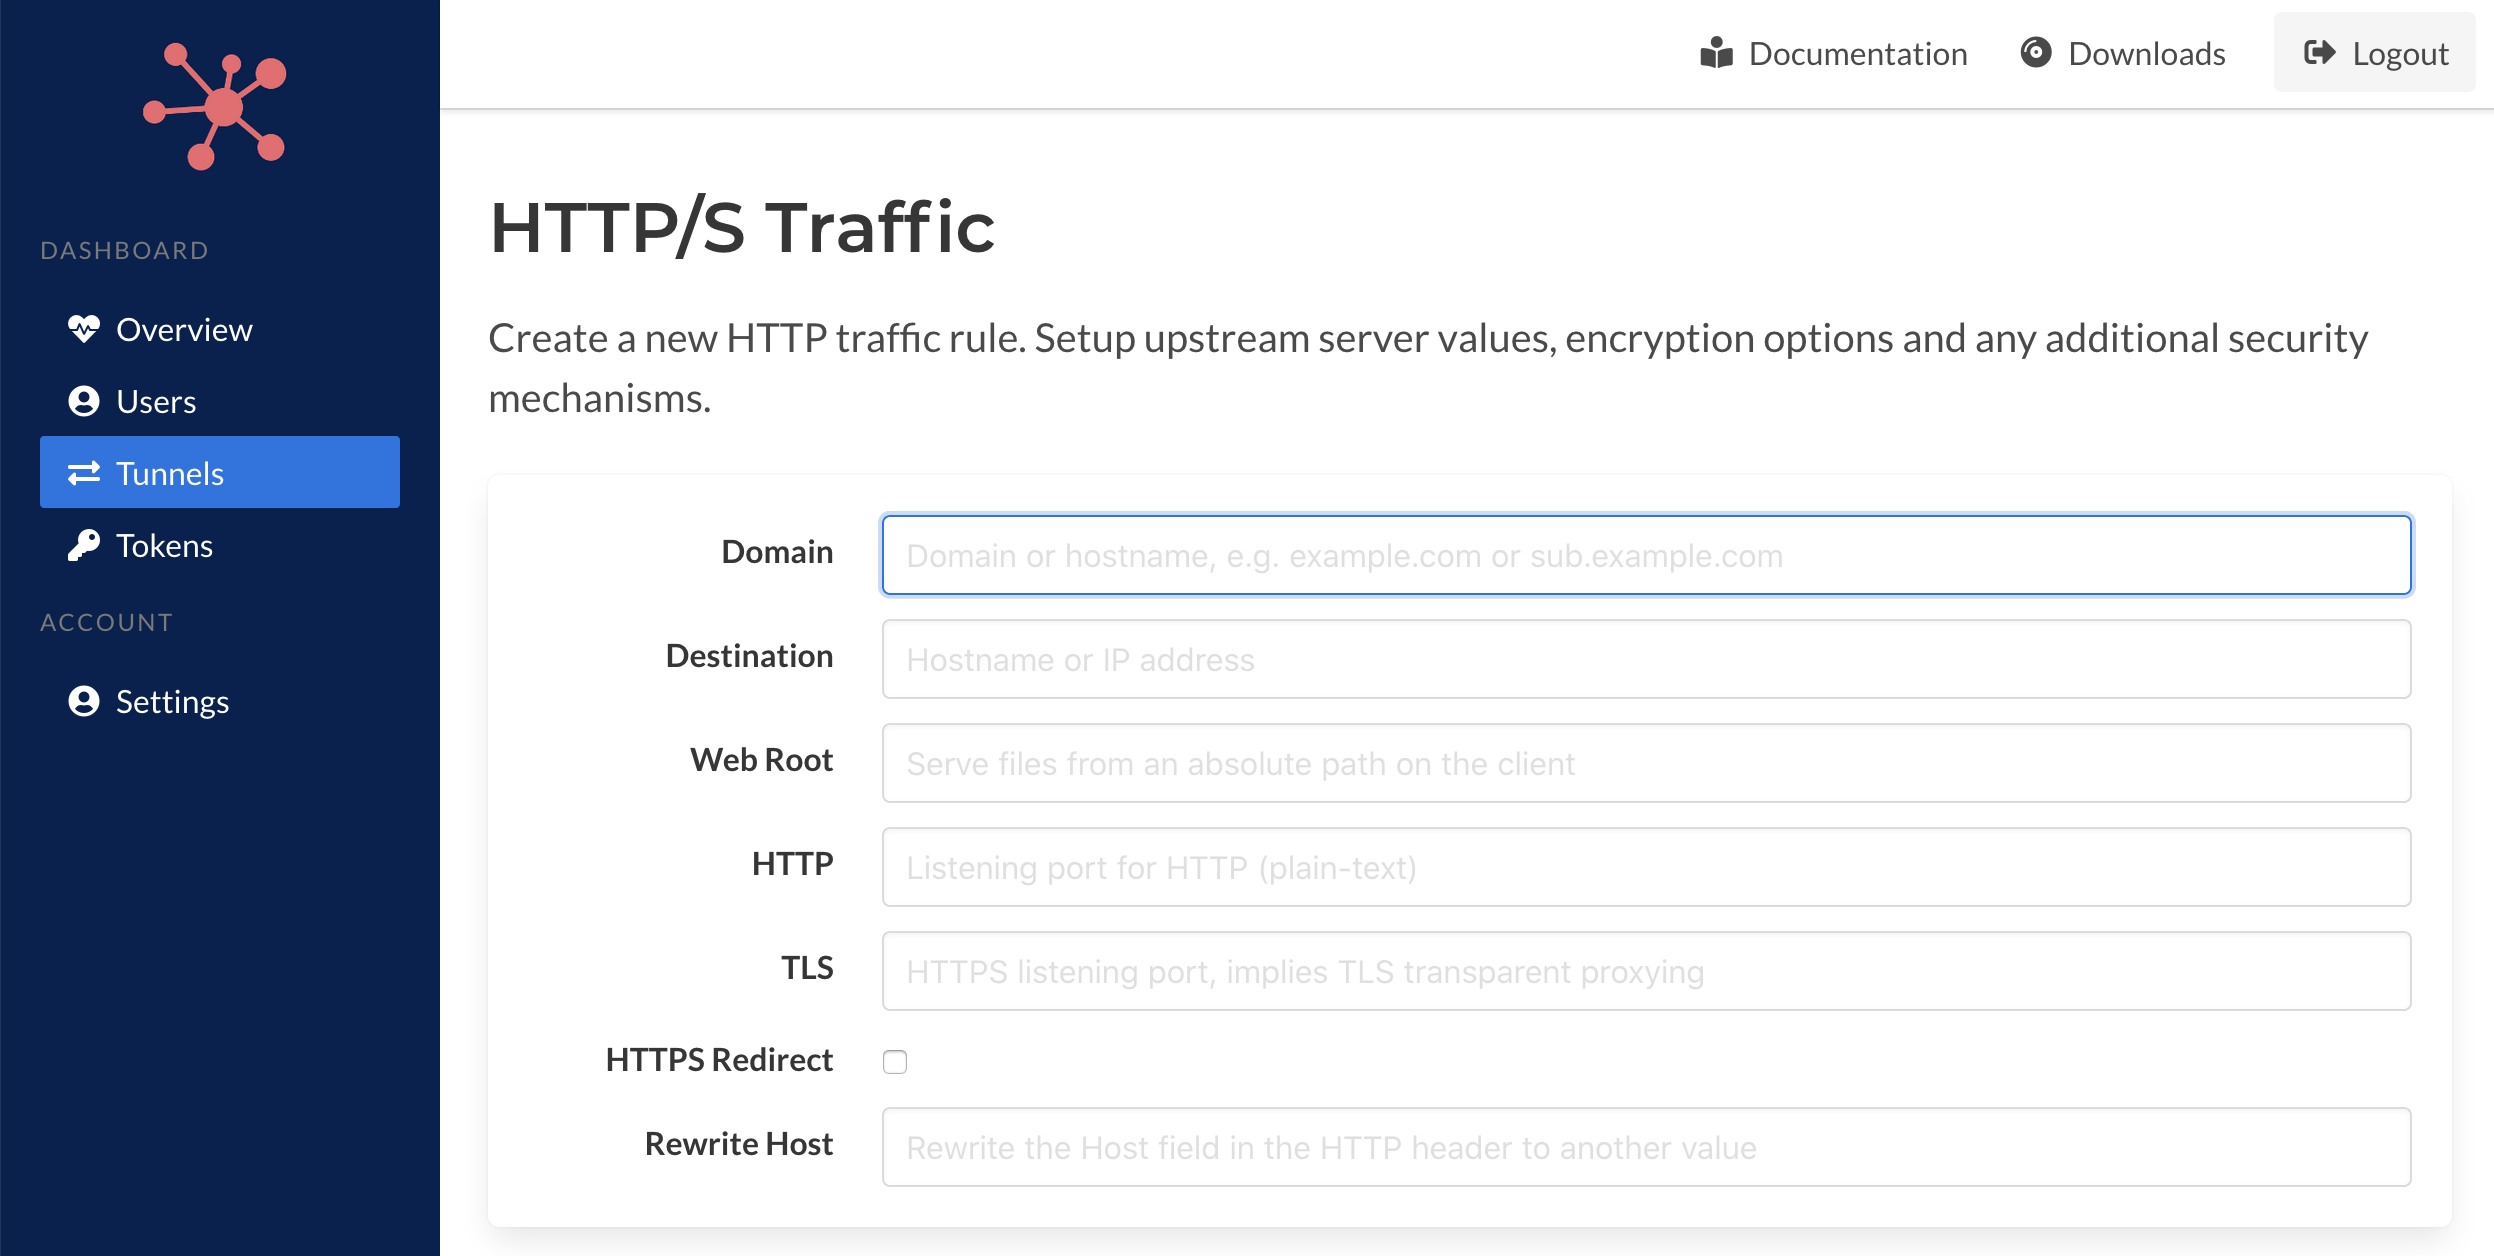
Options for setting up TLS can be selected. Tunnels can use Let's Encrypt or you can upload custom certificates.
Let's Encrypt integration is built into the Packetriot client and can be used for generating certificates and are automatically kept up-to-date. You will need to correctly setup DNS prior to add the rule.
You can recover from errors but the client will continually attempt to handshack with Let's Encrypt which may trigger throttling by their servers. It's best practice to set up DNS first and test it with a tool like dig. This way you're certificates can be created in the initial request.
Custom certificates can be used as well. You will need to select a fullchain CA certificate along with the corresponding private key. They will be uploaded to the Spokes server which will send them to the Packetriot client.
You can only use Let's Encrypt of customer certificates, not both.
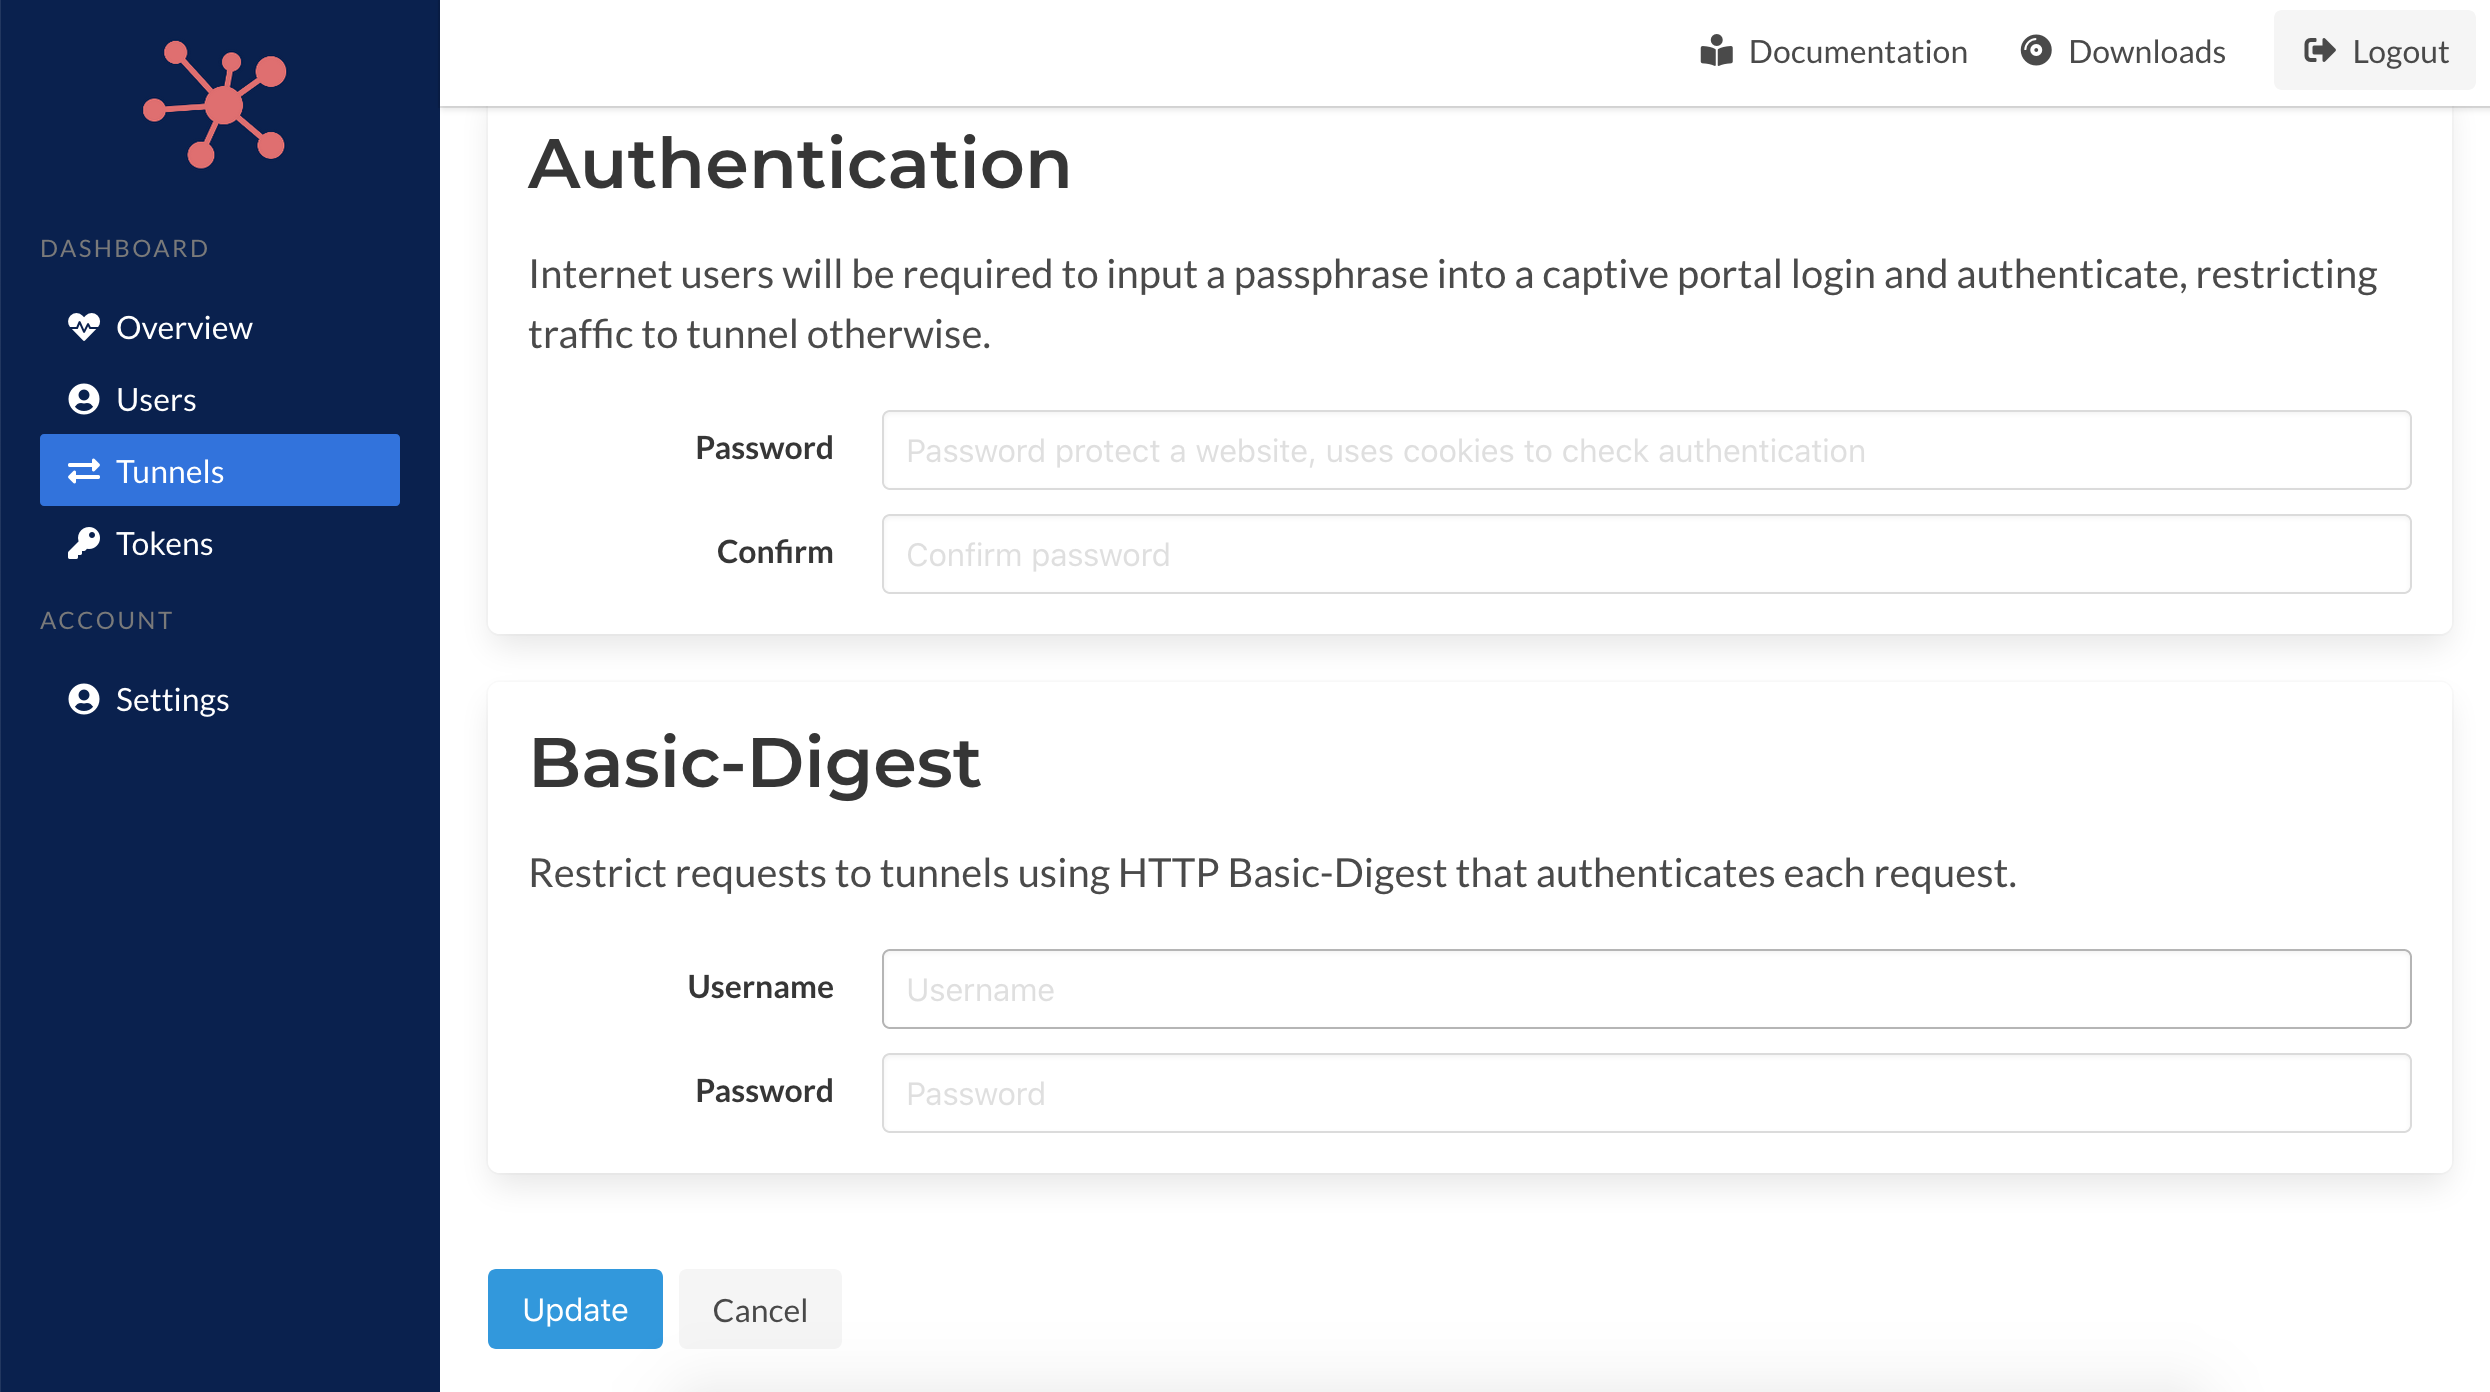
Finally, you can setup session-based (cookie) password protection to websites or use HTTP Basic-digest which will authenticate each request before passing it to the destination server.
You can refer to the Packetriot client for more details on these options. Each option provide in this form has an identical flag or options in the client program using the pktriot tunnel http add command.
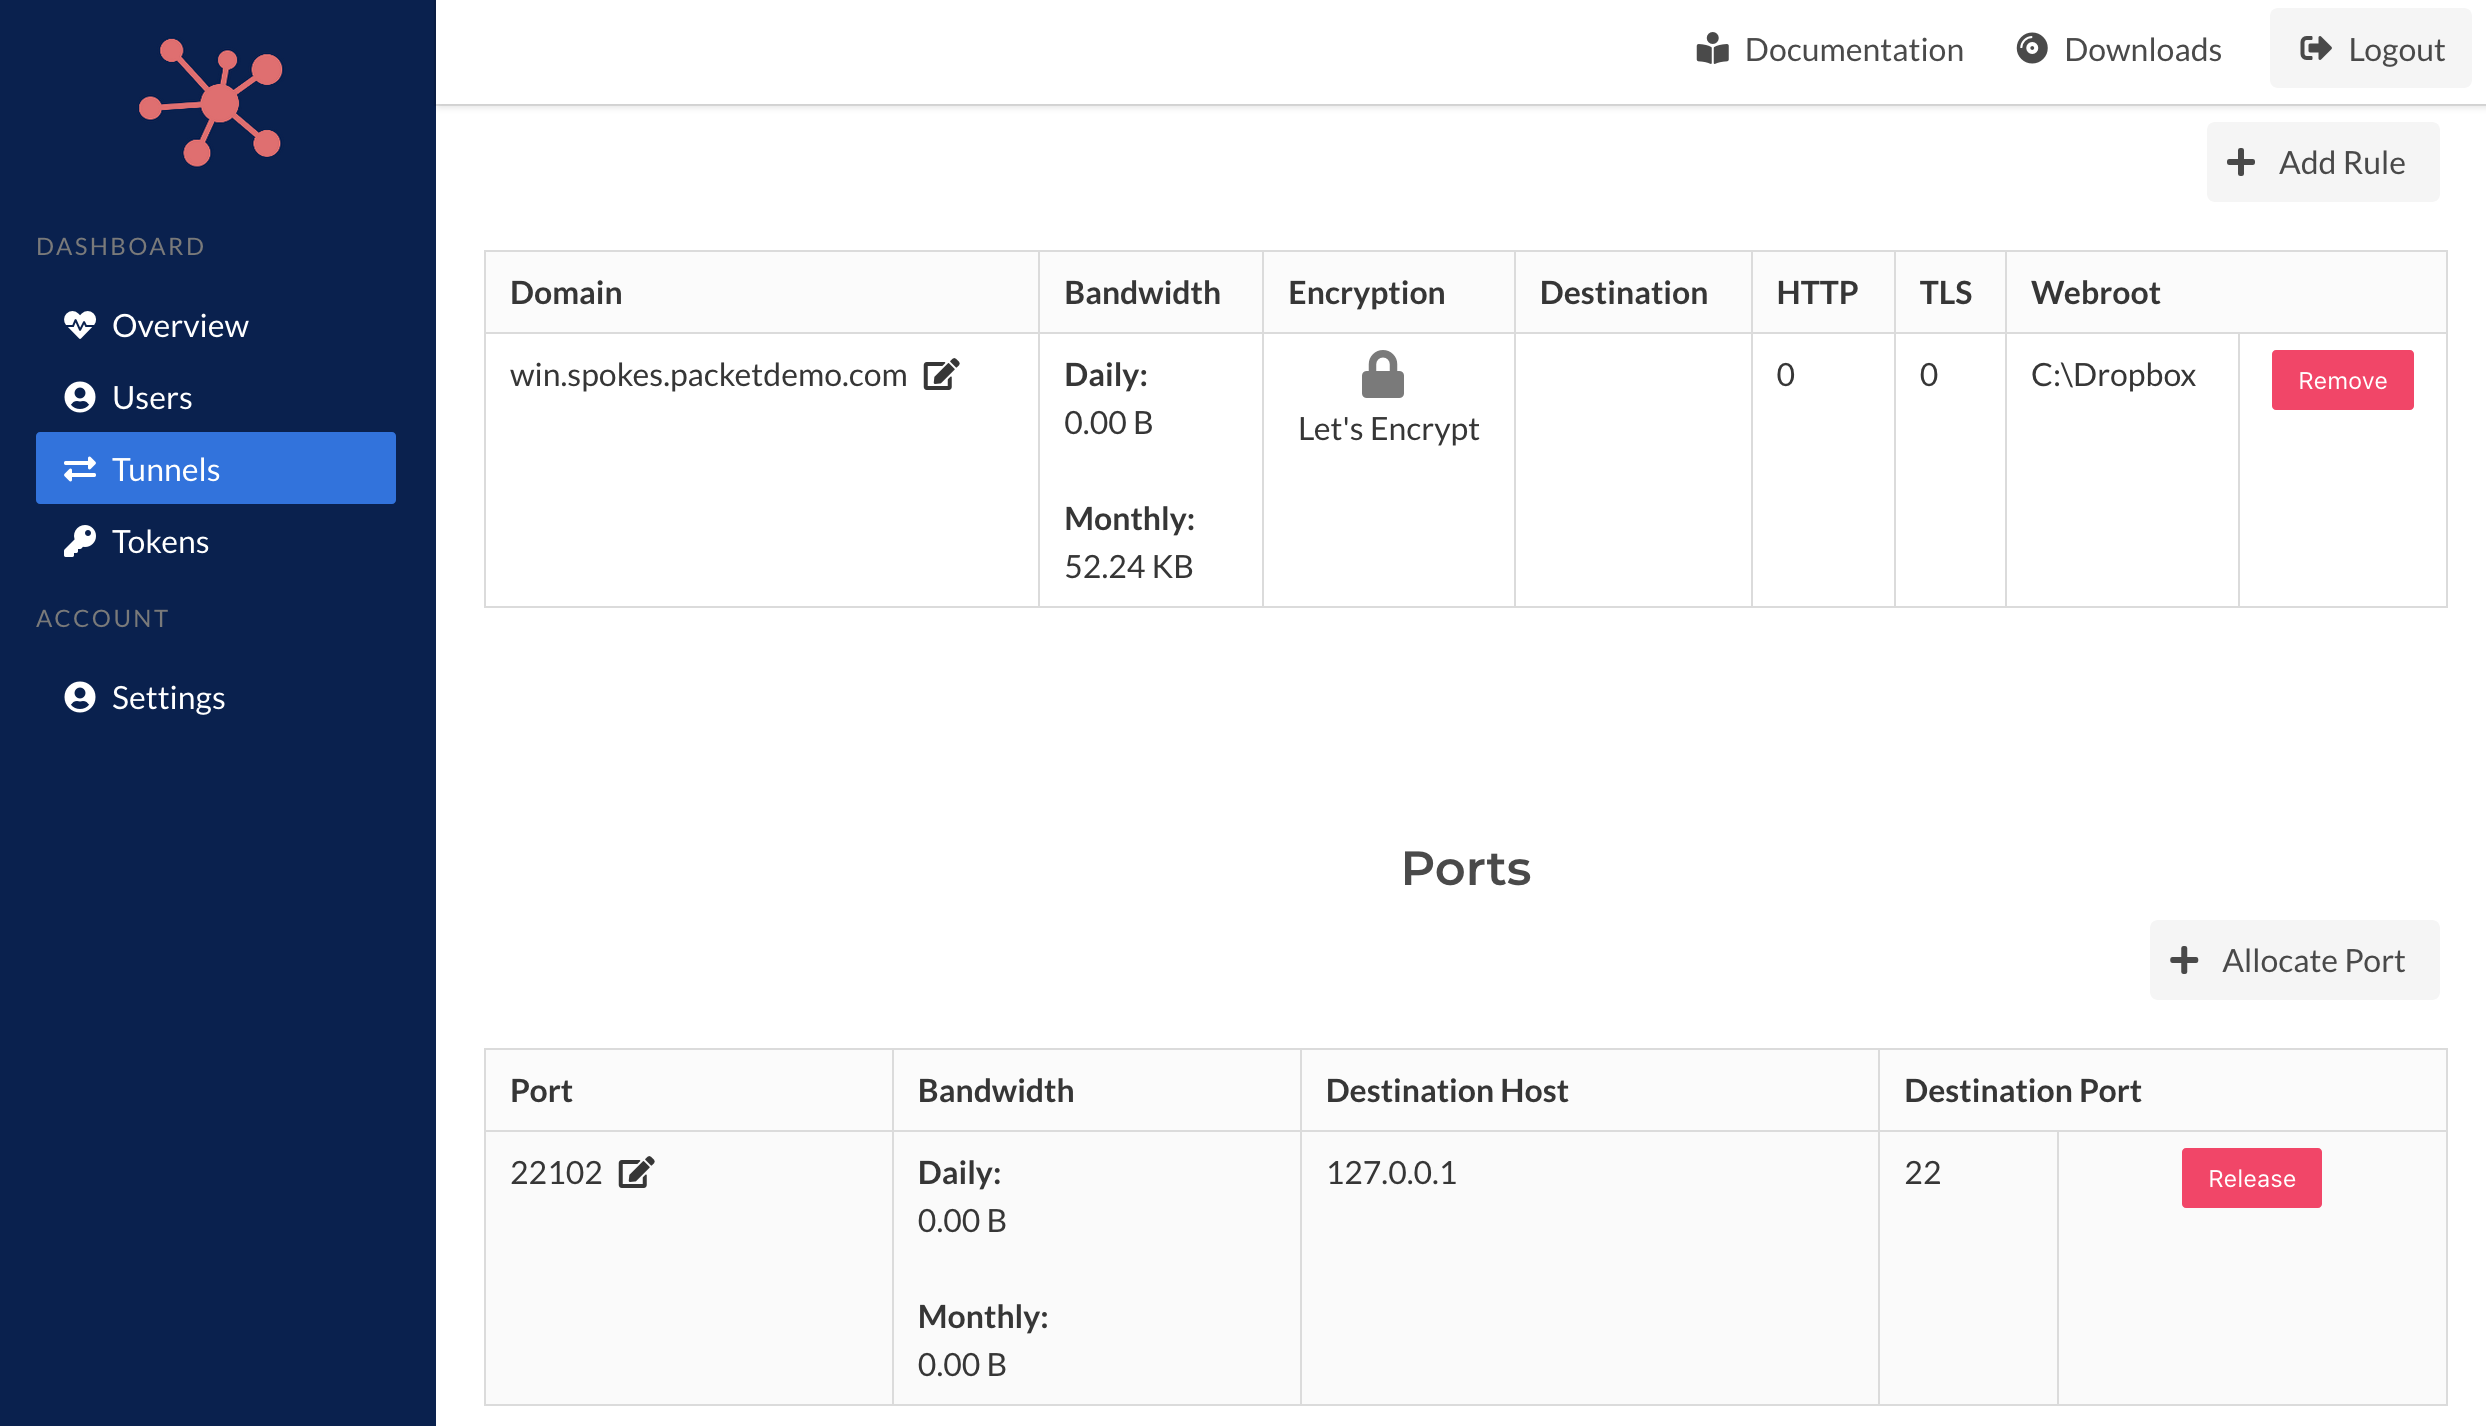
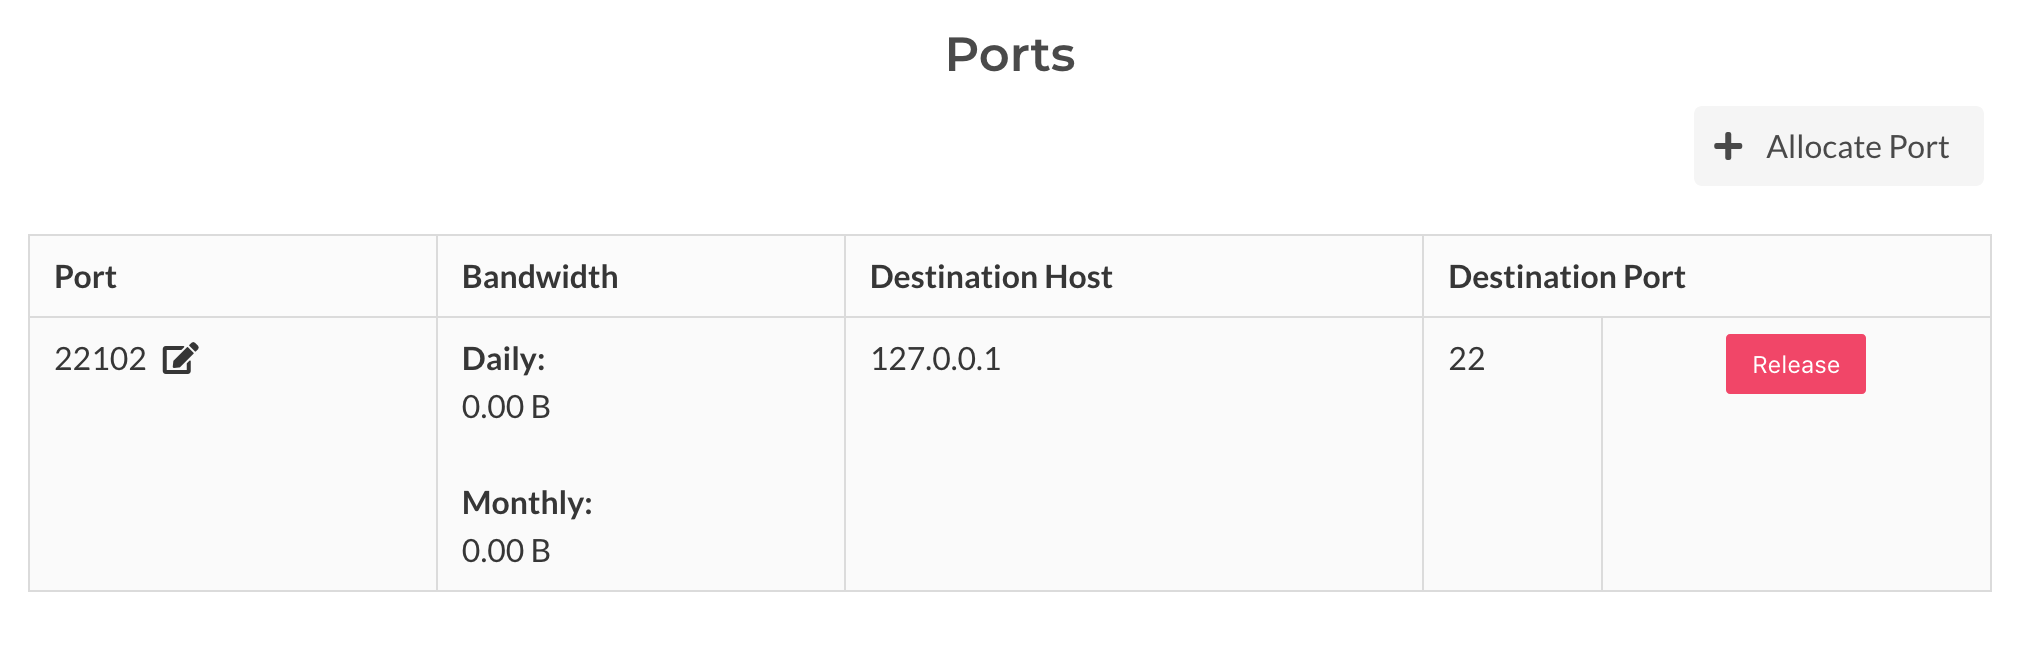
TCP Port Allocation
Generic TCP traffic relays can be established with the Packetriot client and Spokes. It first begins with port allocation. When a tunnel is connect to the server, e.g. it's online, you will be able to allocate a port.
The port allocation request will be sent to the client. The client will make a request to Spokes will which validate the tunnel hasn't exceed the quota of maximum ports for each tunnel. On success a new port will be allocated and will be visible on the page reloading.
TCP Port Traffic
Traffic to TCP ports can be editing by clicking the edit icon next the port number in the tunnels' detail page. It will present a destination address (or hostname) and destination port. The host will need to be accessible to the host running the client.
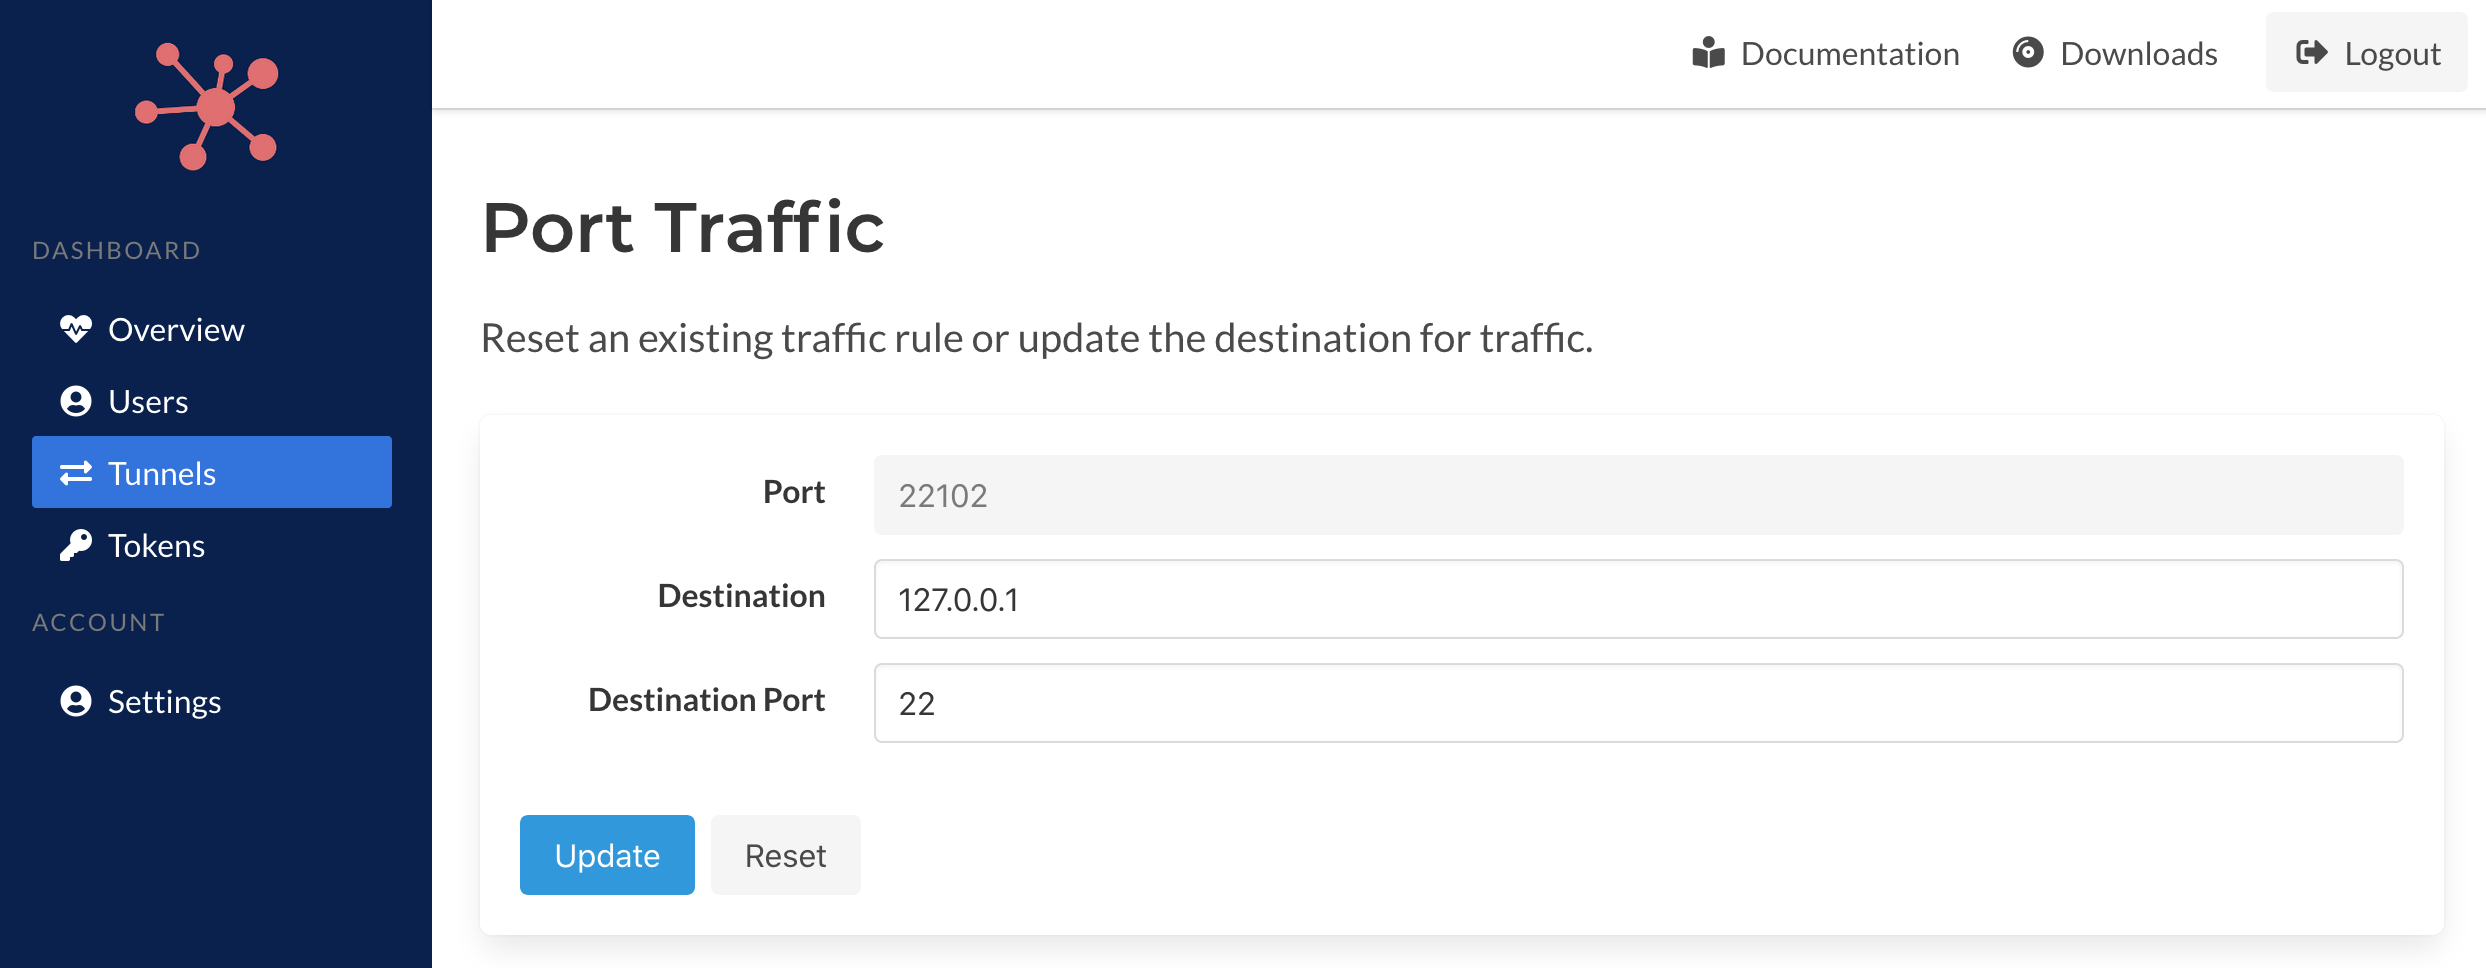
Traffic to a port can be stopped by just resetting the rule which will clear our the destination address/hort and port.
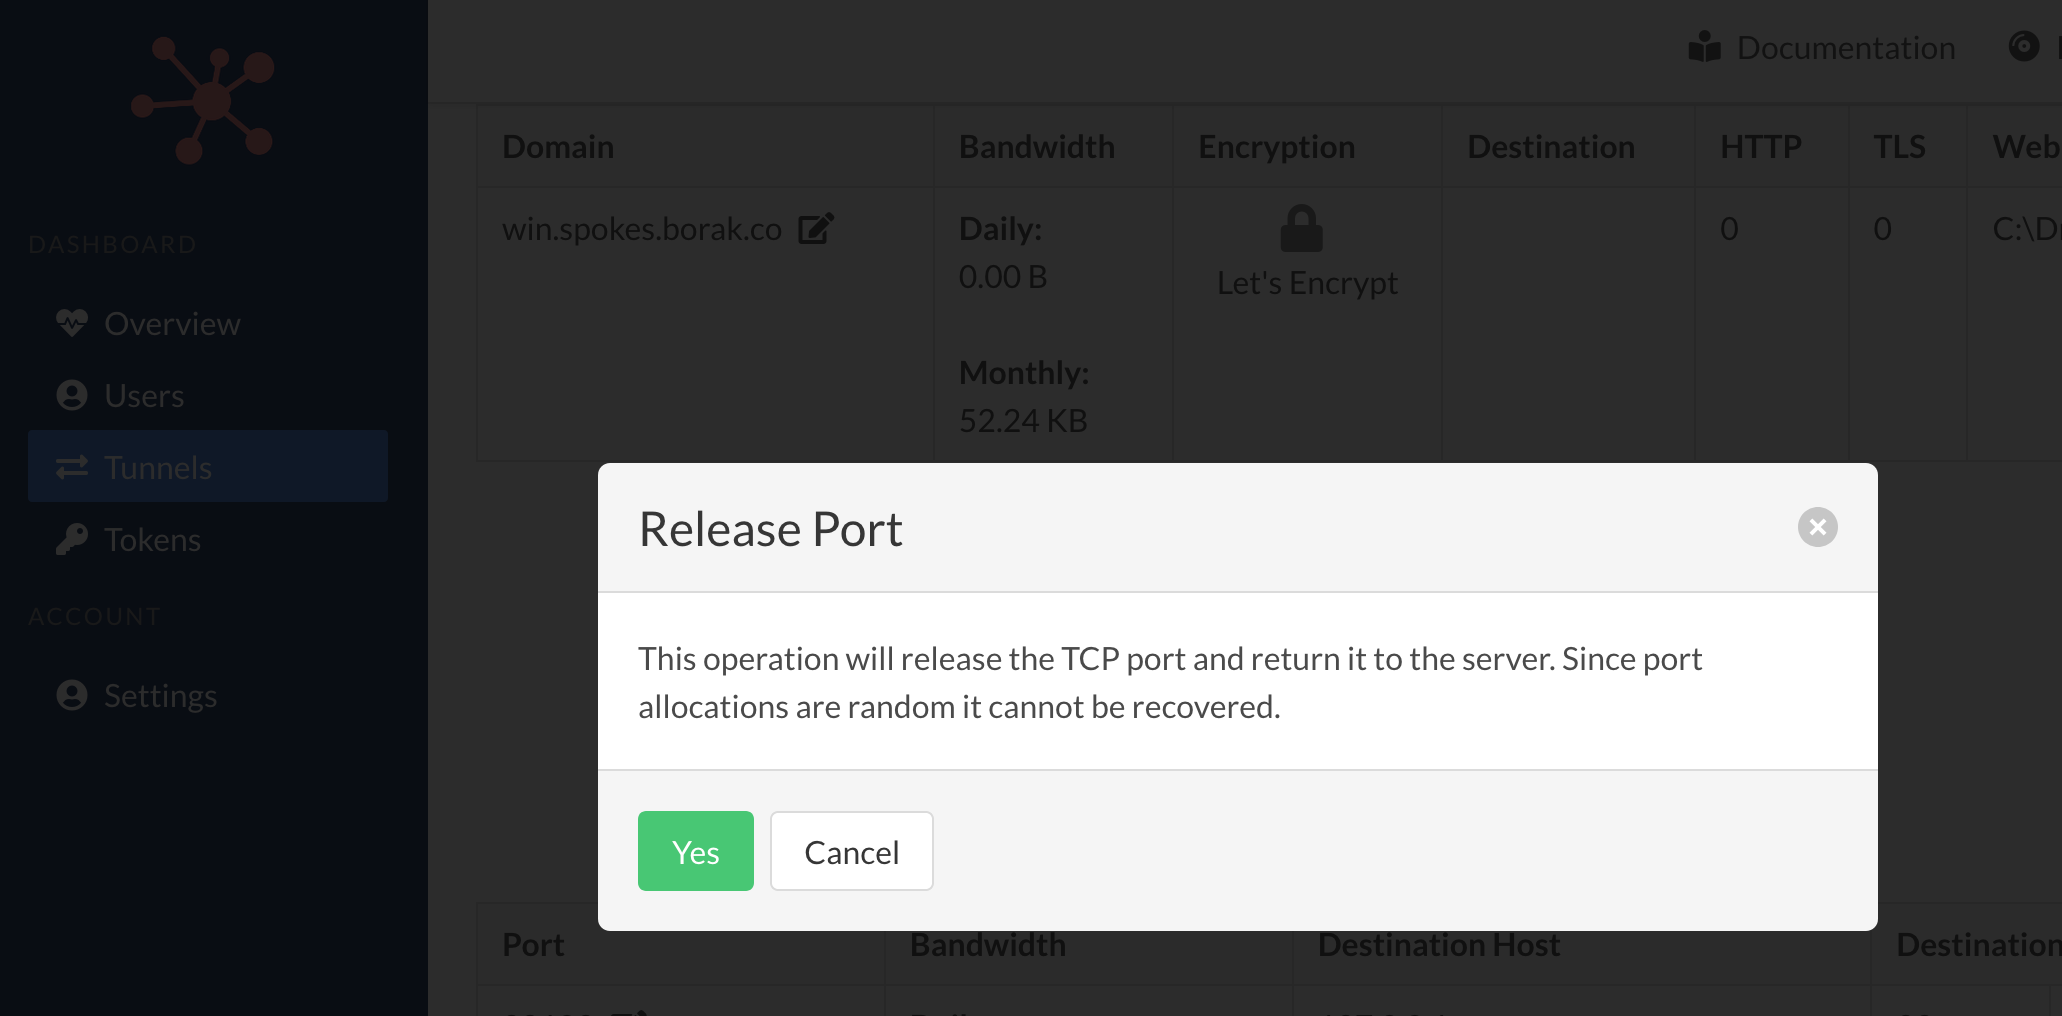
TCP Port Release
A port can be released, e.g. given back, to the Spokes server by clicking the Release button. This operation will drop the TCP traffic rule on the client side and return the port to the server. No traffic to this port will be relayed to the tunnel.
Ports are allocated randomly so be sure that this operation is whats intended.
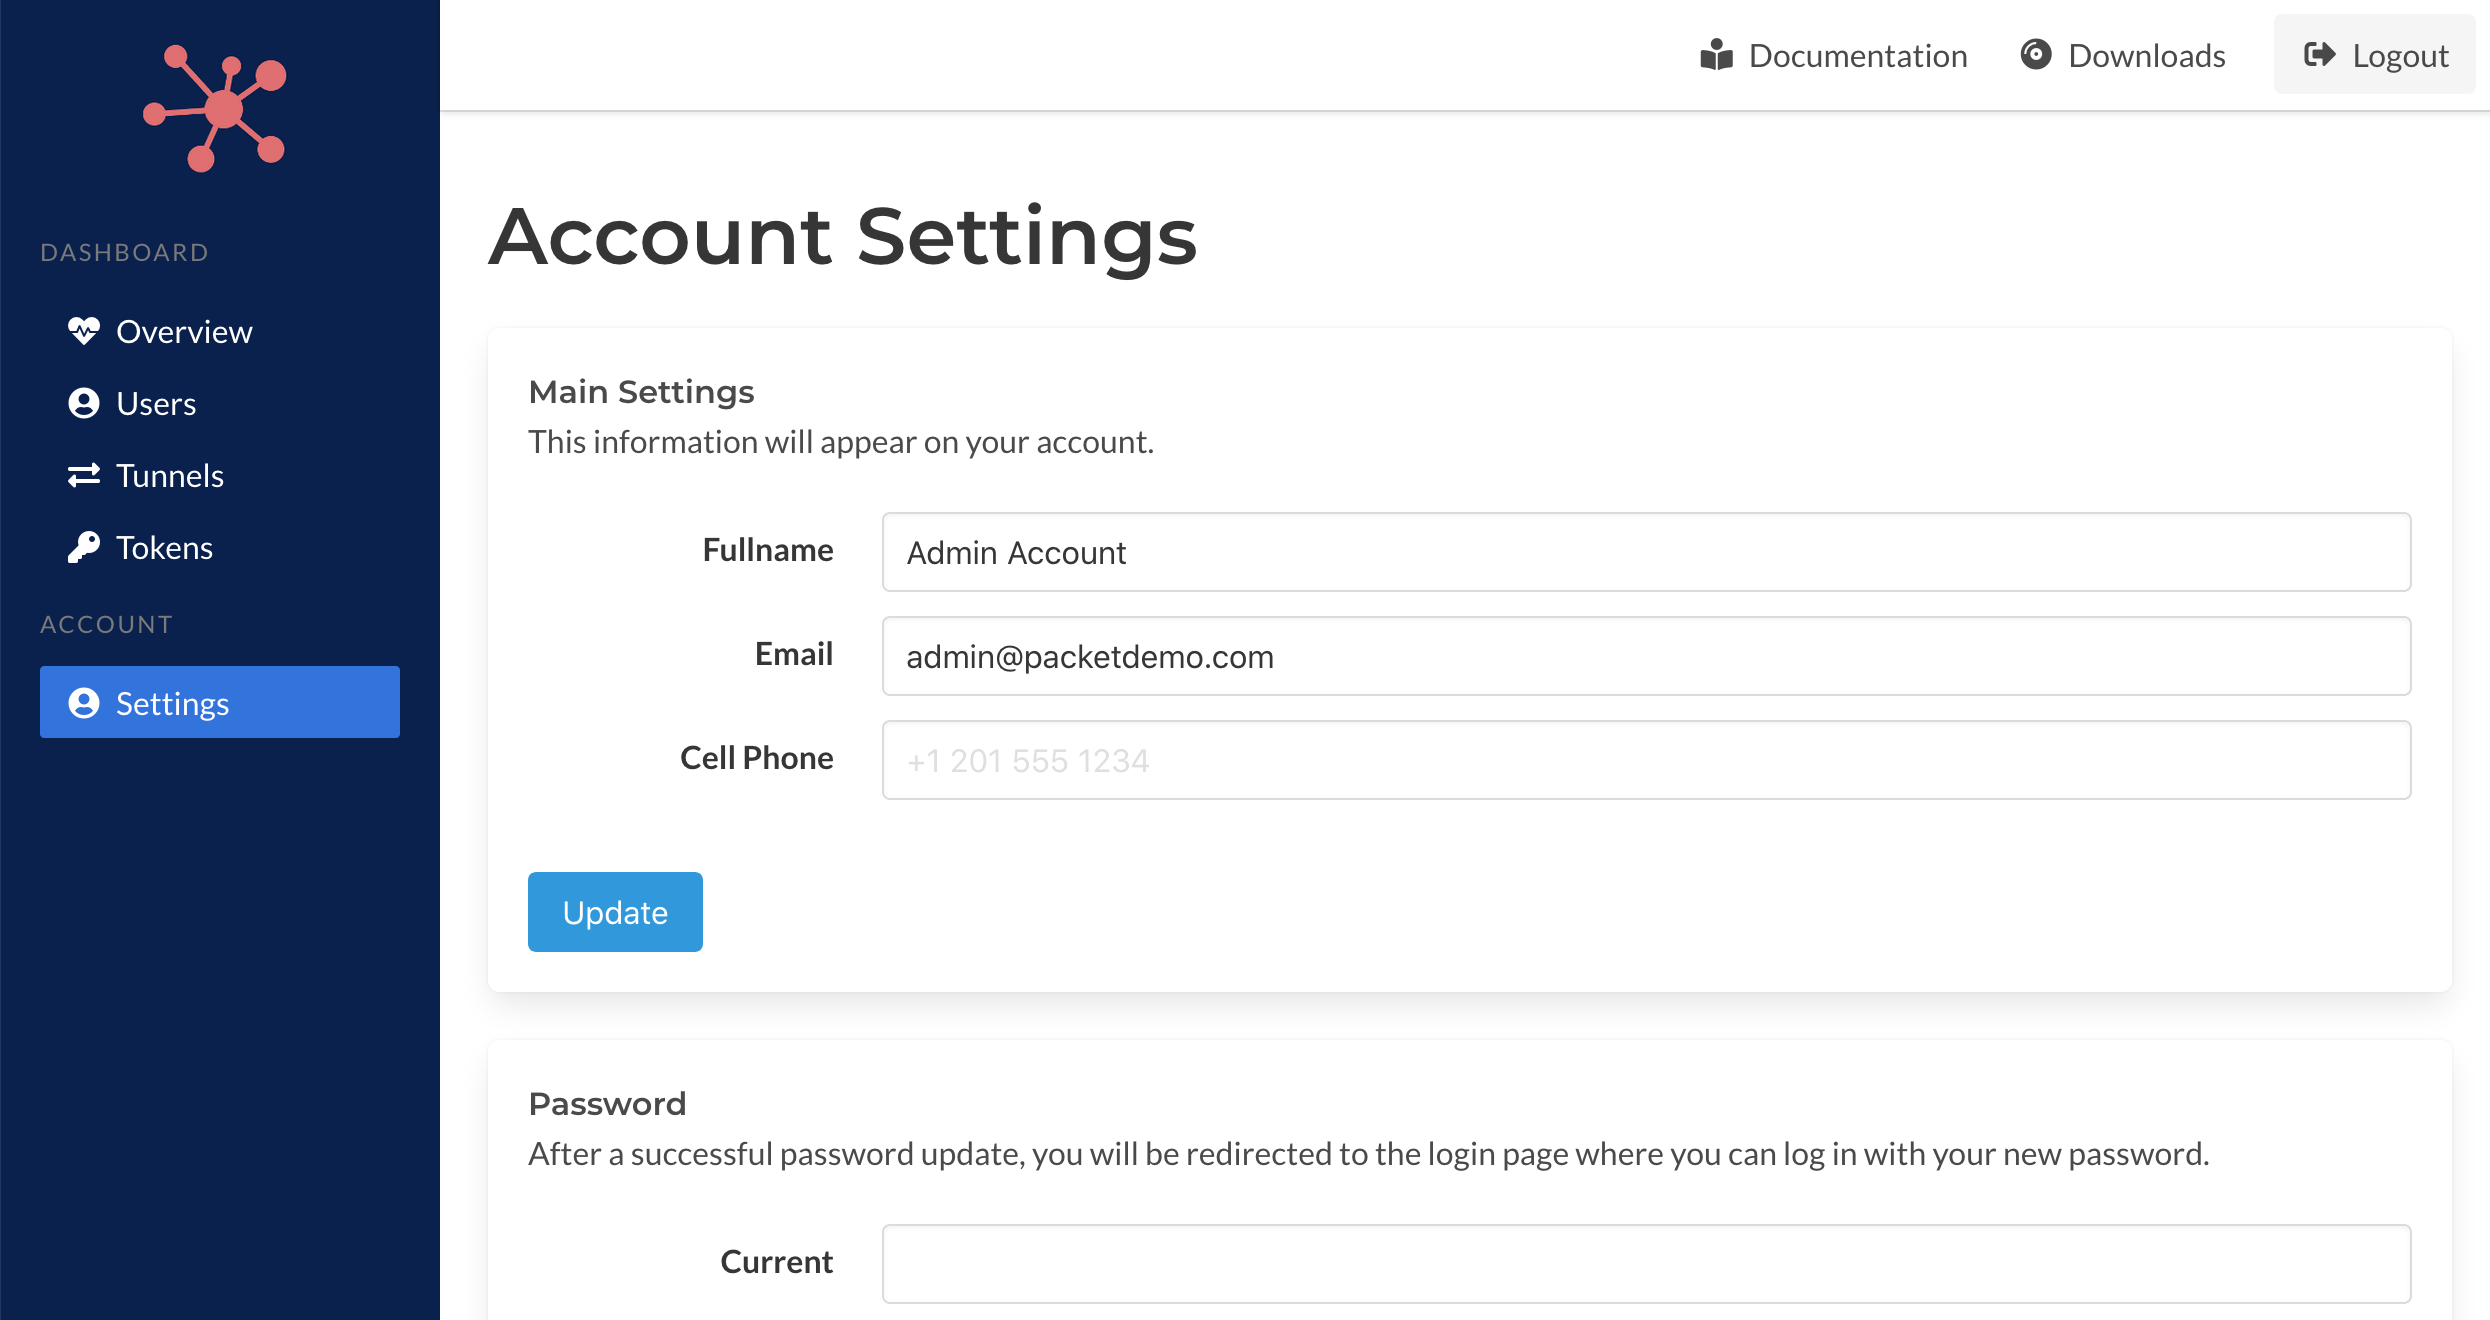
Account Settings
Users can edit information about themselves, excluding the email address, in this page. Passwords can be updated as well and you will be asked to login in again with the new password when its updated.
Server Settings
There are several options and settings for Spokes that can be updated and applied without requiring manual changes to the configuration file stored in /etc/spokes/config.json or restarting the server process. These options include domain name and TLS settings and also options for tunnels such as max number of simulatenous data-plane connections.
Domain
The domain settings can be used to update the domain name for the server and TLS settings. The domain settings form is presented in the figure below.
Domain names can be changed without restart the server process, however, the HTTP server will be restart on success. This enables any existing tunnels or network sessions to remain intact after these changes.
When a user inputs a new domain name the DNS settings for that domain will be verified to ensure it has been set up correctly. If Spokes detects that its not, an error will be reported. If an error report is not valid the user can override it. That condition can happen based on configuration of the host Spokes is running on or the network. For example, if Spokes is behind a load balance but has a public IP address, then an error could potentially be reported. If the domain used is also mapped to 127.0.0.1 then it would resolve to local host and not a publicly addressable IP and this could also cause an error to be reported.
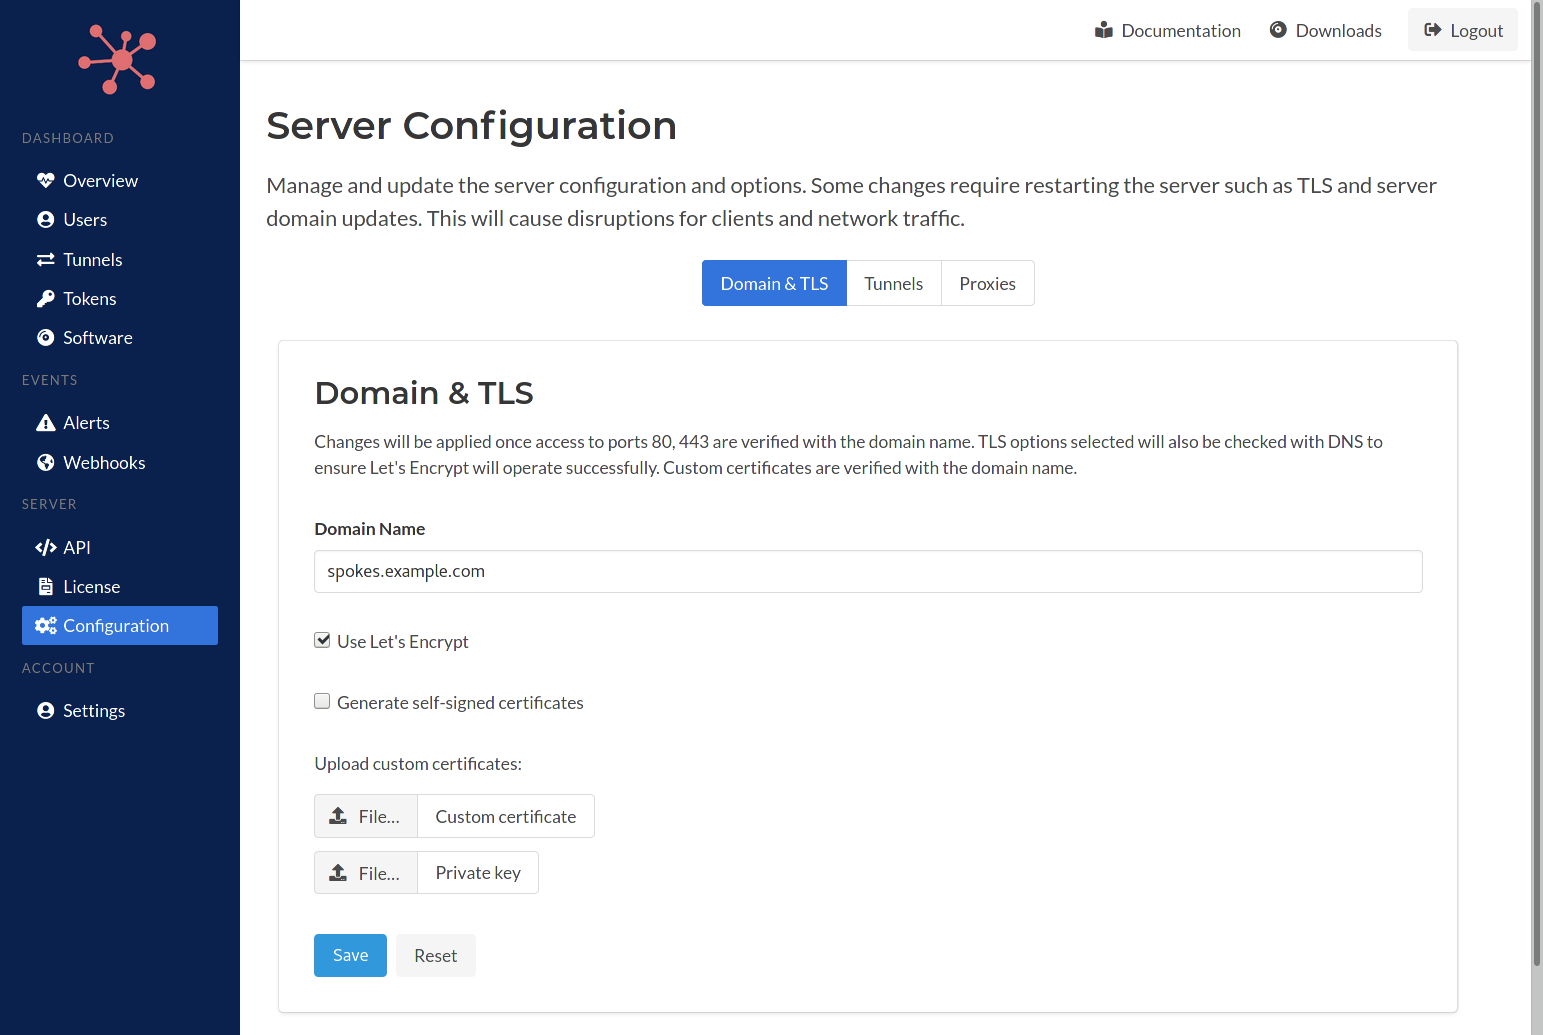
In addition to changing the domain name, TLS settings can be changed as well. An admin can enable Let's Encrypt, choose to generate self-signed certificates or upload custom certificates and private key. When Let's Encrypt is selected a check for proper DNS setup and network connectivity will be performed to ensure that the Let's Encrypt handshake will be successful.
Tunnel Options
The figure below presents the options that can be modifed by the admin. The first option is automatic hostname assignment. When enabled the Spokes server will generate a hostname for a subdomain using the domain set for the Spokes server. A wildcard DNS record will need to be configured for these hostnames to valid and resolve correctly to the Spokes server.
Monitoring can be enabled in this page as well. The monitor will check the upstream services hosted behind a tunnel. A simple TCP connection is performed, when successful the service will be set to online, otherwise it will be set to unavailable. The period of time between checks can be changed here as well.
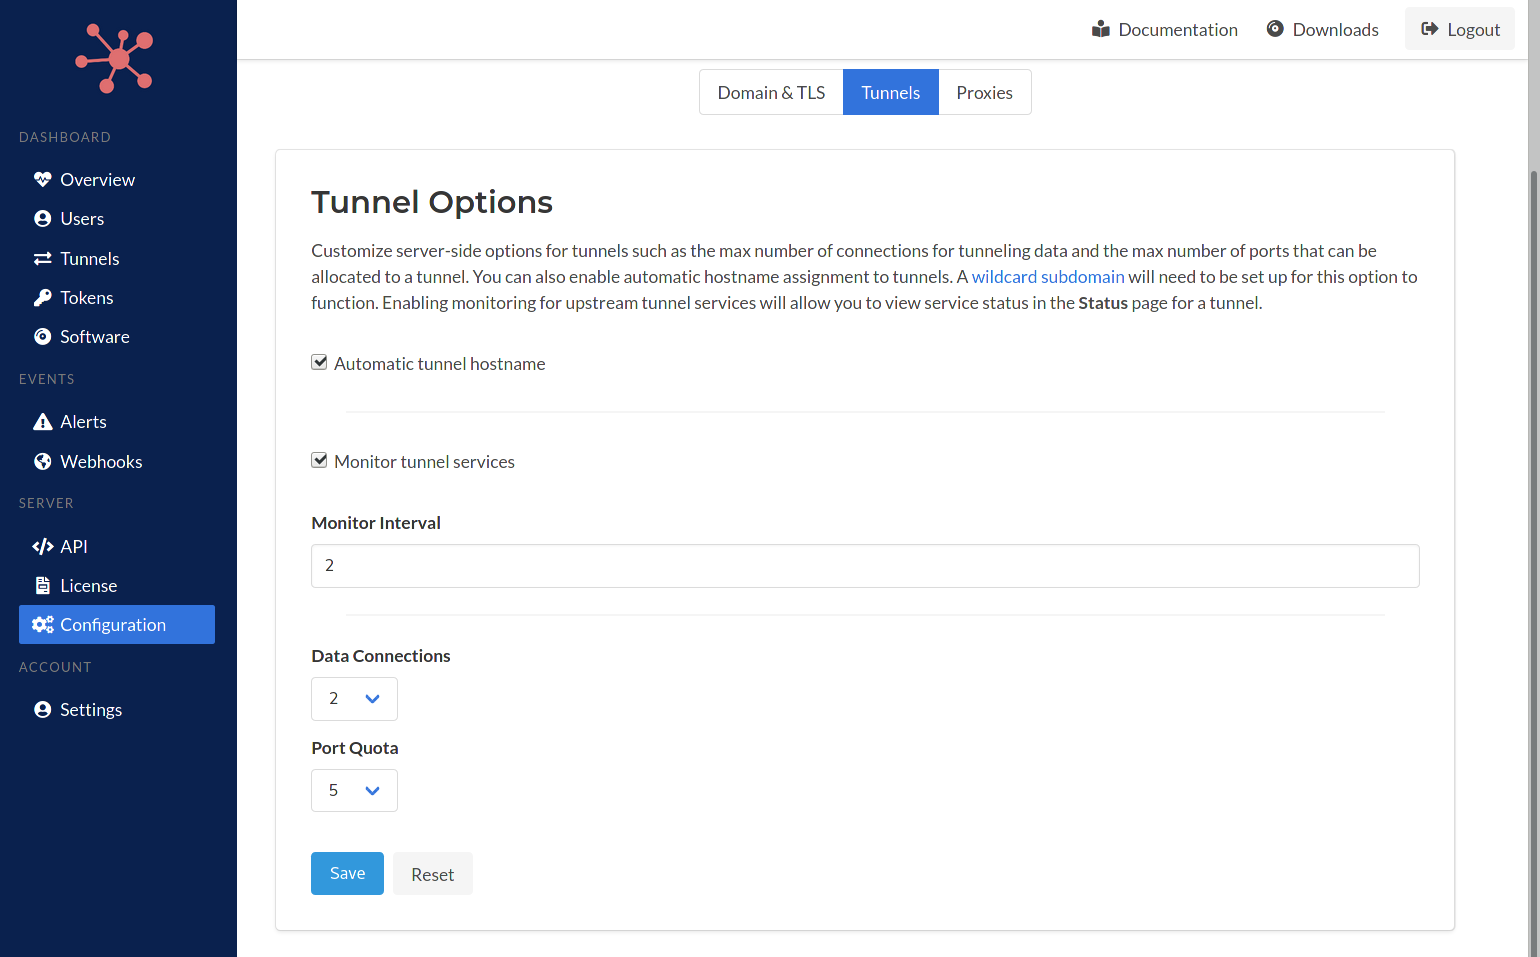
The number of data-plane connections that are set up can be changed here as well. The max default ports that a tunnel allocate to itself can be set here as well. These changes will be applied on all future tunneling session created.
Proxy Settings
A SOCKSv5 proxy server is embedded in Spokes and can be used to provide a single entry point to connect to any of the services hosted behind any of the tunnels. It can be used to limit, or close, incoming ports that are used for TCP-based services. This lowers exposure of ports to the public Internet to prevent scanning or probing.
The SOCKS server provided a standard listening port that can be configured. In addition, a non-standard TLS listening port can be used as well. This TLS port can provide transport security to services or applications that do not include their own transport security layer.
It's important to note that no standard or TLS port settings are required to be set. E.g. they can be left as 0. Enabling the SOCKS server also enables mesh networking between tunnels which does not require a public facing port to the Internet. The client program includes the ability to map a local port to a service hosting behind a tunnel and also an external service. For this feature to work, the SOCKS server needs to be enabled.
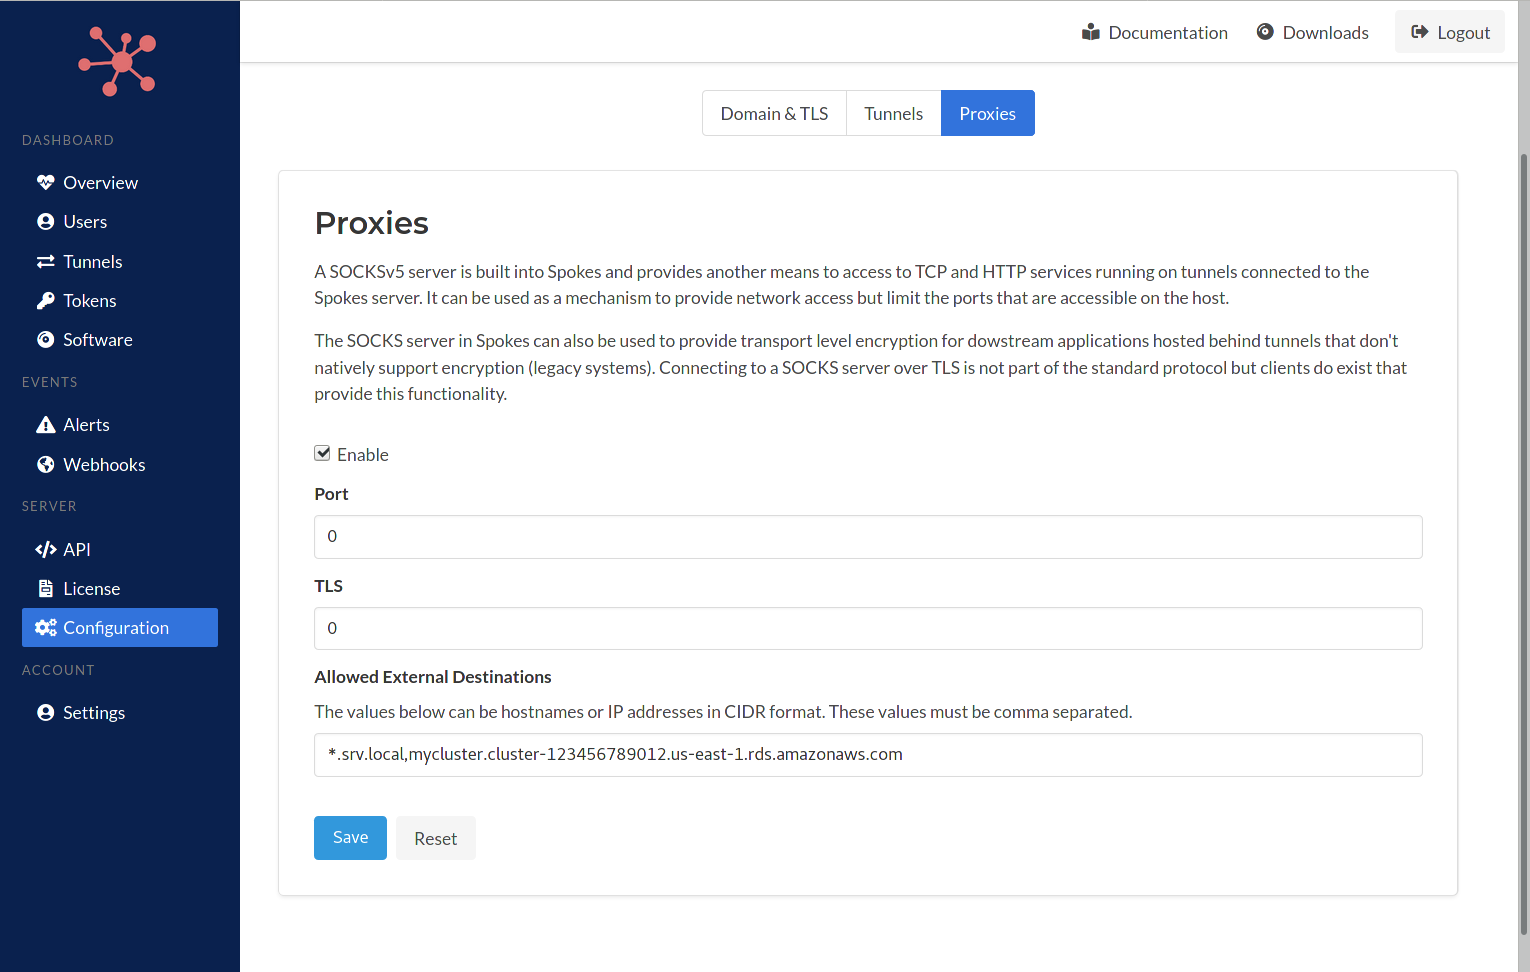
By default the SOCKS server will only serve requests to services that are hosted behind tunnels. However, exclusions can be input here as well. The allowed external destinations must be input as comma separated values and can include IP address (CIDR format) and hostnames. The hostnames can include wildcards as well *.sub.domain.com.
External destinations such as cloud databases, such as AWS Aurora, Redis, etc... can be input here as well and enable tunnels to map local ports on the host they are running on to these services. It's this capability that enables a service mesh network to be created.
Updating
Keeping your Spokes server up-to-date is easy. Follow us on Twitter @packetriot for announcement of new releases for Spokes. Visit our downloads to get the latest versions. Then use the following commands to perform the update on your server.
[user@host] sudo systemctl stop spokes
[user@host] sudo rpm -Uvh spokes-<new version>-1.x86_64.rpm
[user@host] sudo systemctl start spokes
Client Configuration
When using the managed service provided by Packetriot users will configure their client
using the command pktriot configure. Authenticating through your credentials or an
auth-url to begin the configuration workflow. By default the Packetriot client will prompt
you to choose a path from a set of defaults to store the configuration file it will generate.
In addition, users can manually specify a path to a configuration file using the --config flag
as well.
Here is an example of the basic client configuration work-flow using a registration token.
[user@host] pktriot unmanaged configure --hostname unmanaged.borak.co --registration 5b72e92d2c5e863e...
Choose a path to the configuration file:
[1] /etc/pktriot/config.json
[2] /data/config.json
[3] /home/user/.pktriot/config.json
The first path [1] is the system-wide Packetriot client configuration path. If you're not
running the configure command as the pktriot user, then you'll need to run that the command
using sudo: sudo -u pktriot pktriot unmanaged configure....
The second path [2] is the path that used by default in our containerized client. This is
done with the intent, and assumption, that you may want to preserve and have access to the
data generated by the Packetriot client: certificates (custom or from Let's Encrypt) and the
configuration file.
Also, you may be generating or creating static content that you serve through a tunnel and having a mount-point into the container that is host accessible makes this common use-case easier to integrate.
The third path [3] is for clients that are used by a user. If you're developing in your
home directory and want to use Packetriot for serving out a project you're developing, this is
the option you want to choose.
Note, if clients are being initialized for fleets of devices or users, it would be useful to plan how these clients are started on reboot and if the initial configuration is intended to be automatic. You will want manually specify a path but perhaps choose one of the defaults, e.g. the system-wide path. That would enable your deployment to reuse the Systemd service unit that is included without changes.
Registration Token
We touched a bit already on how the Packetriot client uses the registration token but we will
expand on it more in this section. The --d flag was mentioned earlier in the authentication
tokens section to explain how "user" are indicated for a particular authentication token,
An authentication token is associated to an underlying user in Spokes. So if you want to "group"
one or more clients together then using the --id flag is how you do that. In the case
of users, you may want to use emails, system usernames or a full name. If you're managing
devices or automated software, you may want to use a hardware address like a mac address, CPU ID,
or another unique value that would also help you identify the device.
Use double or single quotes if the value you use choose is using any whitespace or special
characters that will be evaluted the shell your using. Example: an awesome tunnel!
[user@host] pktriot unmanaged configuration --id <value> --hostname spokes.example.com --registration <token...>
The --hostname is used to lookup the Spokes server and will be saved to the configuration file.
It should be the domain you setup for your Spokes server. In addition, the --id is an optional
flag.
Another flag can be used to customize the hostname of the tunnel --tunnel-hostname. This
flag can be used to set the hostname when the tunnel is created with the registration
token. Here is an example of the command above using this flag.
[user@host] pktriot unmanaged configuration --id "jack" \
    --tunnel-hostname "tun-13.spokes.example.com" \
    --hostname spokes.example.com --registration <token...>
Note, tunnel hostnames are not functional in Spokes. However, if you setup a wildcard domain with your Spokes server, as we did throughout these sections, then it would be functional in practice.
Authentication Token
An authentication token is a key that was generated on the Spokes server and can be used
immediately for connecting and creating an authenticated session by a Packetriot client.
It's use is similar to the registration and it will also provide the same default behaviors
regarding the prompt to select a configuration path or when you specify a path manually
using --config.
Here is an example of the command. You can still use the --id flag to specify a "user"
and the --key flag to specify the authentication token generate for this client.
Note that --id is optional.
[user@host] pktriot unmanaged configuration --id <value> --hostname spokes.example.com --key <token...>
De-Authenticating
There may times when you want or need to deauthenticate a client. What this means is that you want the authentication token to be deleted and no longer useful for creating a session.
In cases where you have a fleet of Packetriot clients creating tunnels and there are workflows for "resetting" the system or device, this can be useful and it will help manage the number of clients so that the quota of simulatenous tunnels is not reached because of stale or unneeded authentication tokens.
The command for de-authenticating is simple. Note, if you specified a manual configuration path you will need to specify it with this command.
[user@host] pktriot unmanaged deauth

# or...

[user@host] pktriot --config /path/to/config.json unmanaged deauth
The de-authentication feature is intended to assist use-cases where reconfiguring a client from scratch is necessary and disabling the previous authentication would help achieve greater security.
It's not intended to be used often or widely.