Packetriot Client
The Packetriot client enables all the core hosting features that we provide. The client implements a lot of different functions to make instant hosting on any computer, on any network, possible:
- VPN
- Reverse-tunnel
- HTTP/S server
- Let's Encrypt certificate manager
- Reverse Proxy
- File Server
The Packetriot client comes in many different flavors and supports a variety of operating systems such as Linux, MacOS, Windows, and OpenBSD. On Linux the client is available on a variety of architectures such as x86-64, i386, ARMv7 (32-bit) and ARMv8 (64-bit).
We provide some packaging such as RPM and Debian, which makes it easy to install on Linux distributions that support those package management tools. A tarball is provided for each OS/arch we support and can be installed manually.
A Docker container image (x86-64) is available as well. Most developers have docker installed on their system and use Docker in their work-flow. Running docker pull packetriot/pktriot:latest gets you started. More on this later in the docs.
We'll cover all the features and facets of configuring and user our client. Our quickstart guide can help you quickly get off the ground and start hosting HTTP/S services. The the following sections will dive deep and explore and all the functions available and how to use correctly.
Any questions or suggestions can be directed to our email. We're glad to help :)
How It Works
How does Packetriot work? We utilize a lot of different network programming concepts to make it work. We also utilize ideas from other tunneling protocols and leverage DNS and HTTP heavily.
Packetriot uses a secure tunneling protocol to expose servers on local or private networks to the Internet. The goal is to make it quick and easy to host a web application or static website. You can also use Packetriot to self-host existing applications for things like file-sharing, note taking, online collaboration or messaging as well.
These tunnels are establish in reverse so they work behind NATs and Firewalls. This is critical. Your ISP or network admin can be blocking ingress traffic, but blocking egress traffic to common ports HTTPS, would make the network useless.
Once your Packetriot client is configured you can change networks and all your services will still work, as long as they're running locally, no configuration changes required. Packetriot will require a connection to the Internet, that's it.
Each tunnnel is assigned a unique, persistent hostname. The hostname, and its subdomains, can be used as aliases for customs domains. Each tunnel connects to the same server until you shut it down. This means the IP address of the server can be used for setting up DNS A records.
We use domain name verification to ensure that your domains can't be hijack or used by any other users on the Packetriot network.
You can host any number HTTP services behind a Packetriot tunnel. TCP services are limited by the ports available in your selected plan. Our edge-servers use HTTP vhosts and TLS-SNI parsing to route requests to the correct tunnel.
Download & Install
Our downloads page has a list of all the clients for the various operating systems, architecture and packaging we support. It's quite a bit. Our client support Linux, Mac, Window and OpenBSD.
On Linux we suport x86 64-bit, Intel 32-bit, ARM 32-bit and ARM 64-bit. We build packages for RPM and Debian for all of these archiectures, and we include tarballs. Also, for Linux distributions we include a Systemd service unit in cases where you want to use Packetriot to run tunnels 24/7 (we're built for that).
Our Mac distribution includes a Launchd file that you can tailor for running a Packetriot tunnel on a mac 24/7 as well.
We're still working on Windows services. If you can help please send us any templates or resources, we'd really like to integrate something for our Windows users.
Below are some installation tips for the various package we support: RPM, Debian, Tarball and Zip (Windows).
RPM
sudo rpm -Uvh pktriot-<version>-1.<arch>.rpm
Debian
sudo dpkg -i pktriot-<version>.<arch>.dev
Tarball
tar zxvf pktriot-<version>.<arch>.tar.gz
cd pktriot-<version>
Zip
Put picture here of right-clicking and selecting "Extract to..." and then choosing a directly.
Configuration
Client configuration is very first step. The Packetriot client can be configured to work in a few different use-cases. You can set it up for system-wide use or for user-only. If you're using your tunnel for intermittent hosting and testing, then you want user-only.
System-wide
This configuration is simply running the Packetriot client as the pktriot user, you're configuration directory is /etc/pktriot. You can use the Systemd server (Linux) to configure your client to restart on reboots, network outages or crashes.
When you want to configure for this use-case, just switch to the pktriot user.
[user@host] sudo su pktriot

# You're now the pktriot user...
[pktriot@host]
User-only
In this configuration you run the client as your normal user jack, jill, centos, ubuntu. You're configuration directory is ~/.pktriot. Systemd is not an option unless you're advanced and create one in your ~/.local/systemd/user directory.
Configure the Client
Run the command pktriot configure and choose option [3] which will save the
configuration file in your home directory /home/user/.pktriot. If you're running as the pktriot user with the intent to use Packetriot as a service, then choose 1 as the path /etc/pktriot.
Authenticate with your credentials and choose a region that's closest to you.
[user@host] pktriot configure
Choose a path to the configuration file:
[1] /etc/pktriot/config.json
[2] /data/config.json
[3] /home/user/.pktriot/config.json

Input selection [#]: 3

Authenticate client with login credentials:

Email: new.user@domain.com
Password:
Authenticated!

Choose the region for the edge server to connect to:
+------------------------+
| #   | Region           |
+------------------------+
| 1   | us-east          |
+------------------------+
| 2   | us-west          |
+------------------------+
| 3   | eu-central       |
+------------------------+
| 4   | asia-southeast   |
+------------------------+

Input selection [#]: 1

Tunnel configuration:
  Hostname: awesome-tunnel.pktriot.net
  Server: us-east-63815.packetriot.net
  IP: 138.197.66.62

Start the tunnel and visit URL to check its working:
  pktriot --config /home/user/.pktriot/config.json start
  https://awesome-tunnel.pktriot.net

Detailed help and step-by-step tutorials:
  https://docs.packetriot.com
  https://packetriot.com/tutorials.

Need more support?
  Email: packetriot@gmail
  Twitter: @packetriot (please follow us, we like new friends :)
You'll be provided some details about the tunnel printed in the output. This
information is always available and can be printed out again at any time by
running pktriot info.
Note, you don't need to specify --config /path/to/config.json if you use any of the
default paths presented when you ran pktriot configure then you will never have to specify a path to the configuration.
You can run multipe Packetriot clients on your system. This is the order of preference when selecting a configuration:
/home/<username>/.pktriot/config.json/etc/pktriot/config.json/data/config.json
This last option is the convention for clients deployed in Docker containers.
Finally, let's give the tunnel a name, it'll be easier to discern which tunnel is which in the dashboard.
[user@host ~] pktriot edit --name "hello world"
Tunnel updated
Authentication URL
Originally, the Packetriot client only support a unique authentication URL that would be validate when you logged in. The intent here was to make it difficut for users to automate configure a client, however, it created more steps and requirements to setup a client. The default mechanism uses the login credentials as show above.
However, authentication URLs still live on. If for some reason you want to use them to configure your client, simply add the flag --url when you use the configure command.
[user@host ~] pktriot configure --url
[1] /etc/pktriot/config.json
[2] /data/config.json
[3] /home/user/.pktriot/config.json

Input selection [#]: 3

Authenticate client by visiting this URL:
https://packetriot.com/client/identauth/7eb7f5809a451e3333....

Identified and authenticated!

Choose the region for the edge server to connect to:
+------------------------+
| #   | Region           |
+------------------------+
| 1   | us-east          |
+------------------------+
| 2   | us-west          |
+------------------------+
| 3   | eu-central       |
+------------------------+
| 4   | asia-southeast   |
+------------------------+

Input selection [#]: 1

Tunnel configuration:
  Hostname: restless-glade-08105.pktriot.net
  Server: us-east-65319.packetriot.net
  IP: 159.203.126.35

Start the tunnel and visit URL to check its working:
  pktriot --config url.json start
  https://restless-glade-08105.pktriot.net

Detailed help and step-by-step tutorials:
  https://docs.packetriot.com
  https://packetriot.com/tutorials.

Need more support?
  Email: packetriot@gmail
  Twitter: @packetriot (please follow us, we like new friends :)
You will be presented with a unique one-time URL that will expire after 1 hour. Visit the URL in a web browser. You may have to login initially, and then confirm your login credentials again.
Inputting credentials twice is typical if you haven't logged into your Packetriot account very recently. The client will detect the confirmation login and your client will be configured.
Configuring with Spokes
Are you running a Spokes server? This section here will cover the slightly different mechanisms for configuring a client here.
We'll assume that you have read all the Spokes document and are fully aware of Registration and Authentication tokens and the differences.
To summarize, a registration token is a secret token that is used to generate authentication tokens. They are useful because:
- They limit the amount of coordinations betwen the Spokes admin and the user.
- They also enable easy and automatic configuration for devices that are typically flashed with firmware that is uniform.
An authentication token is a secret token that can only be used for authentication a client, a Tunnel, and is prepared ahead of time by an admin for a user. In this case, more coordination between the admin and user is necessary since the admin must communicate the token to the user.
Now let's dive into configuring a client in both of these scenarios. It's important to note that in both these scenarios we must always specify the hostname of the Spokes server using the --hostname flag.
Registration Token
With a registration token we can authenticate enough such that we can request a new authentication token be generate and send to us in the response. In addition, we can communicate a user, through a unique ID of some type (email, username, hardware address, ...) that we want the tunnel to be associated with.
In addition, we can specify a hostname for the tunnel. Hostnames are not functional in Spokes, like it is with managed Packetriot tunnels, however, they can be based on the admins configuration. Read up on wildcard domains in the Spokes documentation for more details.
The configuration command here is slightly different, it begins with the unmanaged subcommand and then includes its own configure. Here it is fully expanded pktriot unmanaged configure.
Let's configure a tunnel with all of these options. We'll present one example, where I'm a developer named jack. Because we are using a registration token, we will use the --registration flag.
We want to "group" or "associate" this tunnel to a user, that exists or will be created by Spokes on the server-side, called jack.
Finally, we will specify a hostname, it may or may not be functional, but as we suggested earlier please read the section on "Wildcard Domains" in the Spokes documentation. Spokes treats this as information, it is not functional.
[user@host] pktriot unmanaged configuration --hostname spokes.example.com \
    --id jack --tunnel-hostname "app-testing.spokes.example.com" \
    --registration <token...>
In this example I'm a device with the hardware address AA:BB:CC:DD:EE. It's pretty much identical to the exampe above.
[user@host] pktriot unmanaged configuration --hostname spokes.example.com \
    --id "AA:BB:CC:DD:EE" --tunnel-hostname "app-testing.spokes.example.com" \
    --registration <token...>
Authentication Token
An authentication token is a secrets generated on the server-side of Spokes, by the admin, and provided a user or client. The option to specify a hostname for the tunnel is not available when using an authentication tunnel since that is specified by the admin when it's created.
As mentioned earlier, tunnel hostnames for Spokes are non-functional, but they can be helpful when managing them and understanding what a tunnel is used for or used by. Note, you can still specify an id that allow you "associate" the tunnel to an existing (or newly created) user on the Spokes server.
Below is the command you would use for configuration the client with an authentication token.
[user@host] pktriot unmanaged configuration --hostname spokes.example.com \
  --id jack --key <token...>
De-Authenticating a Client
Since Spokes is managed and there is no user interface (dashboard) for it, clients have the ability to deauth (a.k.a shutdown and delete) themselves. This is helpful for devices (IoT) or for clients that are setup programmatically and need to be reset.
To de-authenticate the client use the following command:
[user@host] pktriot unmanaged deauth
Note, in any of these cases you can specify a custom path to a configuration file using the --config flag. Please add this flag to any of the command when you're using custom paths.
Note, you can mix specifying a default path with --config flag just to avoid the prompt that you normally receive when configuring a client. This is particularly helpful with devices or programmatic setups.
Reconnect Options
Described below are reconnection options that can be set during the configuration of a tunnel.
By default a client will attempt to reconnect to a server 20 times before the program will exit, requiring the user/admin/service to restart it. There are many use-cases where you want the client to attempt reconnecting forever.
You can instruct a client to attempt reconnecting forever by specifying -1 as the number of times to reconnect during configuration. Any number less than 0 will instruct the client to attempt reconnecting to its server forever, e.g. -1, -2, -3, ...
# configuring for Spokes
[user@host ] pktriot unmanaged configure --reconnect-attempts -1 <other configuration options...>

# configuring for Packetriot.com
[user@host ] pktriot configure --reconnect-attempts -1 <other configuration options...>
You can customize the interval period a client will wait between these reconnection attempts. Note, the --reconnect-wait option will only work with Spokes servers and not managed Packetriot.com servers. In the example below we set the interval to 15 seconds.
[user@host ] pktriot unmanaged configure --reconnect-wait 15 <other configuration options...>
You can combine these two options as well to customize both reconnection parameters. In this example we set the interval, wait time between reconnect attempts, to 5 seconds and set max reconnect option to -1, e.g. attempt reconnecting forever.
[user@host ] pktriot unmanaged configure --reconnect-attempts -1 \
  --reconnect-wait 5 \
  <other configuration options...>
Final note, you can customize these values as well in the pktriot start command. Tunnel connecting to packetriot.com will ignore the value passed into --reconnect-wait.
These runtime options are described again in the section Starting the Tunnel.
Diagnostics
There may be times when you have issues with your Packetriot client running. It's possible there could be issue our with servers, the Internet, or the network admin is blocking some traffic...
Another issue could be that you shutdown or deleted your tunnel on your dashboard but forgot and are using stale configuration.
We include a command in our client called check that will test network connectivity, DNS resolution and authentication to Packetriot and the server you connect to. This should help provide some insight when you have connectivity issues.
Here an example of its output.
[user@host ] pktriot check
Running client and networks test, please wait...

Notes:
* DOH - DNS-over-HTTPS (cloudflare)
* Local - Using local DNS resolver and system settings


+--------------------------------------------------------------------------------------------------------+
| Test Name                                              | Duration (ms)   | Result   | Value            |
+--------------------------------------------------------------------------------------------------------+
| DNS lookup packetriot.com (DOH)                        | 77              | Passed   | 159.89.245.203   |
+--------------------------------------------------------------------------------------------------------+
| DNS lookup packetriot.com (local)                      | 13              | Passed   | 159.89.245.203   |
+--------------------------------------------------------------------------------------------------------+
| DNS lookup us-east-63815.packetriot.net (DOH)          | 27              | Passed   | 138.197.66.62    |
+--------------------------------------------------------------------------------------------------------+
| DNS lookup us-east-63815.packetriot.net (local)        | 85              | Passed   | 138.197.66.62    |
+--------------------------------------------------------------------------------------------------------+
| Connect to packetriot.com (DOH)                        | 31              | Passed   |                  |
+--------------------------------------------------------------------------------------------------------+
| Connect to packetriot.com (local)                      | 29              | Passed   |                  |
+--------------------------------------------------------------------------------------------------------+
| Connect to us-east-63815.packetriot.net (DOH)          | 52              | Passed   |                  |
+--------------------------------------------------------------------------------------------------------+
| Connect to us-east-63815.packetriot.net (local)        | 58              | Passed   |                  |
+--------------------------------------------------------------------------------------------------------+
| Authenticate on packetriot.com (DOH)                   | 137             | Passed   |                  |
+--------------------------------------------------------------------------------------------------------+
| Authenticate on packetriot.com (local)                 | 18              | Passed   |                  |
+--------------------------------------------------------------------------------------------------------+
| Authenticate on us-east-63815.packetriot.net (DOH)     | 84              | Passed   |                  |
+--------------------------------------------------------------------------------------------------------+
| Authenticate on us-east-63815.packetriot.net (local)   | 88              | Passed   |                  |
+--------------------------------------------------------------------------------------------------------+
Starting the Tunnel
There are two modes of hosting, or operation, for the pktriot client: instant hosting and persistent hosting. Instant hosting is intended for quick tunneling of HTTP/S or TCP traffic using the hostname assigned to the tunnel. Instant hosting is utilized using the commands pktriot http or pktriot tcp. There's more information on instanting hosting in the HTTP/S and TCP sections of our client documentation.
Persistent hosting is intended for hosting any number of traffic rules at the same time. Normally these tunnels are long-running and require more specialized options. Some of these options include: password protections, custom TLS certs, automatic Let's Encrypt use, URL redirection, etc... Running the tunnel in this mode is performed with the command pktriot start.
Then persistent rules are changed, e.g. using the pktriot tunnel http or pktriot tunnel tcp commands, the tunnel will need to be restarted. It will not automatically detect changes.
More information on how to host traffic in both modes is available in the sections below.
Custom Reconnect Options
You can customize the reconnection options when starting a tunnel in persistent mode. By default the client will attempt to reconnect 20 times and wait 30 seconds in-between each attempt. These two parameters can be changed by utilizing two flags available in the pktriot start command.
Below is an example of instrucitng the client to continuously make attempts to reconnect.
[user@host ] pktriot start --reconnect-attempts -1
Any number less than 0 will instruct the client to attempt reconnecting to its server forever, e.g. -1, -2, -3, ...
You can also customize the time a client will wait between these reconnection attempts. Note, this value can only be changed for tunnels connecting to Spokes servers, not Packetriot servers. In the example below we set the interval to 15 seconds.
[user@host ] pktriot start --reconnect-wait 15 <other configuration options...>
You can combine these two options as well, in this example we change the reconnect interval and the max reconnect option to -1, e.g. attempt reconnecting forever.
[user@host ] pktriot start --reconnect-attempts -1 --reconnect-wait 5
If you're running the client as a service you can add these parameters to the script managing it, e.g. systemd.
Subdomain Reservations
Users with paid plans can reserve a number of subdomains from several domains we manage. These domains can be used for hosting HTTP/S and TCP traffic and are another means to have a stable endpoint or hostname for services you're hosting.
Our domains provide contexts for software development projects, network infrastructure, personal sites and media streaming. The available domains are listed in the table below.
| Domain | Description |
|---|---|
| pktriot.net | Customize a subdomain using the pktriot.net domain we use to automatically assigned hostnames for tunnels. |
| betabuild.dev | A domain for developers and designers that want to show off or share projects that works in-progress. |
| reversetunnel.net | Domain for network infrastructure services or operations. |
| mediastreamer.app | Great for use of media streaming and sharing applications like Plex, Jellyfin, Emby and others. |
Reserving
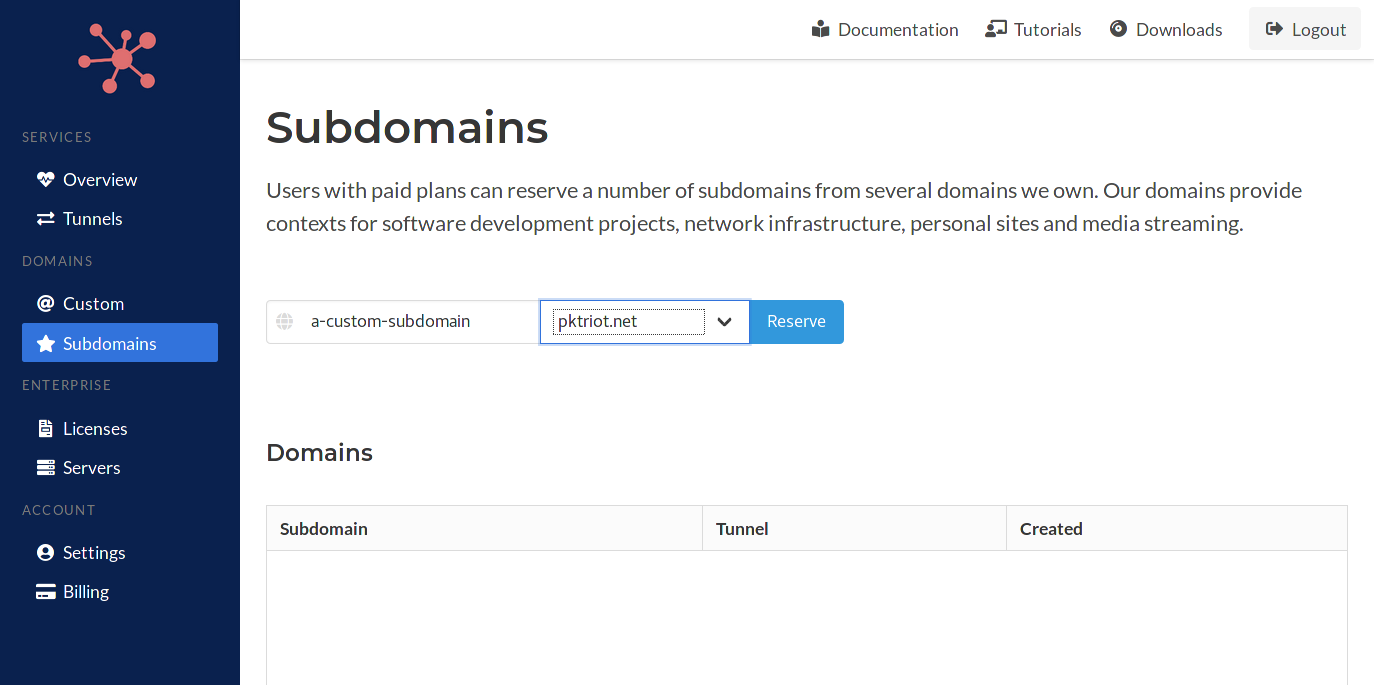
You'll need to log into Packetriot with your account and visit the Subdomains page in the sidebar menu.
We have a simple form that allows you to input a subsomain and choose one of the several domains we manage. Each plan has a limit to the number of subdomains you can reserve. A subdomain reservation can be release and replaced with another.
Subdomains do not expire once reserved (unless you downgrade to a Free account).
We have a list of subdomains that are not available. Some of these restrictions are to protecting subdomains we currently use or intend to use some day. Other restrictions are to help prevent abuse or bad behavior, e.g. google.pktriot.net.
If a subdomain has already been reserved then we will let you know through a specific error message in this scenario. When a subdomain matches a restrictied value you be warned specifically on those errors as well.
Management
Once a subdomain is reserved it'll be listed in lower-half of this page. Each row will provide controls for assigning a subdomain to a tunnel, changing the tunnel assignment, and clearing the assignment.
Click the combo-box and select a tunnel to assign a subdomain to. The assignment is actually a DNS record (CNAME) we created for the subdomain that sets the value to the hostname of the tunnel. This allows you to change the tunnel assignment dynamically from this page.
The CNAME records created use a low TTL, 180 seconds, to enable this.
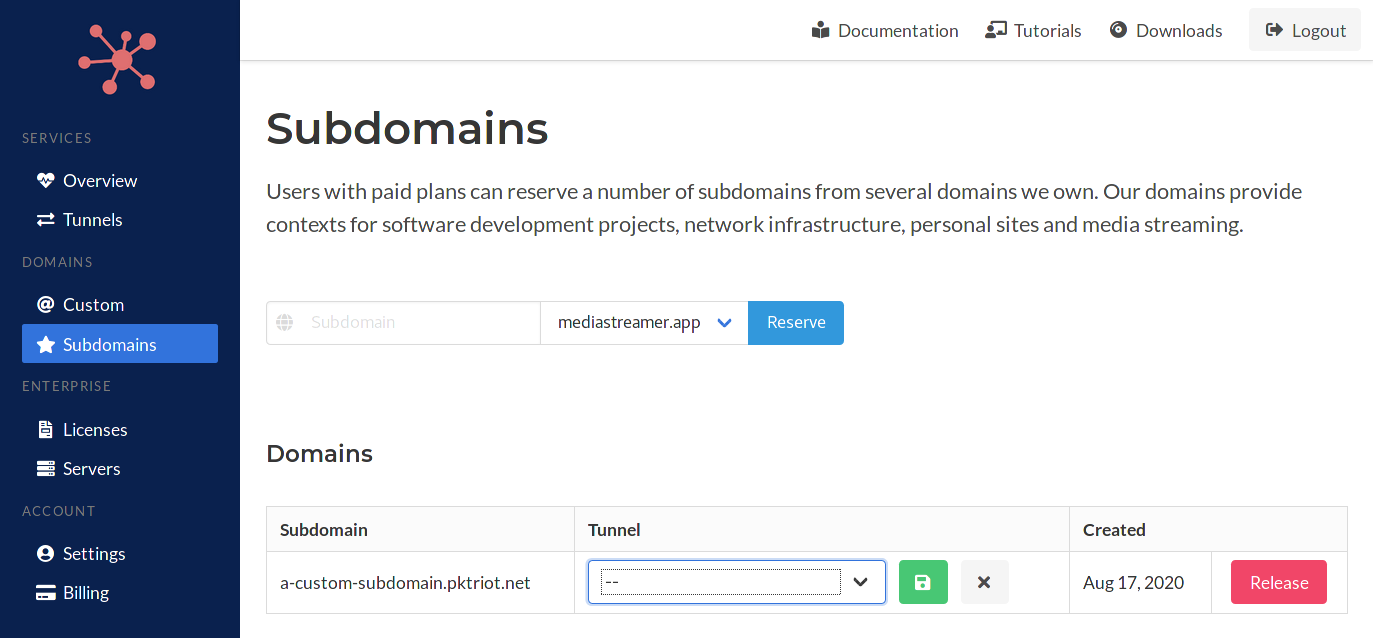
When changing the subdomain-tunnel assignment, click the the green save button to make the assignment. This will create or update the DNS CNAME record for the subdomain. Clicking on the grey X button will reset the assignment and remove the underlying DNS record.
Releasing
Releasing a subsomain not only clears the subdomain tunnel assignment but also returns the subdomain to the available pool, making it available to others.

This concludes reserved subdomains and managing them. You can use subdomains in HTTP/S rules. You'll need to be sure to make sure the subdomain has been assigned to the tunnel that is referring to it in its set of HTTP/S rules.
They can also be use for TCP traffic rules as well but the usage is opaque since the DNS record will resolve to the server your tunnel is conneced.
HTTP/S
Serving out HTTP/S traffic is the primary use-case for Packetriot. This protocol is used so widely that is covers many scenarios for developers and those looking to self-host an application from their local environment.
You can serve any number of HTTP/S services behind a single tunnel. Packetriot does not have a limit on services. The primary limitations are the number of tunnels, TCP port reservation and bandwidth.
The Packetriot client functions similar to an HTTP server and reverse proxy in addition to the tunneling service is establishes with a Packetriot server or Spokes server.
Like most HTTP servers it can serve out static assets and to upstream application servers. It can also connect to clients requesting TLS sessions using custom certificates, certificates create by services like DigiCert or Comodo, and also supports Let's Encrypt. Our Let's Encrypt support is robust and manage your certificates automatically.
When connecting to a Packetriot server a domain name in the *.pktriot.net sub-domain is assigned to your tunnel. This domain name is persistent. In addition, a wildcard record is created as well.
Here is an example example-tunnel-123.pktriot.net and *.example-tunnel-123.pktriot.net. Both of these domains are CNAME records and their value is the Packetriot server they connect to us-east-63815.packetriot.net.
In the sub-sections below we demonstrate how to use all of the HTTP/S features and functions available in with Packetriot client. We will assume in the examples below that we have a tunnel with the assigned hostname example-tunnel-123.pktriot.net.
We'll expand to more examples using custom domains in later sub-sections. Below is the usage for the tunnel http command.
[user@host] pktriot tunnel http
Usage:
  pktriot tunnel http [flags]
  pktriot tunnel http [command]

Available Commands:
  add         Add new domain for HTTP traffic rule
  firewall    Manage rules to restrict traffic to HTTP services
  ls          List all HTTP/S traffic rules
  rm          Remove HTTP/S traffic rule

Flags:
  -h, --help   help for http

Global Flags:
      --config string   path to configuration file
      --host string     host:port for packetriot.com service (default "packetriot.com:443")

Use "pktriot tunnel http [command] --help" for more information about a command.
Reverse Proxy
An HTTP/S reverse proxy will initially receive the HTTP/S request from the client and serve it to the correct upstream server. The upstream server can run locally on the host running the client or elsehwere. As long as the upstream server is routeable the client can serve to it.
This means that you can a single Packetriot client inside your network to proxy to many other hosts on your local or private network.
When serving HTTPS traffic it's important to note that TLS will be terminated by the reverse proxy. Traffic proxied to an upstream server will be unencrypted. In most use-cases the upstream server is running locally or on a trusted private network. This is an important thing to keep in mind.
Instant Hosting
Let's try a quick simple example, you have a locally running server and want to expose it but not persistently. We can use the http command for these short use-cases.
In this example pass in the argument 3000 which is the listening port on a local server. By default the destination is assumed to be 127.0.0.1 but you can also specify a destination using the flag --destination.
You can also specify a path on your local file-system to host static assets. Use the --webroot flag and provide the path as an argument.
This is a simple example using proxying to just a server.
[user@host:~/app-project ] pktriot http 3000
Connecting...

Running HTTP services:
+--------------------------------------------------------------------------------------------------------+
| Domain                            | Destination   | HTTP   | TLS   | Secure   | Protect   | Site Root  |
+--------------------------------------------------------------------------------------------------------+
| example-tunnel-123.pktriot.net    | 127.0.0.1     | 3000   | 0     | true     |           |            |
+--------------------------------------------------------------------------------------------------------+
In this example we add a path to serve static assets from as well.
[user@host:~/app-project ] pktriot http 3000 --webroot $PWD/static-assets
Connecting...

Running HTTP services:
+--------------------------------------------------------------------------------------------------------------------------------+
| Domain                          | Destination   | HTTP   | TLS   | Secure   | Protect   | Site Root                            |
+--------------------------------------------------------------------------------------------------------------------------------+
| example-tunnel-123.pktriot.net  | 127.0.0.1     | 3000   | 0     | true     |           | /home/user/app-project/static-assets |
+--------------------------------------------------------------------------------------------------------------------------------+
Finally, the client can accept a URL such as http:/127.0.0.1:8080 as a destination by using the --upstream-url flag. With the --upstream-url flag you can also use an HTTPS server running locally. It can be combined with the --webroot and --host-header flags well.
The only limitations are combining it with a port argument and the --destination flag.
[user@host:~/app-project ] pktriot http --upstream-url http://127.0.0.1:8080 --webroot $PWD/static-assets
Connecting...

Running HTTP services:
+-----------------------------------------------------------------------------------------------------------------------------------------+
| Domain                          | Destination            | HTTP   | TLS   | Secure   | Protect   | Site Root                            |
+-----------------------------------------------------------------------------------------------------------------------------------------+
| example-tunnel-123.pktriot.net  | http://127.0.0.1:8080  | 0      | 0     | true     |           | /home/user/app-project/static-assets |
+-----------------------------------------------------------------------------------------------------------------------------------------+
Whenever you use the http command the traffic rule is never saved. Also the hostname assigned to the tunnel is the domain that is requested by default.
Persistent Hosting
The following is an example of a persistent HTTP traffic rule for serving a locally running NodeJS server. This rule will be saved and when we restart the client it will automatically request this traffic and serve it as last configured.
We use a different command for these rules tunnel http add. The important flags in this command are --domain which specifies the hostname for the HTTP/S traffic you're requesting the Packetriot/Spokes server to forward to your client. The --destination flag indicates our upsteam servers' address and the --http flag is used to indicate the listening port for the service.
[user@host ] pktriot tunnel http add --domain example-tunnel-123.pktriot.net --destination 127.0.0.1 --http 3000
HTTP/S traffic rule added

[user@host ] pktriot tunnel http ls
+---------------------------------------------------------------------------------------------------------+
| Domain                            | Destination   | HTTP   | TLS   | Secure   | Protect   | Site Root   |
+---------------------------------------------------------------------------------------------------------+
| example-tunnel-123.pktriot.net    | 127.0.0.1     | 3000   | 0     | true     |           | --          |
+---------------------------------------------------------------------------------------------------------+
The --upstream-url flag can be used to express the destination as a URL http://127.0.0.1:8080. This lag enables proxying to an upstream HTTPS server, which isn't possible when the --destination and --http flags are used.
We can rewrite the traffic rule above with the following command.
[user@host ] pktriot tunnel http add --domain example-tunnel-123.pktriot.net \
  --upstream-url http://127.0.0.1:3000

HTTP/S traffic rule added

[user@host ] pktriot tunnel http ls
+-------------------------------------------------------------------------------------------------------------------+
| Domain                            | Destination             | HTTP   | TLS   | Secure   | Protect   | Site Root   |
+-------------------------------------------------------------------------------------------------------------------+
| example-tunnel-123.pktriot.net    | http://127.0.0.1:3000   | 0      | 0     | true     |           | --          |
+-------------------------------------------------------------------------------------------------------------------+
One important limitation is that the reverse proxy used in the Packetriot will not accept insecure TLS certificates.
Rules for the same domain can be overwritten when you need to make changes.
[user@host ] pktriot tunnel http add --domain example-tunnel-123.pktriot.net --destination 127.0.0.1 --http 8000
Warning: existing rule entry for 'morning-frost-73434.pktriot.net' will be overwritten.
HTTP/S traffic rule added
Rules can also be removed using the rm command specifying the domain.
[user@host ] pktriot tunnel http rm --domain example-tunnel-123.pktriot.net
Serving Files
In the reverse proxy section we describe how to proxy traffic to an upstream server using the --destination and --http flags. The Packetriot client can serve static files as well. When an HTTP/S rule specifies both, it will first check if it can serve a static file with the request resource. When it cannot it will default to proxying the request to the upstream server.
Instant File Hosting
We can use the http command for serving out static assets as well. Instead of providing a port number as an argument to the http command we can just specify the --webroot flag and provide it a path.
[user@host:~/app-project ] pktriot http --webroot $HOME/Public
Connecting...

Running HTTP services:
+----------------------------------------------------------------------------------------------------------------+
| Domain                            | Destination   | HTTP   | TLS   | Secure   | Protect   | Site Root          |
+----------------------------------------------------------------------------------------------------------------+
| example-tunnel-123.pktriot.net    |               |        | 0     | true     |           | /home/user/Public  |
+----------------------------------------------------------------------------------------------------------------+
Let's say we're developing a web application that is dynamic, e.g. an web-app written in NodeJS, Go, Python, etc..., and there are some static assets that must be serve along our dynamic content. The http command can serve both.
Assume that our application server is already running and listening on port 8080. We will also assume that we running the client from the projects directory root ~/app-project.
[user@host:~/app-project ] pktriot http 8080 --webroot $PWD/static-assets
Connecting...

Running HTTP services:
+-----------------------------------------------------------------------------------------------------------------------------------+
| Domain                            | Destination   | HTTP   | TLS   | Secure   | Protect   | Site Root                             |
+-----------------------------------------------------------------------------------------------------------------------------------+
| example-tunnel-123.pktriot.net    | 127.0.0.1     | 8080   | 0     | true     |           | /home/user/app-project/static-assets  |
+-----------------------------------------------------------------------------------------------------------------------------------+
The http command has one more trick left to explore. Take the example above, however, the web app we're developing is not running but has been built. The --exec flag in the http command can be used to create a child process with the application.
[user@host:~/app-project ] pktriot http 8080 --exec ./appserver --webroot $PWD/static-assets
Created child process './appserver' with PID (116226)

Connecting...

Running HTTP services:
+-----------------------------------------------------------------------------------------------------------------------------------+
| Domain                            | Destination   | HTTP   | TLS   | Secure   | Protect   | Site Root                             |
+-----------------------------------------------------------------------------------------------------------------------------------+
| example-tunnel-123.pktriot.net    | 127.0.0.1     | 8080   | 0     | true     |           | /home/user/app-project/static-assets  |
+-----------------------------------------------------------------------------------------------------------------------------------+
Persistent File Hosting
We can create persistent HTTP/S traffic rules for serving files as well. It's almost identical to the rules we created for the reverse proxy examples. Our differences here are that we are just serving static content we don't need to specify a upstream server.
[user@host ] pktriot tunnel http add --domain example-tunnel-123.pktriot.net --webroot $HOME/Public
HTTP/S traffic rule added

[user@host ] pktriot tunnel http ls
+-------------------------------------------------------------------------------------------------------------------+
| Domain                            | Destination   | HTTP   | TLS   | Secure   | Protect   | Site Root             |
+-------------------------------------------------------------------------------------------------------------------+
| example-tunnel-123.pktriot.net    |               | 0      | 0     | true     |           | /home/user/Public     |
+-------------------------------------------------------------------------------------------------------------------+
In this example we're serving out a static website where all of the content exists in our users' home directory in the ~/Public directory.
There may be some use-cases where you are serving static content along with an upsteam application server. In this case it's a combination and includes the use of all these flags --webroot, --destination and http.
[user@host ] pktriot tunnel http add --domain example-tunnel-123.pktriot.net \
  --destination 127.0.0.1 --http 8080 --webroot $HOME/Public

HTTP/S traffic rule added

[user@host] pktriot tunnel http ls
+----------------------------------------------------------------------------------------------------------------+
| Domain                            | Destination   | HTTP   | TLS   | Secure   | Protect   | Site Root                             |
+----------------------------------------------------------------------------------------------------------------+
| example-tunnel-123.pktriot.net    | 127.0.0.1     | 8080   | 0     | true     |           | /home/user/Public  |
+----------------------------------------------------------------------------------------------------------------+
Inspector
Our HTTP inspector provides the ability to inspect incoming HTTP requests that are relayed from the Packetriot client to an upstream HTTP service running at the destination host:port that you specify. The response from the server is also captured.
The inspector enables users, particularly developers, to closely inspect HTTP inputs to their application and monitor how the application responds and quickly diagnose defects in their code and test their resolutions. The inspector can be used to debug web application, micro-services, web hooks and many other examples of HTTP-based applications.
The inspector is invoked using the inspect command. It's similar to the using the instant HTTP hosting command http. The only difference is that a local web application will be started and all incoming/outgoing requests and response will be captured. Here is an example of running the inspector to debug a typical NodeJS application.
[user@host:~/app-project ] pktriot inspect 3000

Inspector is running: http://127.0.0.1:4000

Connecting...

Running HTTP services:
+--------------------------------------------------------------------------------------------------------+
| Domain                            | Destination   | HTTP   | TLS   | Secure   | Protect   | Site Root  |
+--------------------------------------------------------------------------------------------------------+
| example-tunnel-123.pktriot.net    | 127.0.0.1     | 3000   | 0     | true     |           |            |
+--------------------------------------------------------------------------------------------------------+
You can use the inspector to view all incoming HTTP requests by visiting http://127.0.0.1:4000 in your browser. Note, if port 4000 is being used the inspector will increment and tries other until it finds an open port.
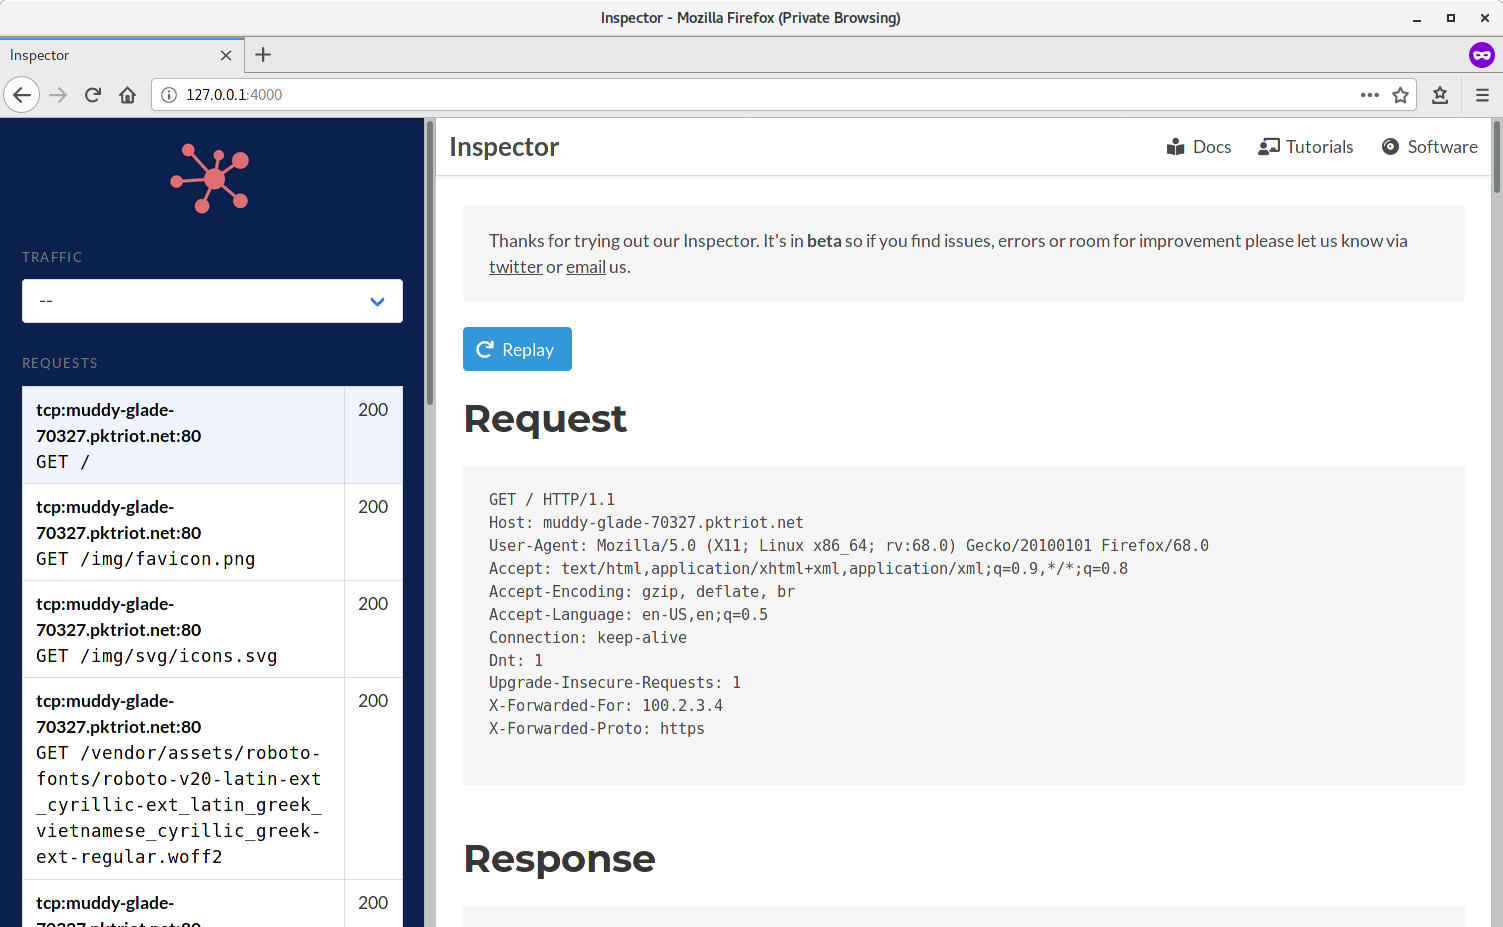
Once you visit the inspector you can select individual requests and view the HTTP request headers and body along with the associated response.
It's useful to replay requests while you're debugging an application. An identical request will be sent to the upstream HTTP server you're testing. It will create a new entry in the request list view on the left-hand side of the application. The request list also includes the HTTP response status code, e.g. 200 (status ok), 401 (forbidden).
The latest requests passing through the inspector will always be at the top of the list. Responses that are binary and not viewable in a browser will be broken out and made available as links below the response headers that you can click to download and inspect.
Similar to the http command the inspector can be used to serve static assets and an upstream HTTP server at the same time. Below an example.
[user@host:~/app-project ] pktriot --config combo.json inspect 3000 --webroot ~/app-project/static

Inspector is running: http://127.0.0.1:4000

Connecting to us-east-63815.packetriot.net...

Running HTTP services:
+------------------------------------------------------------------------------------------------------------------+
| Domain                          | Destination   | HTTP   | TLS   | Secure   | Protect   | Site Root              |
+------------------------------------------------------------------------------------------------------------------+
| example-tunnel-123.pktriot.net  | 127.0.0.1     | 3000   | 0     | true     |           | ~/app-project/static   |
+------------------------------------------------------------------------------------------------------------------+
You can also specify a destination manually as well by including the --destination flag in the command. The upstream HTTP server you're debugging does not have to be running only on your local workstation.
[user@host:~/app-project ] pktriot --config combo.json inspect 3000 --destination 192.168.1.100 --webroot ~/app-project/static

Inspector is running: http://127.0.0.1:4000

Connecting to us-east-63815.packetriot.net...

Running HTTP services:
+------------------------------------------------------------------------------------------------------------------+
| Domain                          | Destination   | HTTP   | TLS   | Secure   | Protect   | Site Root              |
+------------------------------------------------------------------------------------------------------------------+
| example-tunnel-123.pktriot.net  | 192.168.1.100 | 3000   | 0     | true     |           | ~/app-project/static   |
+------------------------------------------------------------------------------------------------------------------+
Closing the Packetriot client while using the inspect command will clear out the cache of requests and responses saved during it's runtime. The cache is maintained in a sub-directory called inspector that is stored in the directory holding the Packetriot client config, typically ~/.pktriot when run as a user.
Subdomains
As mentioned earlier each tunnel created is assigned a static hostname and also a wildcard subdomain along with it. This means that any tunnel can specify some subdomains with the hostname assigned.
For example if the tunnel is assigned example-tunnel-123.pktriot.net you can create persistent traffic rules for blog.example-tunnel-123.pktriot.net and files.example-tunnel-123.pktriot.net. Both of these domain resolve to example-tunnel-123.pktriot.net so traffic on the Internet will be sent to the same Packetriot server.
There is a catch here. The wildcard cert and all tunnel hostname utilize *.pktriot.net will not be trusted by browsers. This is by design and standard. Visiting https://blog.example-tunnel-123.pktriot.net will cause Firefox, Chrome, Safari and Edge to prompt the user that there may be a security concern with the website they are visiting. Or a possibly misconfiguration.
This is a limitation, you can click past it.
Here are some examples of simples using subdomains.
Serving our static assets:
[user@host ] pktriot tunnel http add --domain files.example-tunnel-123.pktriot.net --webroot $HOME/Public
HTTP/S traffic rule added

[user@host ] pktriot tunnel http ls
+----------------------------------------------------------------------------------------------------------------------+
| Domain                               | Destination   | HTTP   | TLS   | Secure   | Protect   | Site Root             |
+----------------------------------------------------------------------------------------------------------------------+
| files.example-tunnel-123.pktriot.net |               | 0      | 0     | true     |           | /home/user/Public     |
+----------------------------------------------------------------------------------------------------------------------+
Serving to an upstream server and static assets.
[user@host ] pktriot tunnel http add --domain example-tunnel-123.pktriot.net \
  --destination 127.0.0.1 --http 8080 --webroot $HOME/Public

HTTP/S traffic rule added

[user@host ] pktriot tunnel http ls
+-------------------------------------------------------------------------------------------------------------------+
| Domain                              | Destination   | HTTP   | TLS   | Secure   | Protect   | Site Root           |
+-------------------------------------------------------------------------------------------------------------------+
| app.example-tunnel-123.pktriot.net  | 127.0.0.1     | 8080   | 0     | true     |           | /home/user/Public   |
+-------------------------------------------------------------------------------------------------------------------+
Reserved Subdomains
When a subdomain has been reserved and assigned to a tunnel, you can successfully request traffic for that domain with the assigned tunnel.
If a tunnel hasn't been assigned, you can still add a traffic rule and the server will not reject it, however, the DNS records for the subdomain will still point to another server so it won't be useful.
However, if you want to create some redundancy and run tunnels in two different locations, then a reserved subdomain can help implement this (for HTTP/S traffic only).
Creating a HTTP/S traffic rule is identical to using the assigned hostname. The only difference is the domain we are requesting traffic for. We'll reuse the scenario above for proxying traffic to a local server running on 8080 and serving static assets from a path on the host.
[user@host ] pktriot tunnel http add --domain reserved-subdomain.pktriot.net \
  --destination 127.0.0.1 --http 8080 --webroot $HOME/Public

HTTP/S traffic rule added

[user@host] pktriot tunnel http ls
+----------------------------------------------------------------------------------------------------------------+
| Domain                            | Destination   | HTTP   | TLS   | Secure   | Protect   | Site Root                             |
+----------------------------------------------------------------------------------------------------------------+
| example-tunnel-123.pktriot.net    | 127.0.0.1     | 8080   | 0     | true     |           | /home/user/Public  |
+----------------------------------------------------------------------------------------------------------------+
You can't use custom certificates or Let's Encrypt with reserved subdomains since the subdomain is utilizing a wildcard certificate we setup and manage.
It's identical to HTTP/S traffic rules when using the assigned hostname except a reserved subdomain can help bring more context to a website, can be easier to remember and provide a stable endpoint that can be transferred between tunnels.
Custom Domains
You can request traffic for custom domains as well. There are two important steps that need to occur.
First, the custom domain must be verified. Visit the domains page in the dashboard on our website. Packetriot requires that you prove you own the domain. You do this by requesting you add a TXT record for the domain using a random secret value we provide you.
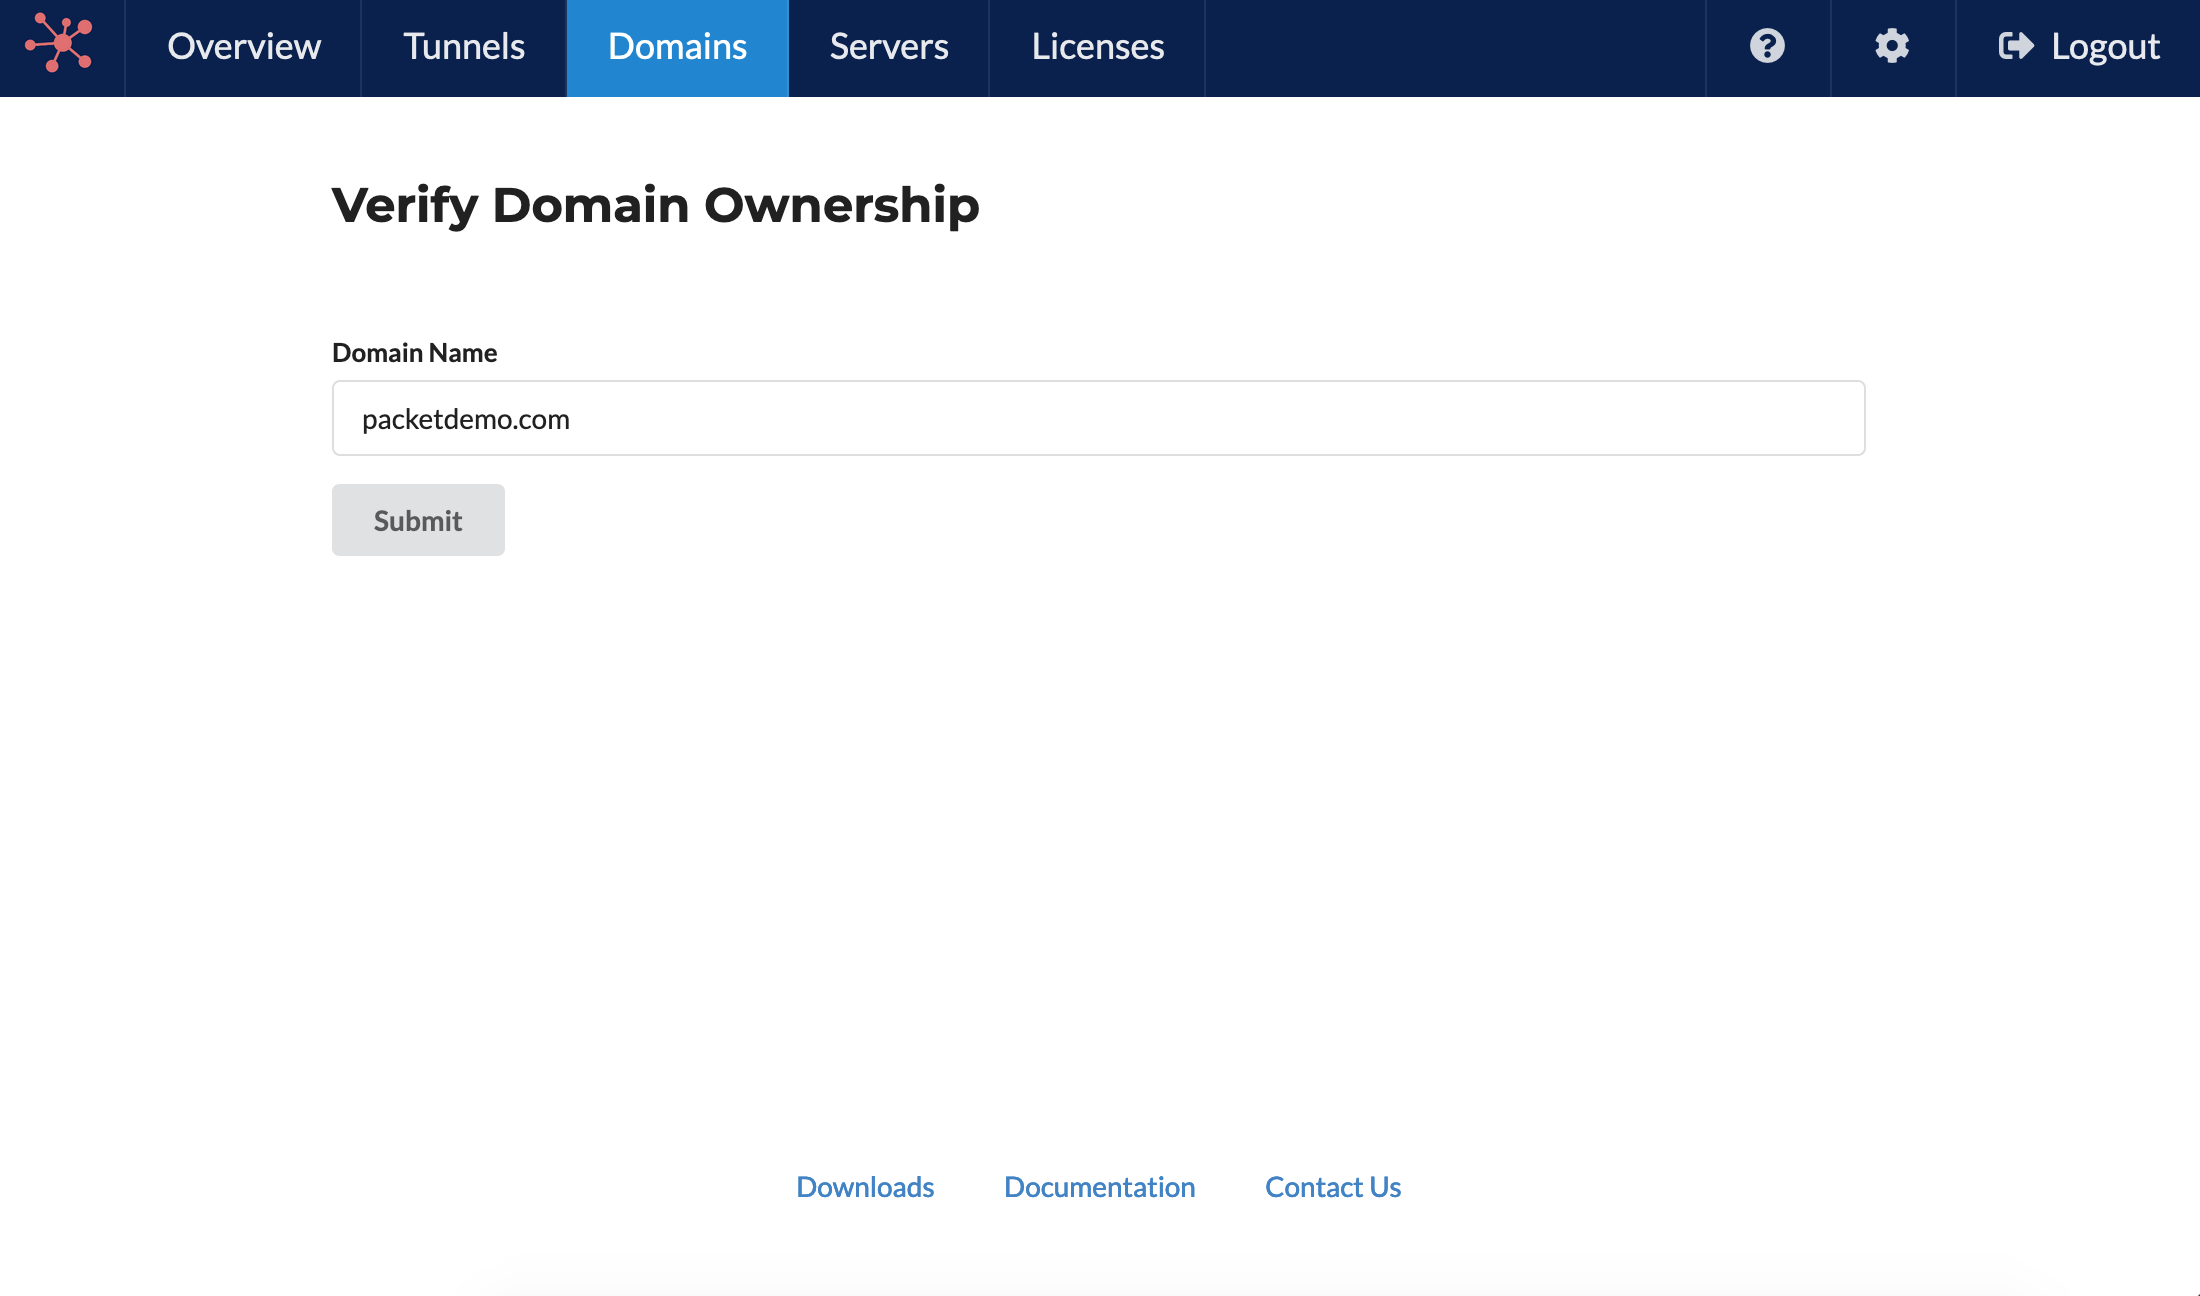
You add the TXT record using the domain registrar or service (nameserver) that you manage DNS records with. Packetriot is checking every 2-3 minutes to verify ownership of newly inputted domains. It may take longer if you change or incorrectly input the TXT record value due to caching. Once the TTL expires it will verify with correct input.
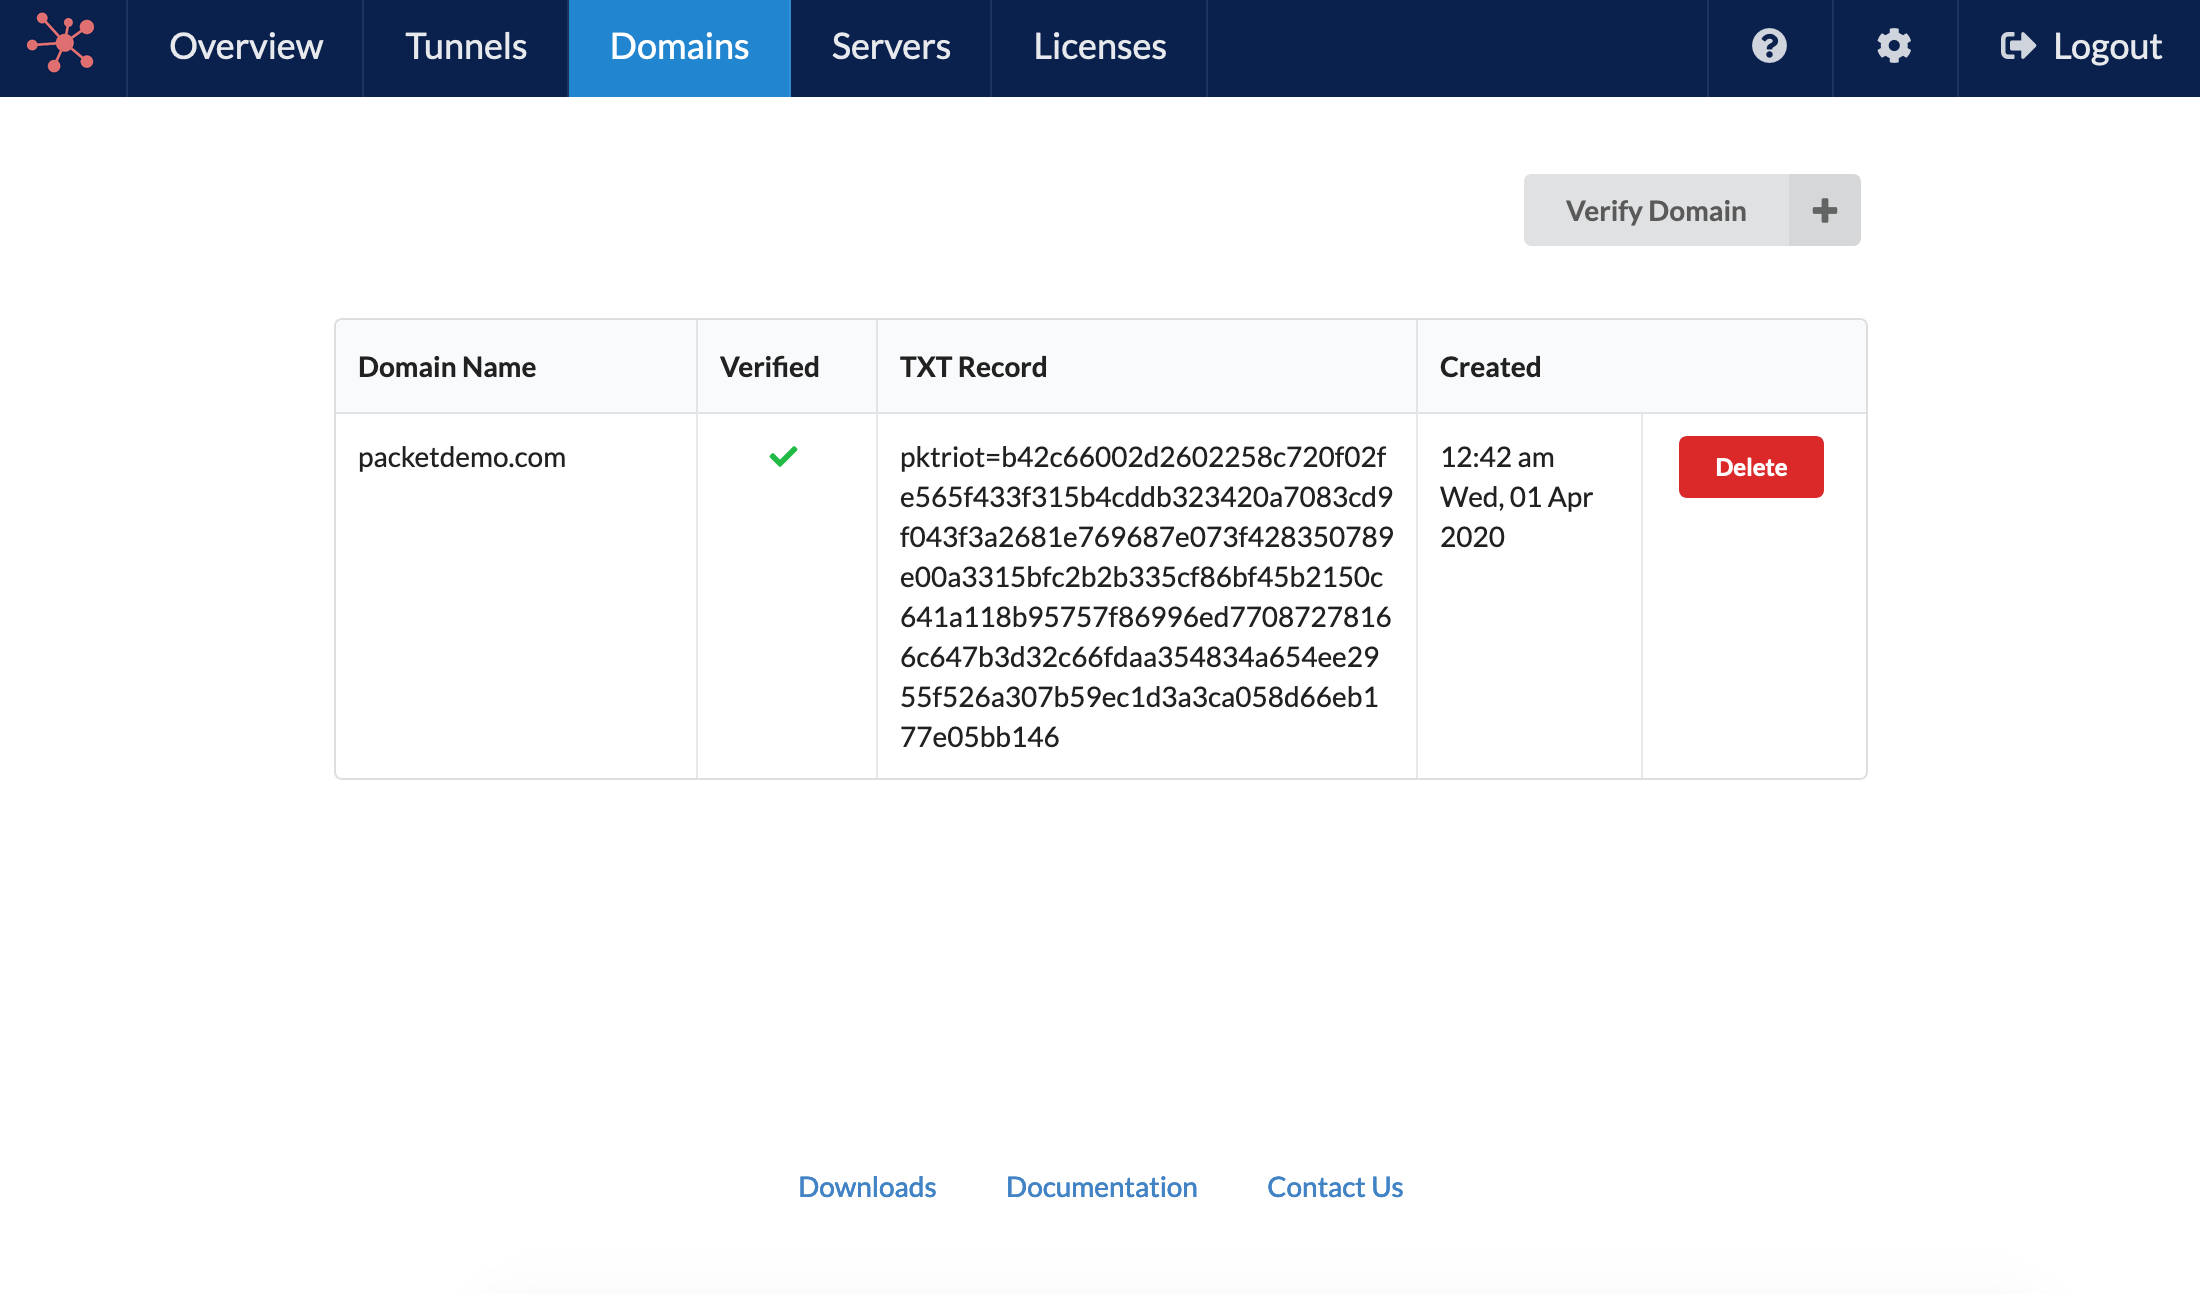
This is a pretty standard method for proving ownership. Once a domain has been verified you can request traffic to it or any sub-domains, across any tunnels, and those rules will be accept.
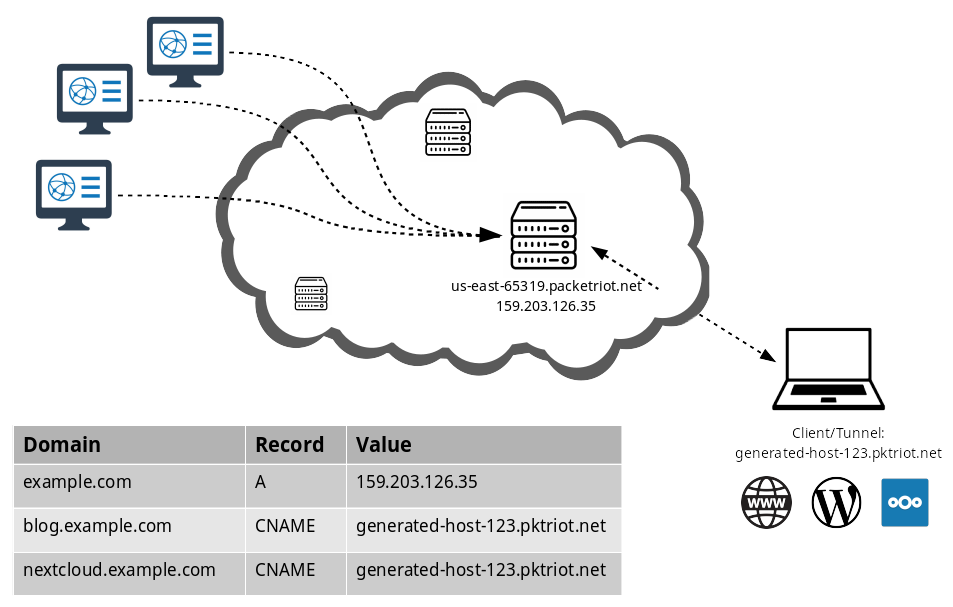
The second step is setting up the DNS records for your custom domain. Once you configure a tunnel you're assigned a hostname and the server you connect to it static. With the IP of the server and your hostname you can configure A and CNAME DNS records with your registrator or nameserver.
Let's assume the domain you own is example.com and below is the information about your tunnel printed using the command pktriot info.
[user@host] pktriot info
Client:
  Hostname: example-tunnel-123.pktriot.net
  Server: us-east-65319.packetriot.net
  IP: 159.203.126.35
For hosting example.com you will need to create an A record with the value of the server you connect to 159.203.126.35. Hosting www.example.com can also be setup with an A record but you can also use a CNAME record with the following potential values:
example.comexample-tunnel-123.pktriot.netus-east-65319.packetriot.net
Since a CNAME is an alias to another domain all of these values will eventually resolve to the 159.203.126.35. What's the best choice, I would choose example.com in this case. If you were just hosting a sub-domain you could really choose either.
Once this is setup you can begin using custom domains. Here is an example from earlier forwarding upstream app server listening locally and also serving some static assets.
[user@host:~/app-project] pktriot tunnel http add --domain testing.example.com
  --destination 127.0.0.1 --http 8080 --webroot $PWD/static-assets \
  --letsencrypt

HTTP/S traffic rule added

[user@host ] pktriot tunnel http ls
+----------------------------------------------------------------------------------------------------------------------+
| Domain               | Destination   | HTTP   | TLS   | Secure   | Protect   | Site Root                             |
+----------------------------------------------------------------------------------------------------------------------+
| dev.example.com      | 127.0.0.1     | 8080   | 0     | true     |           | /home/user/app-project/static-assets  |
+----------------------------------------------------------------------------------------------------------------------+
I added a new flag here --letsencrypt which will talk about more in the section. I added it since it's the most convenient and quick way to add HTTPS to your hosting.
If we did not include this flag then only plain-text HTTP hosting would be provided with this rule.
Let's Encrypt
The Packetriot client provides integration with Let's Encrypt to add automatic HTTPS hosting for the website served behind a tunnel. Using Let's Encrypt build on the setup you've done for using a custom domain. It's absolutely necessary that the custom domain is setup first otherwise and that domain ownership has been verified.
Without either 1) the Let's Encrypt will fail to correctly verify it's challenges to the Packetriot client and 2) the Packetriot server will ignore the rule since the domain is not verified by the user.
Adding Let's Encrypt to a traffic has the following requirements:
- Must be for a custom domain
- Domain must be verified
- Domain must be configured correctly to resolve the tunnels server
Once these are met all you need to do is the add the flag --letsencrypt when using the tunnel http add command. We'll reuse the example above.
[user@host:~/app-project] pktriot tunnel http add --domain testing.example.com
  --destination 127.0.0.1 --http 8080 --webroot $PWD/static-assets \
  --letsencrypt

HTTP/S traffic rule added

[user@host ] pktriot tunnel http ls
+----------------------------------------------------------------------------------------------------------------------+
| Domain               | Destination   | HTTP   | TLS   | Secure   | Protect   | Site Root                             |
+----------------------------------------------------------------------------------------------------------------------+
| dev.example.com      | 127.0.0.1     | 8080   | 0     | true     |           | /home/user/app-project/static-assets  |
+----------------------------------------------------------------------------------------------------------------------+
When you start the tunnel the client will immediate begin the routine to request a new certificate or maintain an existing one. Initial requests may take 20-30 seconds to complete.
The certificates generated will stored in the acme directory that contains your configuration file. For example, if you've configured a tunnel for your normal user and choose the default location then you're certificates will be located in these locations:
- /home/user/.pktriot/acme - Linux & Mac OS
- C:\Users\user.pktriot\acme - Windows
The Packetriot client will run maintenance on Let's Encrypt certificates daily and update them when necessary. If the certificates are manually deleted, then on the next restart of the client it will request new ones from Let's Encrypt and store them.
Custom Certificates
Custom certificates can be used as well. The certificate and private key can be generated by a third-party service such as DigiCert or Comodo or even be a self-signed certificate.
You can specify custom certificated using the --ca and --key flags with the tunnel http add command. Here is an example.
[user@host:~/app-project] pktriot tunnel http add --domain testing.example.com
  --destination 127.0.0.1 --http 8080 --webroot $PWD/static-assets \
  --ca /path/to/fullchain.crt --key /path/to/key

HTTP/S traffic rule added
The client will make copy of the certification and private key and copy them to the location of the configuration file. It will create a sub-directory called certs and rename the certificate and key to using the form <domain>.crt and <domain>.key using the domain name use in the rule.
Password Protection
The Packetriot client provides two mechanisms for adding an authentication layer between incoming traffic and the destination service. The client support HTTP Basic Authentication and session-based password authentication.
HTTP Basic Auth
This mechanism using Basic Auth that is part of the HTTP protocol. It's not a robust method but can provide some measure of additional security. This feature was added to support programs wishing to authenticate with services behind Packetriot tunnels.
There is a user-prompt via the --basic-auth flag and inline flag --basic-auth-inline. The later is useful when automating rule creation. You'll notice that the Protect column finally has a value, it lists the additional authentication mechanism added to the rule Basic Auth.
[user@host ] pktriot tunnel http add --domain example-tunnel-123.pktriot.net \
  --destination 127.0.0.1 --http 8080 --basic-auth
HTTP Basic-Auth requires a username:password to be input

Username: developer
Password:

HTTP/S traffic rule added

[user@host ] pktriot tunnel http ls
+-------------------------------------------------------------------------------------------------------------+
| Domain                             | Destination   | HTTP   | TLS   | Secure   | Protect      | Site Root   |
+-------------------------------------------------------------------------------------------------------------+
| example-tunnel-123.pktriot.net     | 127.0.0.1     | 8080   | 0     | true     | Basic-Auth   | --          |
+-------------------------------------------------------------------------------------------------------------+
In this varient we adding the username and password for HTTP Basic Auth inline. Note, we're overwriting our previously entered rule.
[user@host ] pktriot tunnel http add --domain example-tunnel-123.pktriot.net \
  --destination 127.0.0.1 --http 8080 --basic-auth-inline developer:password
Warning: existing rule entry for 'ancient-meadow-29326.pktriot.net' will be overwritten.
HTTP/S traffic rule added
Session-based Password
The session-based password protected websites act as a login page for the HTTP/S service for the request domain. The service can already have it's own authentication mechanism but this is another. It is session-based which means we use a cookie to validate the connection with the client was first authenticated by the Packetriot client.

You can add a password to a HTTP/S service adding the --password flag to the tunnel http add command. It will prompt you for a password and then store it's salted hash in the configuration.
[user@host ] pktriot tunnel http add --domain example-tunnel-123.pktriot.net \
  --destination 127.0.0.1 --http 8080 --password

Input password for session-based authorized traffic
Password:

HTTP/S traffic rule added

[user@host ] pktriot tunnel http ls
+-------------------------------------------------------------------------------------------------------------+
| Domain                             | Destination   | HTTP   | TLS   | Secure   | Protect      | Site Root   |
+-------------------------------------------------------------------------------------------------------------+
| example-tunnel-123.pktriot.net     | 127.0.0.1     | 8080   | 0     | true     | Password     | --          |
+-------------------------------------------------------------------------------------------------------------+
Transparent TLS Proxying
This mode of proxying is different than the Reverse Proxy examples introduced earlier. In this configuration we don't want the Packetriot server or client to tertminate TLS, that is the responsibility of another HTTP/S server.
Implementing transparent TLS proxying in the context of using Packetriot implies that you are using a custom domain and that you've configured the necessary DNS records with A or CNAME records such that traffic from the Internet will be directed to the Packetriot server that will route it across the tunnel to your client. Ownership of the domain must be performed as well.
The HTTP/S server that the client will proxy too will have already been configured with TLS certificates or include support for Let's Encrypt. This server will be listening for plain-text HTTP and TLS traffic.
Creating a traffic rule to implement TLS proxying is simple. We use the familiar tunnel http add command and not include the --tls flag to specify a port proxying TLS traffic to.
[user@host ] pktriot tunnel http add --domain secure.example.com \
  --destination 192.168.0.100 --http 80 --tls 443
In this example we're forwarding traffic to a host 192.168.0.100. It could be localhost as well. The listening port for TLS traffic on the host 192.168.0.100 is 443 the standard port. The TLS handshake will occur between the client on the Internet and this server.
The traffic is simply relayed as-is from the client to this host.
An example scenario could be running a Caddy server on your private network. Caddy automatically uses Let's Encrypt for setting up HTTPS. With transparent TLS proxying all of the traffic between Caddy and Let's Encrypt for negotiating the solving the challenges to create new TLS certificates can be performed without any issues, including maintenance.
Another example is using an HTTP server like Nginx with certificates purchases from Comodo or Digicert. Those certificates were generated by a third-party provider for length of time. Transparent TLS proxying would enable this Nginx server already configured with those certificates to function as if it were on the Internet.
TCP
Packetriot provides support for generic TCP relaying. This function is not nearly as sophisticated as the networking we perform to route HTTP/S service but it's very useful.
It's challenging to share a single port to multiple users since the applications can be different, so the approach Packetriot takes is provide a range of ports on each server we manage and allow them to be allocated to tunnels. A tunnel can reserve a port (it is randomly selected by the server) and assigned to a tunnel persistently.
Packetriot uses the range 22,000 - 22,999 for its port allocations. A very common use is accessing an SSH server which is why we selected the 22k port range.
TCP port relaying can provide a support to many applications that do not use HTTP/S.
The TCP tunnel commands are available using the tunnel tcp command. Below is the usage, it's very similar to our tunnel http commands.
Usage:
  pktriot tunnel tcp [flags]
  pktriot tunnel tcp [command]

Available Commands:
  allocate    Allocates new port assignment for TCP traffic
  clear       Clears the traffic rule from port assignment
  firewall    Manage rules to restrict traffic to port services
  forward     Forwards traffic from port assignment to destination and port
  ls          List all TCP traffic rules
  release     Releases port assignment

Flags:
  -h, --help   help for tcp

Global Flags:
      --config string   path to configuration file
      --host string     host:port for packetriot.com service (default "packetriot.com:443")

Use "pktriot tunnel tcp [command] --help" for more information about a command.
Instant Forwarding
The Packetriot client provides the tcp command, which similar to http, for quick and convenient TCP forwarding.
In the next sections we review the individuals steps necessary to forward TCP traffic to a local server. The tcp command automates this for quick use scenarios.
It will check for any reserved ports and allocate one if there's none to select from. It also assumes that the destination is 127.0.0.1. This default can be overwritten by using the flag --destination and passing in an IP address or hostname.
In this example we'll forward a port to the SSH server running on our PC, so we can connect remotely.
[user@host ] pktriot tcp 22
Allocated port 22198 to forward traffic

Endpoints:
  Hostname: example-tunnel-123.pktriot.net
  Server: us-east-63815.packetriot.net
  IP: 138.197.66.62

Connecting to us-east-63815.packetriot.net...

Running TCP services:
+---------------------------------------+
| Port    | Destination   | Dest Port   |
+---------------------------------------+
| 22198   | 127.0.0.1     | 22          |
+---------------------------------------+
A TCP port was automatically reserved and a temporary TCP forwarding rule created to support this example. Users can use the command ssh -p 22198 user@example-tunnel-123.pktriot.net to connect to this host or to transfer files using sftp / scp.
Similar to the http command these rules are not saved. Any ports reserved however will remain reserved and useful for future uses like creating persistent TCP forward rules.
Reserving Ports
Port reservations are performed using the tunnel tcp allocate command. Port are selected randomly by the server.
[user@host ] pktriot tunnel tcp allocate
Allocated port 22660

[user@host ] pktriot tunnel tcp ls
+---------------------------------------+
| Port    | Destination   | Dest Port   |
+---------------------------------------+
| 22660   | --            | 0           |
+---------------------------------------+
Different plans available on Packetriot provide varying number of ports available to be allocated. All port allocations are persistent until the tunnel is deleted or shutdown.
Releasing
Ports can be returned to the server using the tunnel tcp release command. You only need to specify the port using the --port command. Releasing a port will also delete any set traffic forwarding rules.
[user@host ] pktriot tunnel tcp release --port 22660
Released port 22660

[user@host ] pktriot tunnel tcp ls
Ports are also released back to servers when a tunnel is shutdown or deleted.
TCP Forwarding
A port can be allocated initially, however, if you don't allocate a port and use the tunnel tcp forward rule, the client will first try to reuse an allocated by unused port. If an allocated port is not free it will then request a port from the server and use that. We'll provide both example below.
Allocating a port and specifying it in a forwarding rule.
[user@host ] pktriot tunnel tcp allocate
Allocated port 22695

[user@host ] pktriot tunnel tcp forward --port 22695 --destination 127.0.0.1 --dstport 22
TCP traffic rule added
Using the automatic port allocation.
[user@host ] pktriot tunnel tcp forward --destination 127.0.0.1 --dstport 22
Allocated port 22501 to forward traffic

TCP traffic rule added
You can overwrite existing rules for allocated TCP ports by just specifying the new rule with the existing port.
Clear Forwarding Rules
It's not necessary to release a port to the server to remove the traffic forwarding that was previously configurd for a port. You can just clearing the rule by specify the port and using the tunnel tcp clear command.
pktriot --config docs.json tunnel tcp clear --port 22695
Cleared rule
You can use the --all flag to reset all TCP traffic forward rules.
[user@host ] pktriot tunnel tcp clear --all
Cleared all TCP traffic rules

[user@host ] pktriot tunnel tcp ls
+---------------------------------------+
| Port    | Destination   | Dest Port   |
+---------------------------------------+
| 22501   | --            | 0           |
+---------------------------------------+
| 22695   | --            | 0           |
+---------------------------------------+
Firewall
Packetriot servers can filter traffic using DENY and ALLOW mechanisms. Both our managed servers and Spokes (managed by you) have this feature. The Packetriot client includes commands for both HTTP/S and TCP traffic filtering
Since HTTP/S and TCP traffic are managed separately in their respective commands tunnel http and tunnel tcp their firewall command structure does the same.
It's important to note here since the behavior is the same for HTTP/S and TCP traffic filtering that DENY rules are applied first before ALLOW rules. In practice you may only really need to use either, not both. Typically you want to whitelist a few IPs or a range.
Firewall filtering is only available to users with the Pro plan or higher.
HTTP/S Filtering Rules
The usage for the tunnel http firewall command is below and lists the sub-dommands that are available.
Manage rules to restrict traffic to HTTP services

Usage:
  pktriot tunnel http firewall [flags]
  pktriot tunnel http firewall [command]

Available Commands:
  allow       Adds new firewall to be applied on traffic to HTTP service
  drop        Adds new firewall to be applied on traffic to HTTP service
  ls          List all firewall rules for HTTP services
  rm          Remove HTTP firewall rule

Flags:
  -h, --help   help for firewall

Global Flags:
      --config string   path to configuration file
      --host string     host:port for packetriot.com service (default "packetriot.com:443")
Let's use in our example a single HTTP/S rule using the hostname assigned to our tunnel. Rules are applied to a domain and you can have any number of rules per domain.
[user@host ] pktriot tunnel http ls
+-------------------------------------------------------------------------------------------------------------+
| Domain                             | Destination   | HTTP   | TLS   | Secure   | Protect      | Site Root   |
+-------------------------------------------------------------------------------------------------------------+
| example-tunnel-123.pktriot.net     | 127.0.0.1     | 8080   | 0     | true     | Password     | --          |
+-------------------------------------------------------------------------------------------------------------+
Below are example of rules to deny incoming traffic from one IP and another rule to block an range of IPs using CIDR. Note that for the single IP we are required to use CIDR notation and append /32 to the IP.
[user@host ] pktriot tunnel http firewall drop --domain wandering-sea-52660.pktriot.net \
  --network 1.2.3.4/32

[user@host ] pktriot tunnel http firewall drop --domain wandering-sea-52660.pktriot.net \
  --network 2.0.0.0/24

[user@host ] pktriot tunnel http firewall ls
+--------------------------------------------------------------------------+
| Sequence   | Domain                            | Action   | Network      |
+--------------------------------------------------------------------------+
| 1          | example-tunnel-123.pktriot.net    | drop     | 1.2.3.4/32   |
+--------------------------------------------------------------------------+
| 2          | example-tunnel-123.pktriot.net    | drop     | 2.0.0.0/24   |
+--------------------------------------------------------------------------+
Reversing the filtering logic and using the ALLOW filter works identically except our subcommand is different, here is an example of filtering rules to allow this one IP and network to access our service
[user@host ] pktriot tunnel http firewall allow --domain wandering-sea-52660.pktriot.net \
  --network 1.2.3.4/32

[user@host ] pktriot tunnel http firewall allow --domain wandering-sea-52660.pktriot.net \
  --network 2.0.0.0/24

[user@host ] pktriot tunnel http firewall ls
+--------------------------------------------------------------------------+
| Sequence   | Domain                            | Action   | Network      |
+--------------------------------------------------------------------------+
| 1          | wandering-sea-52660.pktriot.net   | allow    | 1.2.3.4/32   |
+--------------------------------------------------------------------------+
| 2          | wandering-sea-52660.pktriot.net   | allow    | 2.0.0.0/24   |
+--------------------------------------------------------------------------+
Removing filtering rules is performed by using the tunnel firewall rm command specifying a --domain. The domain is the most important flag. Next, you can use the --all flag to remove all rules associated to the domain. To remove a more specific rule use the --seq and only that filtering rule will be removed.
The sequence for any other rules associated to the domain will be updated appropiately.
Below is an example of us removing the first ALLOW we just added and we'll view how the other rule is updated.
[user@host ] pktriot tunnel http firewall ls

+--------------------------------------------------------------------------+
| Sequence   | Domain                            | Action   | Network      |
+--------------------------------------------------------------------------+
| 1          | wandering-sea-52660.pktriot.net   | allow    | 1.2.3.4/32   |
+--------------------------------------------------------------------------+
| 2          | wandering-sea-52660.pktriot.net   | allow    | 2.0.0.0/24   |
+--------------------------------------------------------------------------+

[user@host ] pktriot tunnel http firewall rm --domain wandering-sea-52660.pktriot.net \
  --seq 1

[user@host ] pktriot tunnel http firewall ls

+--------------------------------------------------------------------------+
| Sequence   | Domain                            | Action   | Network      |
+--------------------------------------------------------------------------+
| 1          | wandering-sea-52660.pktriot.net   | allow    | 2.0.0.0/24   |
+--------------------------------------------------------------------------+
TCP Filtering Rules
Filtering rules for TCP traffic works identically to the HTTP/S filtering but instead of a domain we use the TCP port allocate on the server as the target for our rules.
This is usage for the tunnel tcp firewall command.
Usage:
  pktriot tunnel tcp firewall [flags]
  pktriot tunnel tcp firewall [command]

Available Commands:
  allow       Adds new firewall to be applied on traffic to port
  drop        Adds new firewall to be applied on traffic to port
  ls          List all firewall rules for TCP port services
  rm          Remove tcp firewall rule

Flags:
  -h, --help   help for firewall

Global Flags:
      --config string   path to configuration file
      --host string     host:port for packetriot.com service (default "packetriot.com:443")

Use "pktriot tunnel tcp firewall [command] --help" for more information about a command.
We'll use the same example as above with the following TCP traffic rule.
[user@host ] pktriot tunnel tcp ls
+---------------------------------------+
| Port    | Destination   | Dest Port   |
+---------------------------------------+
| 22657   | 127.0.0.1     | 8000        |
+---------------------------------------+
Since this is identical to the HTTP/S filtering rules we'll cover the ALLOW example, filtering one IP address and range of IPs using a CIDR. Like the earlier examples, we must add /32 to individual IPs.
[user@host ] pktriot tunnel tcp firewall allow --port 22657 \
  --network 1.2.3.4/32
[user@host ] pktriot tunnel tcp firewall allow --port 22657 \
  --network 2.0.0.0/24

[user@host ] pktriot tunnel tcp firewall ls
+------------------------------------------------+
| Sequence   | Port    | Action   | Network      |
+------------------------------------------------+
| 1          | 22657   | allow    | 1.2.3.4/32   |
+------------------------------------------------+
| 2          | 22657   | allow    | 2.0.0.0/24   |
+------------------------------------------------+
We can remove all of the rules associated the port 22657 using the --all command with tunnel tcp firewall rm.
[user@host ] pktriot tunnel tcp firewall rm --port 22657 --all
[user@host ] pktriot tunnel tcp firewall ls
Port Mapping
Port mapping is a function of the client that creates a local listening port on the host that is mapped to a another service running behind a tunnel or an external service. The pktriot ports is the root command for all port mapping operations. It's important to note that this command only works with customers that have deployed their own Spokes server.
The pktriot ports map command is used to map a local port to a remote service that is identified using the transport (tcp), destination (hostname or IP) and destination port. This command does not function for customers using our SaaS.
For example, a mariadb db server may be running on a remote host that is privately exposed using a tcp traffic rule that forwards port 22123 that was previously allocated by that respective tunnel. The database server is provided access by forward upstream to db socket listening on 127.0.0.1:3306.
An application we've deployed somewhere else may need to access to this database server. We can do that by mapping tcp:mariadb:22123 to a local listening port. Below is an example command that would map this port and make it available on that host:
[user@host ] pktriot ports map 3306 --transport tcp --destination mariadb --port 22123
For services hosted behind tunnels that are not HTTP-based, e.g. listen to port 80 or 443, the destination hostname is not actually used to locate the resource. However, you can also map a port to an external service, like a AWS Aurora. For example, Aurora can host MySQL or Postgres database in the cloud. You can map a local port to services like this by:
- Add the DB endpoint to the SOCKS allow-list in Spokes
- Use the
pktriot ports mapcommand to map a local port to the DB endpoint
Here is an example:
[user@host ] pktriot ports map 3306 --transport tcp \
  --destination mycluster.cluster-123456789012.us-east-1.rds.amazonaws.com --port 3306
Now you can access 127.0.0.1:3306 with local applications and connect to the database and the request will transparently be forwarded and relayed to the DB server hosting the AWS Aurora cloud service.
Below are examples of listing defined port mappings and and removing them.
[user@host ] pktriot ports ls
+-----------------------------------------------------------------------+
| Local Port   | Transport   | Host                | Destination Port   |
+-----------------------------------------------------------------------+
| 5000         | tcp         | docker.srv.local   | 5000                |
+-----------------------------------------------------------------------+
| 3306         | tcp         | mariadb            | 221234              |
+-----------------------------------------------------------------------+

[user@host ] pktriot ports rm 5000
Removed port mapping
Port mapping is only available to clients that connect to Spokes, our enterprise tunneling and mesh server.
Proxy Forwarding
A SOCKSv5 listening port can be configured with the client. This feature is only available for clients that connect a Spokes server.
This feature will forward all SOCKSv5 requests to the Spokes server and processed there. This means that destinations are limited to services hosted behind tunnels and external destinations that are allowed. This feature is useful if you want to avoid mapping lots of local ports and prefer using SOCKS as an interface for lots of services that may be distributed elsewhere.
Here is an example of setting up the local SOCKS listener:
[user@host ] pktriot proxies socks listen 1080
You can now point SOCKSv5 clients to 127.0.0.1:1080 and make requests to service running remotely behind other tunnels or external destinations and applications that you've allowed in the Spokes server configuration.
You can remove the SOCKS listener with this command:
[user@host ] pktriot proxies socks rm
Local Hosting
The primary use-case for most Packetriot users is to expose servers and applications to the Internet. More than likely you also want those services available to clients on your LAN.
It wouldn't make sense for client traffic to exit the LAN, go out to the Internet, and then back into your LAN via a tunnel to access the host providing the service.
With the --listen flag provided with the start command, you can set listening ports for HTTP and HTTPS traffic that the Packetriot client will use to serve clients on the local network.
The Packetriot client will listen the ports specified and serve traffic through it's reverse proxy to the servers you've setup.
Below is an example of starting up your client and using the standard ports for HTTP and HTTPS.
[user@host ] pktriot start --listen 80:443
Local server listening on http:80, https:443

Connecting to us-east-63815.packetriot.net...
This will require some DNS administration for the LAN or on individual hosts. DNS records will need to be created to point custom domains your using for HTTP/S services hosted behind your Packetriot tunnel to point to the IP address of the host running the client.
Here is an example. You have a host 192.168.1.10 on your LAN that is running the Packetriot client. You've setup several HTTP/S services behind the tunnel:
example.comnextcloud.example.comweb-app.example.com
On Linux and most Unix systems you can do this locally on hosts by adding entries to the /etc/hosts file. Windows has a similar file located in C:\Windows\System32\drivers\etc.
192.168.1.10  example.com
192.168.1.10  nextcloud.example.com
192.168.1.10  web-app.exampe.com
Traffic to custom domains can be served this way. Traffic to our domains that utilize the hostname assigned to the tunnel and its subdomains can only be served correctly through the tunnel.
Since our servers host wildcard TLS certificates for the hostnames assigned to tunnels, trying to access HTTPS services with our domain locally will fail. With custom domains, the client has the TLS certificates so both HTTP and HTTPS will work as expected.
Using the local hosts file on your OS works on a small scale, however, if you have many clients on your networks or want the configuration to just work you can run a proper DNS server like BIND or dnsmasq to customize DNS on your local network and update your routers DHCP settings to point to this DNS server.
In our Debian and RPM packages we now run:
setcap 'cap_net_bind_service=+ep' /usr/bin/pktriot
to enable the client to serve on privileged ports for non-admin users. When using our archives (tar.gz) you will need to do this manually.
Final note, if you want to set this flag in your client that runs as a service, you'll need to update any systemd or launchctl configuration files to include the --listen flag and it's arguments: <http-port>:<https-port>.
Running as a Service
Packetriot servers and clients have been designed to robust and can run for weeks to months without interruption. This doesn't include networking outages since they can't be helped :) but both our server infrastructure and client software are constantly testing the network and restarting when connectivity is an issue.
Each operating system has different mechanism to help the Packetriot client remain running 24/7. On many Linux distributions we can use Systemd.
Docker is available on many operating systems these days and we have a containerized version of our client. On Mac OS and Windows, Docker is available through a virtual machine and excellent integration with the host OS. Docker containers can be run with the same "restart container on reboot" just as Systemd services on native Linux can.
Mac OS provided it's own service management system called Launchd. Launchd is similar in concept to Systemd and provides system and user service management.
Windows provides service management as well. We have not authored any templates yet and are in the process. However, if you're running Docker on Windows, or WSL 2, you can use our containerized client and Docker method of maintaining 24/7 operation.
Systemd
On most modern Linux distributions Systemd is used to manage services running on the host. In all of our Linux packages, RPM, Debian and tarballs, we include a Systemd service unit that can be used to manage the Packetriot client as a service. With Systemd you can ensure that the client will be started on reboots or if it crashes.
Our RPM and Debian packages will automatically install the service unit in /etc/systemd/system which is a default location for third-party services. Our RPM and Debian package will run systemctl daemon-reload to initiate Systemd to check for new, or changed, service units on the system.
Archives (tar.gz) of the Packetrio client include pktriot.service which can be manually copy in /etc/systemd/system or locations that Systemd is expecting service units. You will need to manually run systemctl daemon-reload so that it will have pktriot.service in its record of available services.
It's extremely import to note that if you plan to run the Packetriot client as a system-wide service then it will be running as the pktriot user. This is by default the case in the RPM and Debian distributions. If you're using an archive then it will up to the user to tailer the pktriot.service with the user and group the client will be running as.
Since the Packektriot client will be running as the pktriot user, all commands to the client for configuration and traffic rules will also need to be run as the pktriot user. Here are some examples exercising many examples.
First enable the Packetriot service.
[user@host] sudo systemctl enable pktriot
Created symlink /etc/systemd/system/multi-user.target.wants/pktriot.service → /etc/systemd/system/pktriot.service.
Configuring the client. Note you must select option 1 as your configuration file. /etc/pktriot/config.json is the default system-wide path for the client.
[user@host] sudo -u pktriot pktriot configure
Choose a path to the configuration file:
[1] /etc/pktriot/config.json
[2] /data/config.json
[3] /home/pktriot/.pktriot/config.json

Input selection [#]: 1

Authenticate client with login credentials:

Email:
...
Adding some basic rules for the locally running HTTP server listening on port 8080 and also a directory where the static assets for this web application are located.
[user@host] sudo -u pktriot pktriot tunnel http add --domain <domain.name> \
  --destination 127.0.01 --http 8080 --webroot /var/lib/www/<website-root>
The convention to use here is to execute the pktriot client program using the command sudo -u pktriot which will run the pktriot command as the pktriot user.
You can start and stop the Packetriot client service using these commands.
[user@host] sudo systemctl start pktriot

[user@host] sudo systemctl stop pktriot
You can disable the service with this command.
[user@host] sudo systemctl disable pktriot
Removed /etc/systemd/system/multi-user.target.wants/pktriot.service.
Docker
A Docker container image for the Packetriot client is maintained along our hosted OS/arch packages.
Using the Packetriot client in a container does different slightly since the client program is running in the container. We can do two things:
- Create a shell and step into the container, using the client as normal.
- Using the command
docker exec -it <container-name> pktriotto run our commands on the host.
My preference is running command using docker exec -it. When I have a lot planned management for my traffic rules, or just tinkering, I'll usually step into the container by creating a shell docker exec -it <pktriot-container> sh and using the client as I would on my host.
We host our image on Docker Hub, so getting our image requires a simple pull.
[user@host] docker pull packetriot/pktriot:latest
It's best practice when setting a containerized client to map a directory on the host to the /data in the container. This is where the configuration file and directory is located by default in our image.
My convention is to create a directory the name I intend to give my tunnel.
We'll use the --restart flag with docker run to ensure that our client is restart everytime Docker is restrart (system updates or reboots).
[user@host ] mkdir hello-world-tunnel
[user@host ] docker run -d --restart unless-stopped -v $PWD/hello-world-tunnel:/data --name hello-world-tun packetriot/pktriot:latest
6ae2732df2d616af894a66426f7e631174ebd2bcd9b2be0af1f3e5b6504b61bd

[user@host ] docker ps
CONTAINER ID        IMAGE                       COMMAND                  CREATED             STATUS                  PORTS                    NAMES
6ae2732df2d6        packetriot/pktriot:latest   "/usr/bin/pktriot --…"   2 seconds ago       Up 1 second                                      hello-world-tunnel

[user@host ] ls hello-world-tunnel
config.json

[user@host ] cat temp/config.json
{"version":"v0.9.10","doh":false}
Let's quickly walk through configuring a client in a Docker. Earlier we mentioned using docker exec -it <tunnel name> pktriot ... to execute commands on the Packetriot client running inside the container.
[user@host ] docker exec -it hello-world-tun pktriot configure
Choose a path to the configuration file:
[1] /etc/pktriot/config.json
[2] /data/config.json
[3] /root/.pktriot/config.json

Input selection [#]: 2

...

[user@host ] docker exec -it hello-world-tun pktriot edit --name "hello world"
Tunnel name updated

[user@host ] docker exec -it hello-world-tunnel pktriot info
Client:
  Hostname: red-surf-48236.pktriot.net
  Server: us-east-65319.packetriot.net
  IP: 159.203.126.35
We ran a few additional commands above to change the name of the tunnel so we can identify it more easily in our dashboard. We also printed out the hostname and server information.
Launchd
Windows Services
We have added support for Windows services to the Packetriot client. It will require administrative privileges on the host Windows system to install and manage.
The first step is to the configure the Packetriot client as you normally would. This could be configuring as the user you normally in as and using the default configuration path. Here is an example for the user "jack" on the system.
C:\Path\pktriot-0.10.0\pktriot.exe configure
...
The default path for the configuration file and directory will be C:\Users\jack\.pktriot\config.json. Setup any traffic rules you typically would. Remember that changes to the configuration will not be realized until the client is restarted, which is important to always keep in mind when you run the Packetriot client as a service.
Install
Using the start menu, or anyother methods, launch cmd.exe or Powershell as an administrator. Run this command to install the service.
C:\Path\pktriot-0.10.0\pktriot.exe windows install
On success the client will tell that the service has been install but is not yet running. You'll need to run the Services application as an administrator and scroll to the Packetriot service and start it. By default it will restart on reboots and a limited number of failures.
Uninstall
Similarly to uninstall the Windows service run cmd.exe or Powershell as an administrator and run this command.
C:\Path\pktriot-0.10.0\pktriot.exe windows uninstall
The service will be uninstalled but it's possible that it is still running, so run the Services application as an administrator and manually stop it.
Traffic Rule Updates
Be sure to run the Services application as an administrator when you make changes to the client configuration and want them to be realized.
Custom Configuration Path
If you're using a custom configuration path you will need to pass the --config flag to pktriot windows install. This will make sure we use custom path to the configuration and not the default. See the example below.
C:\Path\pktriot-0.10.0\pktriot.exe --config C:\Custom\Path\Packetriot\config.json windows install
Notes
You may find that we have a sub-command called pktriot windows start. This sub-command is used to launch the client as a Windows service. It will fail if you attempt to use this manually. It specifically interfaces with the Services application so it can be managed by that application.